Subscribe:

Ads 468x60px

Pages

mercredi 4 mai 2011

Computer Tips From A Computer Guy

Computer Tips From A Computer Guy


Save Your Favorite Articles, Tweets and Links in One Place

Posted: 04 May 2011 04:50 AM PDT

Between Twitter, Facebook, Delicious and numerous RSS feeds, it is no wonder our online lives feel chaotic. Finding a single article you just know you saved somewhere can be dizzying.

Faveous connects to our favorite social networks and RSS feeds to keep all of our marked favorites in a single place, making them easy to find when needed.

image

Faveous is currently in invitation-only beta testing, so to use the service, you can either request an invitation, or pay with a Tweet—that is, send a Tweet about the service in exchange for using it.

image

Once you have an invitation code, you can set up your account by entering your email address and choosing a password. Next, choose the services you want to add to your all-in-one Faveous account. Selections include Twitter, Facebook, YouTube, Google Reader, Delicious and Instapaper. When you have made your selections, click Next.

services

You are then asked to approve Faveous through each of the selected services. Click Approve or Authorize for each service.

Authorize

Once all the authorizing is done, Faveous takes a few minutes to aggregate all of your favorites. While waiting, click the Pick a Username link and choose a username. Be aware that creating a username makes your favorites public, complete with a vanity URL. If you do not want your favorites to be public, skip this step.

username

Your favorites appear in a big list,with each service's icon on the left. Clicking an icon shows your favorites for the service.

services

The big heart at the bottom is for your Faveous favorites. To add a favorite item to this list, click the small heart at the bottom of its listing.

heart

Faveous comes with a Chrome extension and bookmarklet, both designed to make adding Web sites to Faveous as simple as clicking a button on your browser.

image

Overall, Faveous is a solid all-in-one favorites tracker. The service was created by an 18-year old gentleman who has reportedly dropped his studies to launch Faveous. We look forward to seeing what features are added to Faveous as the Web site emerges from Beta.

Post from:

Save Your Favorite Articles, Tweets and Links in One Place


Use AutoHotKey to Automate Image Sizing in SnagIt

Posted: 03 May 2011 05:02 AM PDT

SnagIt is likely the most popular screen capture utility on the market, it's versatile, has plenty of features and is easy to use. One drawback to using it though is when you have a lot of images you want to capture and place in a document or for posting on a web site, and you need the images to be resized.

With SnagIt, ver 10, you have to click Image, then Resize, then Resize Image… then click the bubble next to where it says Scale to specific size (pixels), then finally, input the width you want. After several files, this grows tedious; enter AutoHotKey, a free utility that allows you capture keystrokes and then do something based on those keystrokes.

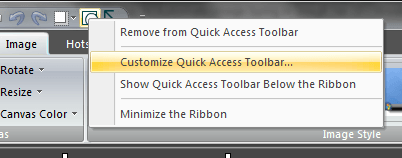
To begin, before you even download AutoHotKey, first take advantage of SnagIt's ability to assign keystroke commands. First right-click on the Quick Access Menu, to get this dropdown:

Customize Quick Access Toolbar

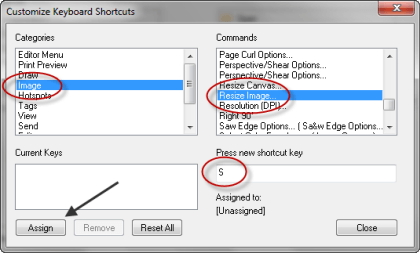
Click on Customize Quick Access toolbar… to get this popup menu:

Assign A Key

Scroll down under Categories and pick Images, then scroll down under Commands and pick Resize Image; then type an "s" in the box that says Press new shortcut key. Then, to make it happen, click the Assign button to make it happen. What this all does is make it so that this window pops up whenever you press the "s' key:

Resize Image Popup

That gets us most of the way there, but it would be nice if we could get it to go one step further and click the bubble next to Scale to specific size (pixels) for us too, because that's what we need to do to find the current size or to resize it to something else; to do that, we need a hotkey utility program, and in this case, it's AutoHotKey, the program you can download and use for free.

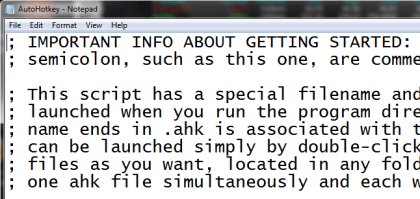
When you download and install AutoHotkey, the installation process creates a script file and opens it for you to use; it looks like this:

Initial Script from AutoHotKey

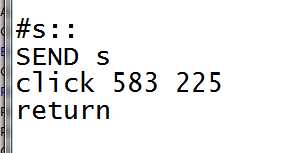
It has some initial code in it that you can ignore; instead, move down past the point where the lines start with semi-colons (these are comment lines) and type this:

new Code

What this does is assign Win-s to the commands below it (Win-s means type the key on your keyboard with the Windows logo on it, then the letter "s'.

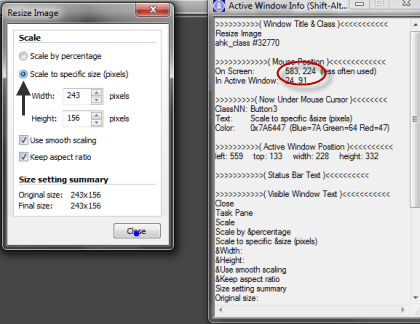
The commands below it instruct it to first send the letter s, because that utilizes the shortcut we just created above. Next, the command "click 583 225" causes the screen to be mouse clicked at screen position 583 225 which we got by running another program that comes with AutoHotKey,  AutoIt3 WindowSpy.

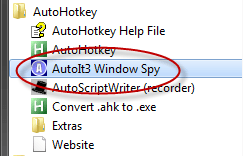
This works because Snagit always pops up the sizing window in the same place, if it pops up at a different location on your screen, you'll need to go into your AutoHotKey Folder and run AutoIt3 WindowsSpy yourself from the Start button (after clicking on All Programs):

Run Auto3 Window Spy

You'll get a small popup window chock full of information which you can ignore for the moment. Instead, click on the SnagIt Editor to bring it up (the popup window should remain on top) then click once where you want to find your screen numbers, in this case on the bubble that says Scale to specific size (pixels):

Click to get screen coordinates

Write down the screen coordinates (in the red circle) and put them in place of the coordinates in your script.

Then, all you have left to do is save the script to your hard drive, then run it by clicking on your Start button , the double-clicking on this:

Click to Run

Note: For the script to run correctly, you have to have the SnagIt Editor open in full screen mode, ready for use.

The script should execute when you press Win-s, bringing up your Resize Image PopUp window with the bubble next to Scale to specific size (pixels) checked.

Post from:

Use AutoHotKey to Automate Image Sizing in SnagIt


[Lettre d'information PC Astuces #3121]

  PC Astuces - L'entraide informatique francophone Mercredi 4 Mai 2011

 
Micro Application : - 20% sur PC Cloneur 11 PRO
Avec le nouveau PC Cloneur 11 Pro, créez facilement une image exacte de votre PC !
  • Sauvegardez automatiquement vos fichiers, votre système et vos applications !
  • Clonez facilement votre disque dur sans avoir à réinstaller vos programmes
  • Restaurez votre PC même lorsque Windows® ne démarre plus grâce à la création d'archives bootables sur CD/DVD
-20% avec le code promo : CLONEUR

> 39,95 € au lieu de 49,95 € <

Grand jeu concours des Régions Poulain :

Avec le chocolat Poulain, jouez maintenant et gagnez peut être des séjours pour toute la famille en France : 30 week-ends extras découverte de région et 3 séjours d'une semaine de vacances.

Dossier : Tester sa mémoire RAM avec Windows 7

Une barrette de mémoire défectueuse peut entraîner l'instabilité de votre système avec des plantages et des erreurs de Windows.

Windows 7 intègre des outils de diagnostics de la mémoire qui vont vous permettre de tester votre mémoire afin de vérifier si elle est à l'origine de vos problèmes.

Découvrez dans ce nouveau dossier comment tester sa mémoire RAM avec Windows 7.
Téléchargez et/ou imprimez gratuitement l’intégralité du sommaire des dossiers et guides pratiques de PC Astuces.
Plus de 80 pages pour optimiser, sécuriser, personnaliser votre ordinateur !


Astuce du jour : Accéder rapidement à sa Dropbox - Google Chrome
Vous avez besoin d'accéder rapidement aux fichiers de votre Dropbox depuis votre navigateur Web ? Avec l'extension Dropbox pour Google Chrome, c'est facile...


Découvrez toutes les astuces pour Google Chrome dans PC Astuces.

Produit du jour : Belkin Support de refroidissement pour PC portable
  • Tous les ventilateurs PC

    Votre ordinateur portable a la fâcheuse tendance de chauffer, au point que le dessous est brûlant ? Et la chaleur de l'été n'arrange rien puisque le refroidissement de l'ordinateur portable est encore plus difficile ! Optez pour le support de refroidissement Belkin.

    Ce support de refroidissement pour ordinateur portable protège votre ordinateur contre la surchauffe. Sa conception brevetée unique en forme de vague utilise la convection naturelle pour améliorer le refroidissement par ventilateur. Ce support affiche une consommation faible et se branche sur le port USB de l'ordinateur, sans adaptateur secteur encombrant.


  • Logiciel du jour : Real Alternative
    Pour lire les vidéos et musiques au format Real (.ra, .rm, .ram, .rmvb, .rpx, .smi ou .smil), vous devez installer le lecteur Real Player développé par Real Networks.

    Or le logiciel RealPlayer est lourd, gourmand en ressources et assez intrusif (notamment par les pubs incitant à acheter la version payante du logiciel). Si vous souhaitez lire les fichiers Real avec votre lecteur habituel (le lecteur Windows Media par exemple) ou bien avec votre navigateur Web (Internet Explorer, Firefox, Opera), nous vous conseillons le logiciel Real Alternative.

    Dans la même veine que QuickTime alternative qui lui est dédié au format .mov, Real Alternative vous permettra de vous passer du lecteur RealPlayer officiel pour lire du contenu au format Real, sans alourdir et encombrer votre système inutilement.

    A noter que le package d'installation comporte le lecteur gratuit Media Player Classic que vous n'êtes pas obligé d'installer si vous souhaitez lire les fichiers Real avec votre lecteur usuel.


    Fond d'écran du jour :   Les nouveaux logiciels et mises à jour :

    Aigle
     
    Jeu gratuit du jour : Ronflements

    Reveillez l'éléphant en vous aidant des autres animaux.


    Actualité informatique :   En direct du forum :
    03/05 - Affaire PSN : Sony s'excuse en Japonais
    03/05 - Une Radeon HD 6750 passive chez Club 3D
    03/05 - Ce qui change réellement dans l'iPhone blanc
    03/05 - Le boîtier tour SpineRex d'Enermax en Europe
    03/05 - Radeon E6760 : le GPU pour les machines à sous
    03/05 - Dossier : Contrôler plusieurs ordinateurs avec un clavier et une souris
    03/05 - Asus P8B-X : Sandy Bridge version serveur
    03/05 - AMD : 3 millions de Fusion en un trimestre
    03/05 - Une victoire d'Apple contre Elan
    03/05 - Deux nouvelles machines sous Chrome OS
    03/05 - Une fibre qui transporte 100 Tbit/s
    03/05 - Le retour d'un Eee PC sous Linux ?
    03/05 - FerriSSD, le plus petit SSD du monde
    03/05 - Blu-ray 3D pour les Radeon HD 5000
    03/05 - La protection des photos Nikon cassée
      Tous les derniers sujets publiés | Les sujets sans réponse


    Pour vous désabonner de cette lettre d'information, rendez-vous à l'adresse : http://www.pcastuces.com/quotidien_desabonnement.htm
    Changement d'adresse e-mail : http://www.pcastuces.com/modif_email.htm
    Informatique et libertés - Nous contacter : http://www.pcastuces.com/libertes.htm
    Pour retrouver les archives de la lettre d'information : http://www.pcastuces.com/newsletter/lettres/

    mardi 3 mai 2011

    Computer Tips From A Computer Guy

    Computer Tips From A Computer Guy


    Make a PDF Resume the Easy Way

    Posted: 03 May 2011 04:29 AM PDT

    A good, solid resume is essential in any job search. However, most job seekers have a hard time figuring out what information to list on a resume, and an even harder time formatting all the information in an easy-to-read manner.

    If you are stuck in making your resume and prefer to enter information in application style, question/answer format, PDFCV.com is a quick way to generate such a resume.

    logo

    Click Create CV to start entering your resume information.

    create

    Sign in with your favorite social network, or register the old fashioned way with a username and password.

    image

    Enter your contact information. You can enter as little or as much as you like—no fields are absolutely required. Notice the option to add a profile picture. This is definitely up to user preference, as many employers find this unprofessional, while others like the idea of seeing a picture of a potential employee. Click Next Tab when finished.

    contact

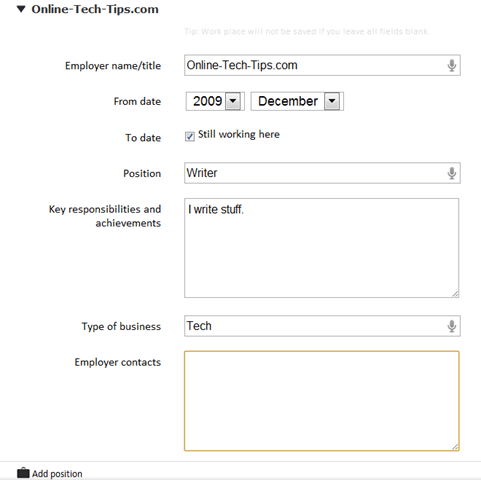
    Enter your work experience. You can add more jobs by clicking Add Position at the bottom of the screen. Click Next Tab when finished.

    work

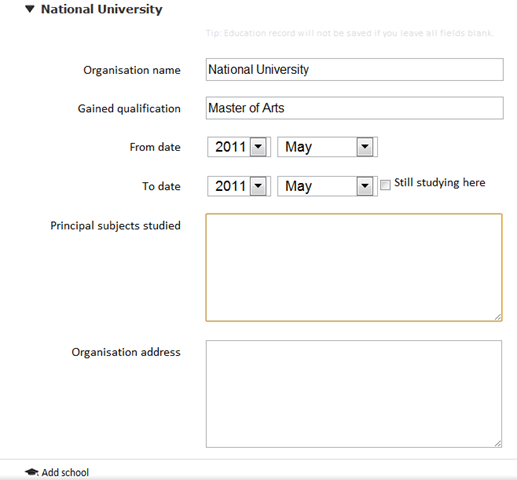
    Click Add School to enter your education information. To add more degrees, click Add School at the bottom of the page. Click Next Tab to continue.

    education

    The rest of the tabs are completely optional in any resume. You can enter languages and skills, as well as additional, non-categorized information. When you are satisfied with the information entered, click the red Download CV button on top right of the screen.

    download

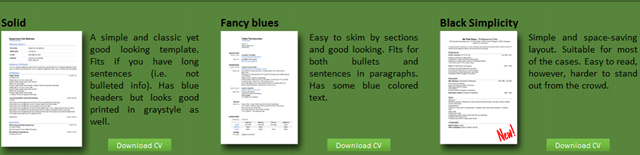
    Choose the format you would like to use for your resume, then click Download CV next to it.

    format

    LinkedIn users can create a resume much faster than the steps above by clicking the Import button on the right and signing in with a LinkedIN account.

    image

    Resumes download in PDF format, ready to send to a potential employer. PDFCV.com is designed to generate the longer, most complex resume style: a curriculum vitae. For this purpose, the site works great. But, if you are making a standard, 1-page resume, options are not available. You simply must limit the information entered in hopes of keeping it to one page.

    Post from:

    Make a PDF Resume the Easy Way


    Two Easy Ways to Hide Your Email Address on a Web Site

    Posted: 02 May 2011 05:45 AM PDT

    For Web site owners and bloggers, spam bots are a real pain. These Web crawlers troll the Internet looking for unsuspecting email addresses. Spammers then use this information to bombard addresses with appendage enlargement advertisements and shady business opportunities.

    If you are concerned with the amount of spam generated by placing your email addresses on your Web site or blog, yet still want your visitors to have a way to contact you, concealing your email address from non-human eyes is a must. Here are two easy ways:

    Email Me!

    email me

    Email Me! creates a quick contact form that works with any Web site or blog, without the use of PHP.

    Click the big red Get Your Button button.

    get

    Enter your name and email address, then click Get Code.

    info

    Copy the generated code, and paste it between the <body> tags on your Web site. Directions are available for WordPress and Blogger, too. A red button that says Email Me then appears on your site.

    button

    When visitors click the button, your page dims and a contact form appears. Email Me! forwards the message to your email address, never exposing the address to spam bots.

    preview

    Emailerr

    Emailerr

    Emailerr turns your email address into an image that blends with the text on your Web site. Spam bots generally do not read text in images, so this conceals your address.

    Enter your email address and click Advanced Options.

    image

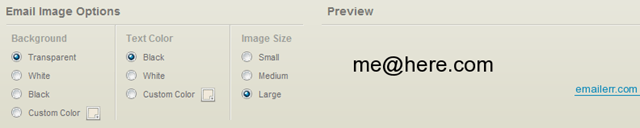
    Choose the font color, size and background color for your image. Click Sumbit to download your image. You can then place the image anywhere on your Web site.

    image

    Either of these methods takes less than five minutes from start to installation, and even Web novices can use them easily. While concealing your email address will not eliminate all spam, it will reduce the amount in most cases.

    Post from:

    Two Easy Ways to Hide Your Email Address on a Web Site