Subscribe:

Ads 468x60px

Pages

vendredi 29 avril 2011

[Lettre d'information PC Astuces #3117]

  PC Astuces - L'entraide informatique francophone Vendredi 29 Avril 2011

 
Micro Application : Nouveauté SOS PC Sauvegarde
Protection automatique et restauration en 1 clic de tout votre PC !
  • Sauvegarde automatique : Photos, données, logiciels, paramètres, Windows®
  • Sans aucune intervention : Tout est automatique, rien à planifier ou à configurer
  • Récupération en 1 clic : Restauration facile du PC ou de données perdues
  • Disponible en version 1 PC et 3 PC
A l'occasion de la sortie de cette nouveauté,
profitez d'une réduction de 20%
avec le code : SOSPC

> J'en profite ! <

Dossier : Assembler plusieurs vidéos en une seule

Vous avez téléchargé une vidéo découpée en plusieurs morceaux et vous souhaitez les regrouper en une seule ?

Avec le logiciel gratuit Windows Live Movie Maker, c'est facile.

Découvrez dans ce nouveau dossier comment assembler plusieurs vidéos en une seule.
Téléchargez et/ou imprimez gratuitement l’intégralité du sommaire des dossiers et guides pratiques de PC Astuces.
Plus de 75 pages pour optimiser, sécuriser, personnaliser votre ordinateur !


Astuce du jour : Activer le répondeur automatique dans Gmail - Tous les navigateurs
Vous vous absentez quelques jours et vous souhaitez prévenir les personnes qui vous écrivent que vous n'êtes pas là. Avec Gmail, vous pouvez activer un répondeur automatique...


Produit du jour : Apple iPad 16Go Wifi

  • Tablet PC

    Goûtez aux joies des tablettes numériques avec cette version 16Go de l'iPad !

    Qu'il s'agisse de visionner vos photographies (même haute résolution), de lire votre journal, consulter votre agenda, vos emails, l'iPad répondra avec une réactivité impressionnante, sur son grand écran tactile de 24,6 cm.


  • Logiciel du jour : Twin Distress
    Disponible gratuitement et ne nécessitant même pas d’installation (application portable), Twin Distress est un jeu mêlant réflexion et rapidité.

    Le but du jeu est simple, vous devez éliminer tous les blocs à l’écran avant que le temps soit écoulé !

    Pour cela, vous devez retirer deux blocs de la même couleur, qui se touchent horizontalement ou verticalement. Les blocs de la même couleur mais séparés par un espace vide peuvent également être retirés.

    Au fil des niveaux, la difficulté s’accentue. De nombreuses options permettent de pimenter la partie.

    Après avoir téléchargé cette version portable de Twin Distress, l’assistant vous demandera où décompresser les fichiers de la version portable de Twin Distress, indiquez le chemin d’accès à votre clé USB par exemple.


    Fond d'écran du jour :   Les nouveaux logiciels et mises à jour :

    Ombres des arbres
     
    Jeu gratuit du jour : Sky Island

    Petit jeu de plateformes en 2D dans lequel vous devrez collecter des étoiles et où vous pourrez basculer en 3D afin de trouver une solution aux différents obstables.


    Actualité informatique :   En direct du forum :
    28/04 - Un nouveau SDK pour la Freebox Révolution
    28/04 - 75 000 IOPS pour le Vertex 3 d’OCZ
    28/04 - Une borne Wi-Fi 11n... pour les lieux publics
    28/04 - Crucial m4, un clone du C400 de Micron
    28/04 - Nokia se sépare de Symbian
    28/04 - Jouer à ses jeux DOS préférés sous XP, Vista et Windows 7
    28/04 - DisplayPort et Thunderbolt ont le vent dans le dos
    28/04 - Après les CD-R, les SD-R
    28/04 - Du Fusion pour le 3105m de HP
    28/04 - Sony : Freestyle Hybrid et Ultimate Mobile PC
    28/04 - MSI GX780 : un 17,3 pouces pour les joueurs
    28/04 - Bon anniversaire... la souris (30 ans)
    28/04 - Tout passe au tactile, même le BIOS
    28/04 - Affaire PSN : attention à votre compte bancaire
    28/04 - La mauvaise idée du jour : un écran tactile comme clavier
      Tous les derniers sujets publiés | Les sujets sans réponse


    Pour vous désabonner de cette lettre d'information, rendez-vous à l'adresse : http://www.pcastuces.com/quotidien_desabonnement.htm
    Changement d'adresse e-mail : http://www.pcastuces.com/modif_email.htm
    Informatique et libertés - Nous contacter : http://www.pcastuces.com/libertes.htm
    Pour retrouver les archives de la lettre d'information : http://www.pcastuces.com/newsletter/lettres/

    jeudi 28 avril 2011

    Computer Tips From A Computer Guy

    Computer Tips From A Computer Guy


    Resize, Split or Crop Images the Easy Way

    Posted: 27 Apr 2011 05:28 AM PDT

    In the Web 2.0 world, there is no shortage of image-editing Web sites. There is, however, a shortage of image-editing Web sites that split images for printing on multiple pages.

    Jimpl's Image Splitter splits images easily and quickly, but with a few bonus editing features, like cropping and resizing, too.

    logo

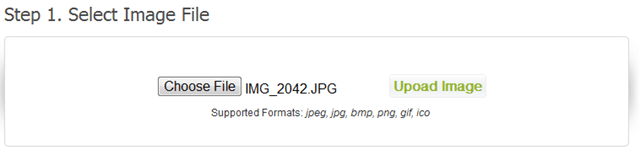
    First, click Choose File and select the image you want to resize, split or crop. Click Upload Image when finished.

    choose

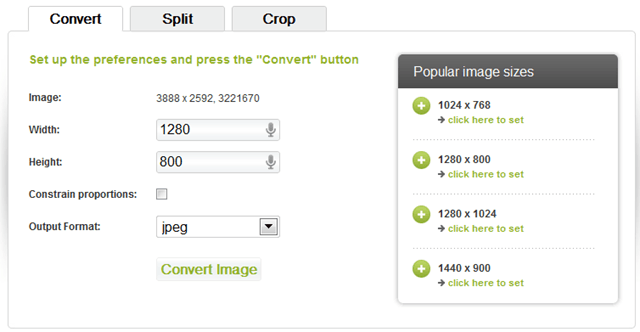
    Three tabs appear—Convert, Split and Crop. To resize an image, use the Convert tab. Select the output size required, or choose one of the pre-configured sizes. Then, select the image file format you want to use: JPEG, BMP, GIF or PNG. Click Convert to download your resized image.

    convert

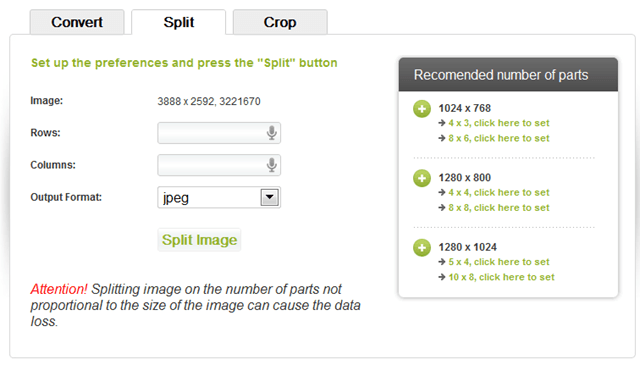
    To split the image in pieces—useful for printing posters on regular-sized paper that you then piece together to create a big image—click the Split tab. Choose the number of rows and columns in which to split the picture, then choose the output file format. Click Split Image to download the image files.

    split

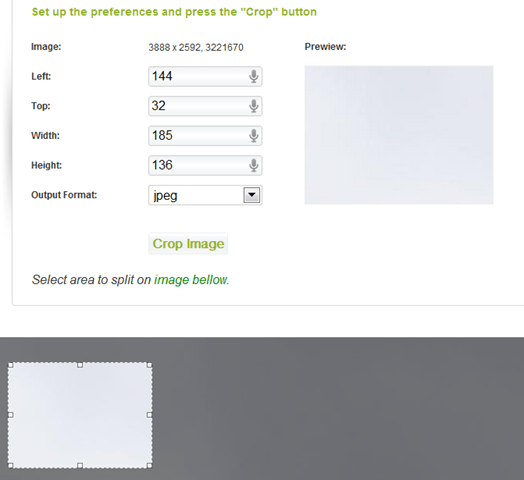
    To crop the image, click the Crop tab. Choose the size of your image precisely by entering numbers on the left of the screen, or use the viewer at the bottom to select the area of the image to crop. Click Crop Image to download your new file.

    crop

    Jimpl's image splitter is one of the fastest ways to split and resize photos we have found so far. However, we struggled to find photos that were in small enough file sizes for Jimpl's limit.

    Files from our 10 MP Cannon Rebel had to be resized before using them. No file size limit is published on the Web site, but from our tests, it appears to be around 4 MB.


    Copyright © 2007
    Online Tech Tips.
    Aseem Kishore (digitalfingerprint: a59a56dce36427d83e23b501579944fcakmk1980 (209.85.224.90) )

    Post from:

    Resize, Split or Crop Images the Easy Way


    [Lettre d'information PC Astuces #3116]

      PC Astuces - L'entraide informatique francophone Jeudi 28 Avril 2011

     
    SOLDES AVANQUEST du 18 Avril au 1er Mai 2011
    70% de réduction sur Architecte 3D Platinium 2010 !
    Avec Architecte 3D Platinium 2010, créez, aménagez et visitez la maison ou l'appartement de vos rêves !
    • Tous les outils professionnels pour concevoir votre maison en 3D
    • Meublez les pièces grâce à la vaste bibliothèque de mobiliers en 3D
    • Conseils écologiques pour économiser de l'énergie et de l'argent
    SOLDES - 70% : 29,97 € seulement au lieu de 99,90 €
    >> Acheter Architecte 3D Platinium 2010

    Dossier : Jouer à ses jeux DOS préférés sous XP, Vista et Windows 7

    Vous êtes nostalgique des anciens jeux sous DOS qui ont accompagnés votre jeunesse ? Avec le logiciel gratuit D-Fend Reloaded, vous allez pouvoir jouer à vos jeux DOS préférés directement depuis Windows XP, Windows Vista ou Windows 7.

    Découvrez dans ce dossier comment jouer à ses jeux DOS préférés sous XP, Vista et Windows 7.
    Téléchargez et/ou imprimez gratuitement l’intégralité du sommaire des dossiers et guides pratiques de PC Astuces.
    Plus de 75 pages pour optimiser, sécuriser, personnaliser votre ordinateur !


    Astuce du jour : Synchroniser ses favoris d'Internet Explorer avec Firefox - Tous les navigateurs Web
    Vous utilisez Internet Explorer et Firefox et vous avez mis dans chacun des navigateurs des sites en favoris ou en marques-pages ? Avec une simple extension, vous pouvez récupérer les favoris d'Internet Explorer dans Firefox. Vous pourrez aussi modifier ses favoris, directement depuis Firefox...


    Produit du jour : Clé USB 16 Go

  • Toutes les clés USB

    Emportez partout avec vous votre collection de photos, de musiques, de films et de fichiers volumineux avec cette clé USB d'une grosse capacité de 16 Go !

  • Logiciel du jour : Exstora 2.8
    Cela vous est sûrement déjà arrivé : vous devez écrire une information importante et vous prenez la première chose qui vous tombe sous la main : un bout de papier, une note dans le bloc notes, etc. Et bien évidemment, c'est quand on a besoin de cette information que l'on ne la trouve plus, quand on ne l'a pas tout simplement oubliée.

    Pour éviter cela, vous pouvez utiliser le logiciel Exstora. Cet agenda gratuit et en français se propose de vous aider à gérer vos notes et pense-bêtes, ainsi que votre emploi du temps.

    Lancé en même temps que Windows, Exstora affiche dans une interface agréable (dont il est possible de modifier la couleur) un calendrier, un emploi du temps et un bloc notes. D'un clic, vous pouvez définir un nouvel évènement ou encore ajouter une nouvelle note qu'il est possible de ranger dans des catégories. Enfin, pour parfaire le tout, un moteur de recherche pour permet de trouver rapidement un mémo ou un évènement particulier. Vous n'avez alors plus d'excuses pour oublier une information !

    Du côté de l'agenda, on regrette simplement qu'il ne soit pas possible de planifier les évènements récurrents (une action qui a lieu toutes les semaines par exemple). Il vous faudra les insérer un par un.

    Si Exstora n'apporte rien de vraiment révolutionnaire, c'est un agenda convivial, simple, léger et sans fioriture qui saura se faire discret dans un coin de votre bureau.


    Fond d'écran du jour :   Les nouveaux logiciels et mises à jour :

    Lézard
     
    Jeu gratuit du jour : Blockgineer

    Placez stratégiquement des blocs pour que les balles atteignent l'arrivée du parcours.


    Actualité informatique :   En direct du forum :
    27/04 - De la DDR3 Plug and Play Chez Kingston
    27/04 - Intel livrerait du watercooling avec ses CPU
    27/04 - GameTree TV : le jeu à la demande sur Freebox
    27/04 - Kingmax : 64 Go qui ne craignent pas l’eau
    27/04 - Gigabyte lance ses alims PoweRock EX
    27/04 - LG veut son propre processeur
    27/04 - Sauvegarder ses documents Office sur Google Documents
    27/04 - Sony : une tablette double écran sous Honeycomb
    27/04 - L'alarme : le tueur insoupçonné de disques durs
    27/04 - 12 nouveaux fonds d'écran à télécharger
    27/04 - Bon anniversaire... circuit intégré (50 ans)
    27/04 - L'écran bleu de Windows 8 est noir
    27/04 - Lenovo prépare un ThinkPad Tegra 2
    27/04 - Microsoft prépare bien Windows Phone 7.5
    27/04 - La chemin de croix de PlayStation Network
      Tous les derniers sujets publiés | Les sujets sans réponse


    Pour vous désabonner de cette lettre d'information, rendez-vous à l'adresse : http://www.pcastuces.com/quotidien_desabonnement.htm
    Changement d'adresse e-mail : http://www.pcastuces.com/modif_email.htm
    Informatique et libertés - Nous contacter : http://www.pcastuces.com/libertes.htm
    Pour retrouver les archives de la lettre d'information : http://www.pcastuces.com/newsletter/lettres/

    mercredi 27 avril 2011

    Computer Tips From A Computer Guy

    Computer Tips From A Computer Guy


    How to Manually Format Spreadsheets in Excel 2010

    Posted: 27 Apr 2011 04:46 AM PDT

    One the downsides to having all kinds of templates and style sheets in MS Excel is that you pretty much get locked in to creating sheets that look like everyone else's; which doesn't do much for creativity or inspirational ideas. This is why it's a good idea to learn how to use Excels formatting tools.

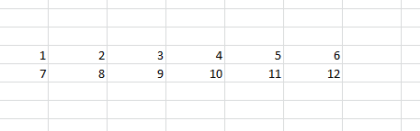
    To begin, start by creating a table that has some rows and tables, like this:

    Unformatted Sheet

    Then, highlight the whole thing…

    Hightlight Data

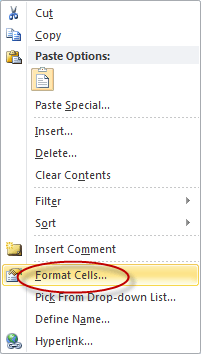
    Next, click on it with your right mouse button, to get this popup men:

    Format Cells Menu Option

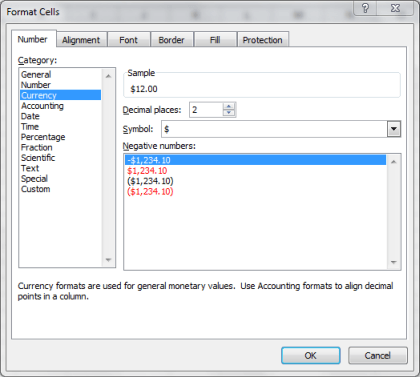
    Choose the Format Cells option, to get this little window:

    Format Cells Window

    Using just these simple tools, you can create pretty much anything you've seen in Excel's pre-formatted templates. To see how, we'll move right across the top menu bar, first up, is the Number format option list, here we can set the number in our table to represent a regular number, a dollar amount, a time or date, or whatever we like; for this example, we'll chose currency and go with the default of two decimal places, that makes out table look like this:

    Format Sheets as currency

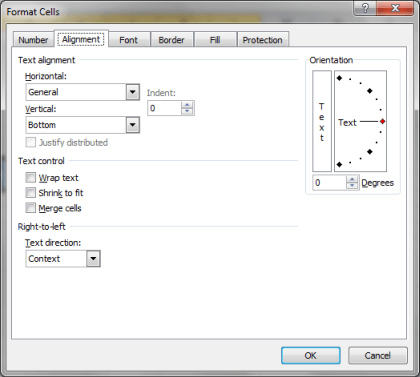
    Next on the menu is Alignment:

    Alignment

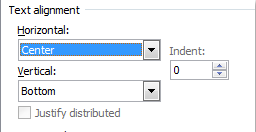
    All of these options are about making the contents of a cell or group of cells sit in their cell the way you want. Mostly they are about putting cell content at the cell, top, bottom, left right or centered; or whether text is wrapped on not; there is also an option to make text or numbers appear at an angle in the cell; but because we just want to show currency, we'll chose to center it and that's all:

    Center

    Which makes our table looks like this:

    Table Cells Centered

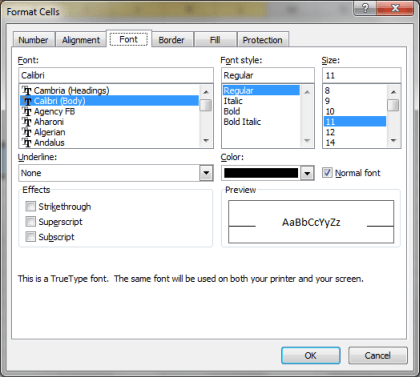
    Next on the menu is Font:

    Choose Font

    Since it works exactly like the Font command in every other Windows application we'll just stick with the default and move on to the Border option:

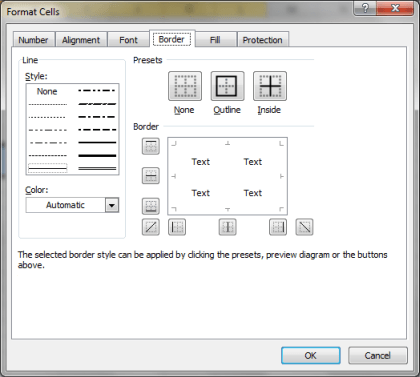
    Border page

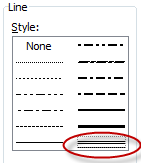
    This is the section where a lot of the magic happens, it's divided into three sections; Line, Presets, and Color. The line section lets you choose what sort of border to draw around whatever cells you've highlighted,  In this case, we'll choose a double bar:

    Double Bar Border

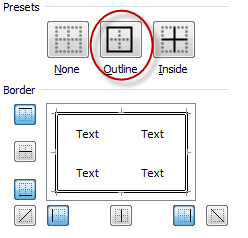
    You'll notice that nothing happens when you choose it, and that's because you have to tell Excel where you want that border to exist, and that's what the Presets section is about. Since we want a border that goes all the way around the outside of our highlighted area, we choose this one:

    Outside Border

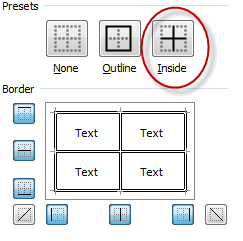
    But, we'd also like all the borders between each cell to have a border as well, so we choose this option too:

    Inside Borders

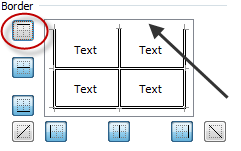
    The other little icons are for adding or removing certain walls of the border, like say if you'd like to not have a border across the top, you'd click on this one:

    Remove Border

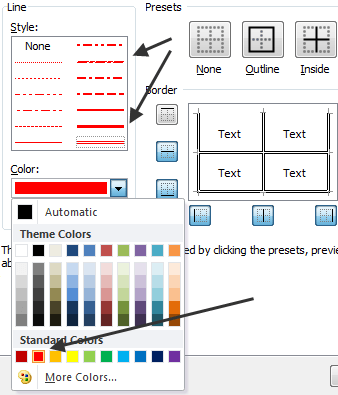
    Then, all that's left to do is choose a color for our border:

    Choose Border Color

    Notice how once you pick a color, the line color above changes to reflect your choice. Unfortunately, the border you added earlier does not change, so you make your choices again to make them the new color you've chosen.

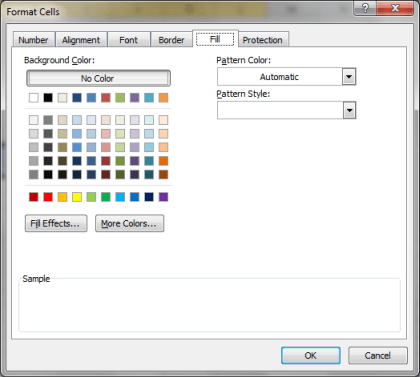
    Next up on the menu is the Fill feature:

    Fill Window Pane

    Here you can add color to the background of the cells themselves. You have two options, to fill the cells you've highlighted with a background color or a pattern with a color. We'll look at background first.

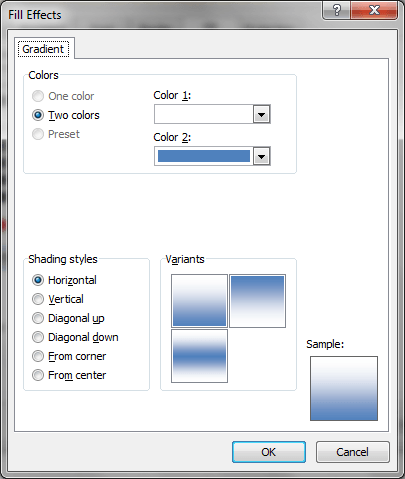
    You can simply click on a color to choose a background color, or or click the More Colors button for a color wheel that gives you more color options, or you can click on the Fill Effects button to get this:

    Fill Effects

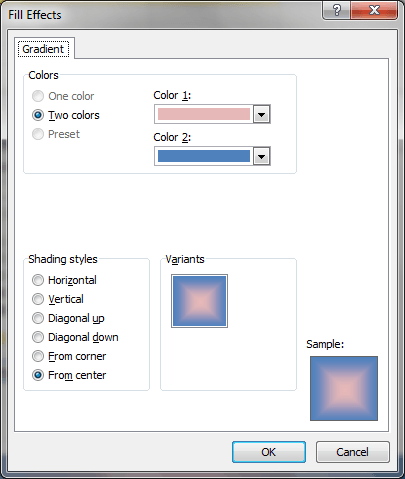
    Here you can add colors or a shading style to create a gradient (a gradient is where color changes slowly across a cell or cells). The top part of the pane allows you to choose one or two colors of your choice, while the bottom selects the direction of the gradient. For our example, we're going to choose  light pink and a somewhat dark blue for the colors and from center as our shading style:

    Gradient Choices

    Then click the OK button and we're about done.

    The last menu choice Protection, isn't really a formatting option, it allows you to lock the contents of cells so that you don't accidently overwrite formulas and such. For now, let's just click the OK button and take a look at what we've done to our original table:

    Result of Formatting

    The effects shown here can be used in very nearly unlimited and creative ways to show off your sheets in ways that stand out far more than you'll ever get using the cookie-cuter styles that come with Excel.

    They can be used in titles, or in descriptions or to create extra borders around the edges of your sheet, or to highlight certain areas, etc. They can also be used to alter your sheet after applying a style if you'd like to change things up just a little bit.


    Copyright © 2007
    Online Tech Tips.
    Aseem Kishore (digitalfingerprint: a59a56dce36427d83e23b501579944fcakmk1980 (209.85.224.87) )

    Post from:

    How to Manually Format Spreadsheets in Excel 2010


    Crop PDFs the Easy Way

    Posted: 26 Apr 2011 05:12 AM PDT

    PDF, as a file type, lies in between a document and a photograph. We can edit it like a document, but at its core, it is a photograph of a document. However, most graphic editors do not allow us to make edits to a PDF.

    One of the biggest edits we need is the ability to crop a PDF document to make it easier to read on our tablets and smartphones. A small piece of software called Briss makes PDFs easy to crop.

    stock screenshot

    After downloading the software from SourceForge.net, extract it. The very first file in the extracted folder should be an application file simply named Briss. Double-click it.

    click briss

    A small window will open in the top-left corner of your screen. Click File then Load File and choose a PDF to crop.

    load file

    A window will open asking if you want to exclude any pages in PDF from merging. We clicked Cancel.

    input

    The PDF loads and the Briss window should enlarge to the size of the PDF. If not, drag the window to the size needed. At first glance, your PDF looks like a jumbled mess—but this is ok. The odd pages are layered, one on top of the other, on the left, whereas the even pages are layered on the right.

    merged

    Click your mouse and drag it across the areas you need to crop. All even or odd pages are cropped to the same dimensions. The first section you highlight is labeled with a one—it will appear first in the new PDF. The following section is labeled 2 and so forth.

    image

    When you have finished making your selections, click Actions and then Crop PDF.

    actions crop

    A new PDF is generated with your cropped pieces in place of the original pages. The PDF may appear longer than the original, but this is because the cropped pieces are placed one after the other rather than side-by-side. This is perfect for cell phone viewing.

    image

    Overall, Briss works great for what it is designed to do. The initial PDF load with the text of all even and odd pages merged together feels quirky, but the cropping tool is great. It is a good way to make PDFs more small-screen-device friendly.


    Copyright © 2007
    Online Tech Tips.
    Aseem Kishore (digitalfingerprint: a59a56dce36427d83e23b501579944fcakmk1980 (209.85.224.87) )
    Post from:

    Crop PDFs the Easy Way