

Computer Tips From A Computer Guy |
- How to Move or Change the Location of My Documents Folder
- How to Fix Svchost.exe High CPU Usage
- How to Fix Window Media Player "Cannot Play This DVD" Error Message
| How to Move or Change the Location of My Documents Folder Posted: 05 Sep 2014 05:49 PM PDT By default, the My Documents folder is located in Windows XP and Windows Vista is located on the same drive or partition as the operating system. This is fine for anyone who has only a single drive or a single partition on their computers, such as the C drive, but if you have more than one physical or logical drive on your computer, it’s best to move your My Documents folder off the system drive. In Windows 7 and Windows 8.1, the situation is a bit different. In Windows 7, you have libraries, which are kind of virtual folders that basically link to other folders that can be located anywhere. Also, starting in Windows 7, in addition to the My Documents folder, you also have the My Pictures, My Music, My Videos and Downloads folders. In Windows 8, the names got changed to simply Documents, Pictures, Music, Videos and Downloads. That means in Windows 7/8.1, you have to manually change the location for each of these system folders if you want to move them. In Windows XP, all the other folders were inside the My Documents folder. I prefer the setup in Windows 7/8.1 because I normally don’t need to move all of the system folders, just one or two. So you might be asking why I would be recommending this? Here are the main two reasons I’ve moved the My Documents folder: 1. Free up precious hard drive space on the system partition – With all of the monthly updates for Office and Windows, my C drive was getting close to becoming full! Also, other system files like the paging file, system restore files, and hibernation files are all stored on the system partition. Once I moved the data off, I gave space-hogging Windows more space to live and breathe. 2. Easy backup and recovery of data in case of Windows crash – The best reason to move the My Documents folder is to better help protect your data. For example, if Windows crashes on you one day and you have to perform a reinstall, then all of your data will be lost if you didn’t have a backup. However, if your data is on the D drive, let’s say, and your Windows partition craps out, you can reinstall a fresh copy of Windows on the C drive and the rest of your data remains intact! Of course, this will not save your data if the entire hard drive fails physically and your My Documents folder is on the same drive, just in a different partition, but there have been many occasions in my time when Windows has become unusable due to a virus, spyware or other calamity of sorts. Using Libraries in Windows 7/8.1Before we get into the actual steps for moving the different system folders in Windows, let’s talk about libraries as they are a pretty good solution for most people. Instead of physically moving the system folders to another location, you can simply move your data to wherever you like and then add that folder to one of the special libraries: Documents, Music, Pictures, Video.
To add a folder to a library, just go to the folder you want to add, right-click on it, choose Include in library and then pick the library you want to add the folder to.
This does not copy or move the contents of that folder to the library, it simply creates a shortcut to the folder, but it won’t look like a shortcut. It’ll seem as if the folder is actually located in that folder, where in reality it could be on a totally different disk. You can even include folders in network locations in a library, but you first have to make it available offline. To do that, just right-click on the folder and choose Always available offline. Once it has synced the folder to your local computer, you can right-click again and you will see the Include in library option. In Windows 8.1, Microsoft suddenly hid the libraries feature for no apparent reason, even though it still exists. So instead of seeing Libraries in the left-hand menu in Explorer, you’ll see This PC with links to the system folders (Documents, Pictures, etc).
To get libraries back in Windows 8.1, click on the View tab and then click Navigation Pane. Then click the checkbox next to Show Libraries.
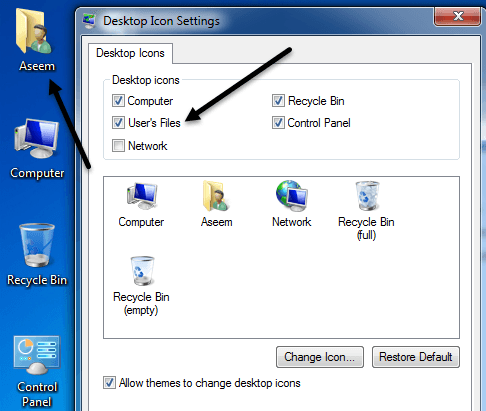
As I mentioned earlier, using libraries is a good alternative in case you don’t want to move a lot of data around from their current locations. Move My Documents in Windows 7/8.1The process for moving the system folders in Windows 7/8.1 is the same for both operating systems. In Windows 7, you have to click on your user folder on the desktop or navigate to C:\Users\UserName to see the system folders. If you don’t see the user folder on your desktop, right-click on the desktop, choose Personalize and then click on Change Desktop Icons. There you can check the User’s Files box.
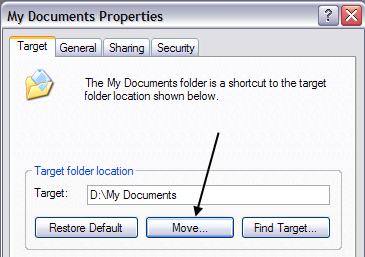
As mentioned above, in Windows 8.1, just click on This PC on the left-hand menu and you’ll see the system folders. Then right-click on the folder you want to move and choose Properties.
Click on the Location tab and then click on the Move button. Choose a destination for the folder and Windows will begin to move everything over to the new location.
Move My Documents Folder in Windows XPIn Windows XP, the process is very similar as above, but you only have to do it for one folder instead of several folders. Right-click on the My Documents folder on your desktop and choose Properties.
2. Click Move and choose the desired location for your My Documents folder. Remember, it would be best to move it to a different PHYSICAL drive if possible. If not, move it to a different partition at least.
3. Click Ok and then click Apply. You’ll be asked whether you want to move all of the current documents to the new location or not. Choose Yes.
And that’s it! Your documents will be moved to the new location and when you click the My Documents icon on your desktop, it’ll open just as before. If you have any questions, post a comment. Enjoy! The post How to Move or Change the Location of My Documents Folder appeared first on Online Tech Tips. |
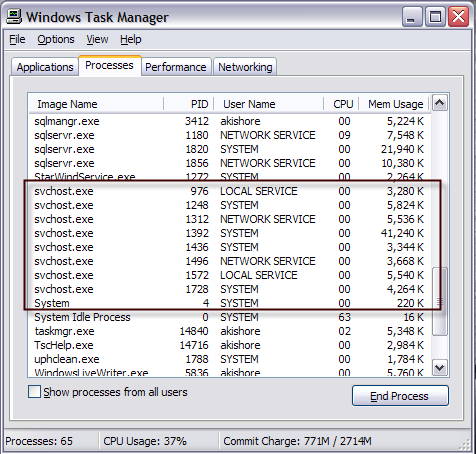
| How to Fix Svchost.exe High CPU Usage Posted: 05 Sep 2014 02:56 PM PDT SVCHOST.EXE is one of those mysterious processes that constantly runs in Windows and is utterly essential, yet you never know exactly what it is doing. So what is SVCHOST.EXE? Identifying the actual services and programs that are running inside each SVCHOST.EXE process is a task well worth knowing, especially when the process eats up 99 or 100 percent of your CPU! So before we dive into solutions, let’s get a deeper understanding of what this process actually does and how you can go about fixing some of the problems that might occur. Firstly, svchost stands for “Service Host” and it does exactly what as the name suggest: helps to “host” services. A service in Windows is simply a program in the operating system that does a particular job and runs in the background at all times when your computer is on, even if you are not logged in. Most programs that you are familiar with run as a stand-alone executable, such .EXE. However, most services are implemented in the form of DLLs, which cannot run on their own. Hence, svchost loads those DLLs and runs them itself. That’s why when you open the Windows Task Manager, you’ll see a bunch of svchost.exe processes running. If you want more info on the Task Manger, check out my articles on understanding the Task Manager.
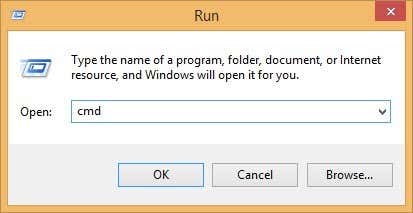
You’ll notice that there are currently eight svchost processes running on my computer, all using up various amounts of memory and running under different user names. So let’s say one of them is running at an excessively high CPU usage of 100 percent, how can we identify the actual application running? There are actually two ways to go about this: doing it all manually using the command prompt and Services tool or by using a third party application. I’m going to mention both here in case one does not work for you. Identify svchost.exe Processes via Command Prompt (hard way)1. First, go ahead and click on Start and then Run and type in CMD and click OK. In Windows 8.1, go ahead and right-click on the Start button and choose Run.
2. Type in the following into the command window and press Enter tasklist /svc /fi “imagename eq svchost.exe You should get an output as shown below with the name, PID, and service description
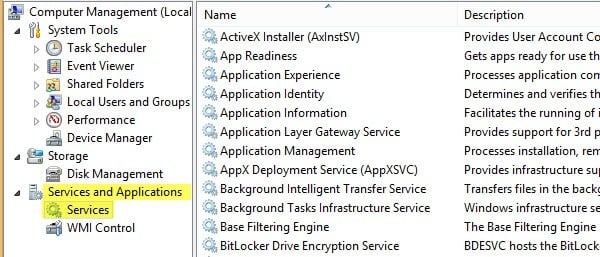
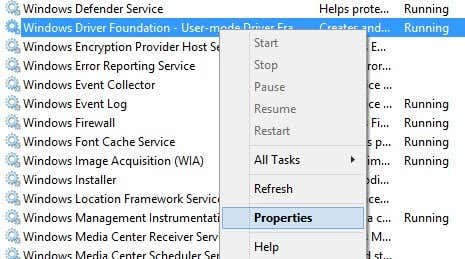
You’ll now see each svchost process along with it’s unique ID number and the services it is responsible for running. However, these names are still very cryptic and are all short-hand names. In order to get some more useful information about the process, we can use the Services browser in Windows. 3. Right-click on My Computer, choose Manage. On the resulting screen, choose Computer Management and then choose Services and Applications. Finally, choose Services.
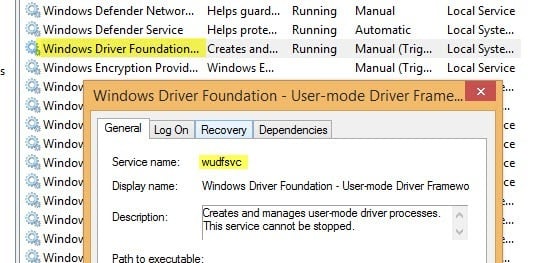
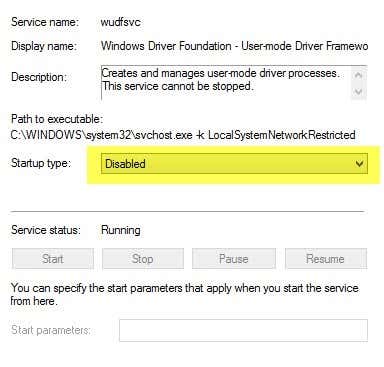
4. Now try to match the cryptic Windows service name with the easily readable names in the Services tab. This is a little and can take some time because if you take the process with ID 1436 and it’s name WudfSvc, you have to try to find it in the list. If you double-click on one the service names, you’ll see their cryptic name also, so that’s how you can match them up. In my case, I guessed that the W means the process starts with “Windows” and opened them until I saw a match.
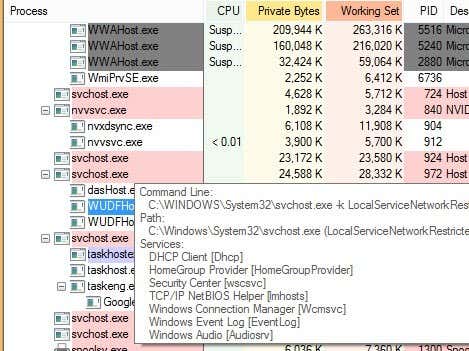
As you can see, the Windows Driver Foundation service is actually called wudfsvc for short! Identify svchost.exe Processes via Process Explorer (easy way)If you found to be too difficult, there is a much easier way! Check out the Process Explorer tool from Microsoft (originally from SysInternals). The tool is completely free and gives you detailed information for each process currently running. Once you download it, just run the exe file as it does not have to be installed. Hover your mouse over the svchost process and you’ll get a popup showing you which services are running under that process. The nice thing about process explorer is that it gets you the friendly name for each process instead of the short name.
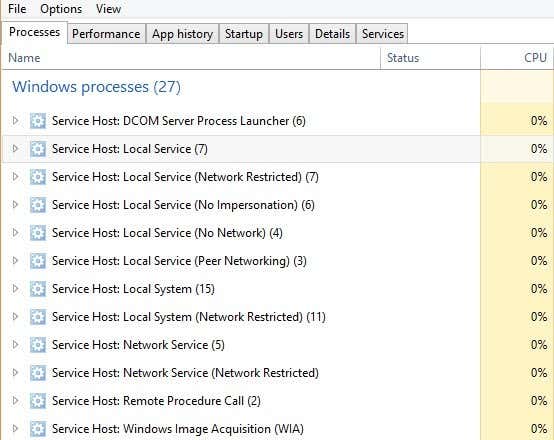
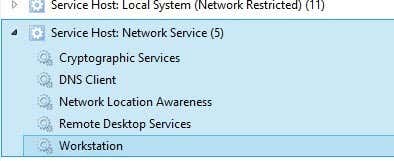
Windows 8 Task ManagerOne last thing I wanted to mention was the fact that the Windows 8 task manager basically makes using the command line or Process Explorer totally obsolete. Open the Task Manager by pressing CTRL + SHIFT + ESC and scroll down on the Processes tab to where it says Windows Processes.
Here you will see every svchost.exe process listed as Service Host: followed by the type of account it is running under (Local System, Network Service, etc). It’ll also have a number next to it and if you expand the item out by clicking the arrow, you will also see every service running under that particular process.
Fixing SVCHOST High CPU UsageNow that you have figured out exactly which process is eating up all of your CPU, we can address how to fix it. If you have found that the process is not a Windows process, such as Windows Update or Windows Firewall, etc, then simply kill the process and uninstall the program. However, most of the time that this problem occurs, it has something to do with a Windows process. The best solution in this case is to install all of the latest updates from Microsoft’s web site. If you’re not able to do so normally in Windows, try restarting the computer in safe mode and try it again. Also, if you can get to the Services tab like we did above, go ahead and right-click on the service and choose Disable. Even if it’s Windows Update or the Firewall, don’t worry, you can re-enable it later. Then restart the computer and go to Microsoft’s web site and manually get the updates. Re-enable the service and restart the computer again and hopefully things are working! In order to disable a service in Windows, right-click on it from the Services tab and choose Properties.
Next choose Disabled from the Startup type combo box located in the middle of the dialog box:
I have gone through this process a couple of times and it has worked for me. So again, first disable the service, then restart computer, then install updates manually, then re-enable service, and then restart computer again. If this doesn’t work, you have to perform a repair install of Windows. Do a Google search for repair install and follow the steps. If you’re running Windows 8, you can refresh your computer. If you have any questions, post a comment. Enjoy! The post How to Fix Svchost.exe High CPU Usage appeared first on Online Tech Tips. |
| How to Fix Window Media Player "Cannot Play This DVD" Error Message Posted: 05 Sep 2014 01:42 PM PDT Isn’t it great how even in our modern computer age with Windows 7 and Windows 8, you can still receive an error like “Windows Media Player cannot play this DVD because there is problem with digital copy protection” when you’re trying to watch a regular from Netflix on your computer? It’s really a pain that something like that doesn’t just “work” considering it’s VERY COMMON for people to watch DVDs on their computers! Anyway, this happened to me last night and it took me about 20 minutes to fix the problem, so I thought I would write up how I ended up fixing it! Hopefully, you read this before thinking it’s some problem with Windows or with your DVD drive, etc as I have seen some people re-install Windows or get a new DVD drive because of this error!
Actually, the problem all comes down to something called codecs. Codecs are small pieces of software that can decode the material on a DVD. Whenever a DVD is created, especially new one with copyright protection software installed on them, the content of the DVD is encoded using algorithms into a special format. This encoded data cannot be played on your computer in its normal format, so it has to be DECODED on your computer before it plays. You may have heard of DivX, which is a codec that allows people to compress full-length DVDs onto a CD without losing much of its original image quality. Some software DVD players will auto-download the required codecs for you and hence you won’t have this problem, but for some reason Windows Media Players sucks at this and will pop up with the error message. If you have a Blu-ray drive and are trying to play a Blu-ray disc in Windows Media Player, the same thing applies. Windows Media Player, by default, cannot play Blu-ray discs like it can DVDs, so you have to install the correct codecs to get them to play in Windows Media Player. You can download all of the codecs for just about any type of video format by going to Free-Codecs.com and downloading the X Codec Pack or the K-Lite Codec Pack. You’ll see them both listed, one on the first page and the other on the second page. Simply ignore all the items that are grayed out as they are obsolete.
My suggestion would be to go ahead and install the K-Lite Codec Pack 10.x.x Full, Standard, and Basic package onto your system if you are running Windows 7 or Windows 8. This codec pack supports 64-bit also, so don’t worry about the K-Lite Code Pack 64-bit because development of that has been discontinued. You could install X Codec Pack also for Windows 7 and Windows 8, but K-Lite seems to be the more popular choice with almost 247 million downloads! If you have enough space on your system, I would recommend installing the Full code pack rather than Standard or Basic. That way you can play any video file your throw at it and don’t have to worry about installing more codecs at a later point. As for Blu-ray drives and discs, if Windows Media Player is not able to play the disc even with the codecs installed, you may have to try install something like VLC from VideoLAN. Actually, if you don’t mind installing VLC, it might be worth trying to play the disc using VLC first before installing a codec pack because VLC can play many formats without additional software. Also, make sure you have a drive that can read Blu-ray discs. Enjoy! The post How to Fix Window Media Player "Cannot Play This DVD" Error Message appeared first on Online Tech Tips. |


| You are subscribed to email updates from Online Tech Tips To stop receiving these emails, you may unsubscribe now. | Email delivery powered by Google |
| Google Inc., 20 West Kinzie, Chicago IL USA 60610 | |
0 commentaires:
Enregistrer un commentaire