Subscribe:

Ads 468x60px

Pages

jeudi 31 mars 2011

Computer Tips From A Computer Guy

Computer Tips From A Computer Guy


Edit Sound in Windows Live Movie Maker

Posted: 31 Mar 2011 04:22 AM PDT

Windows Live Movie Maker makes it easy to edit the sound track in your movie projects. While its tools aren’t very advanced, and you can only have one sound track at a time, Windows Live Movie Maker does allow you some control over the sound in your videos.

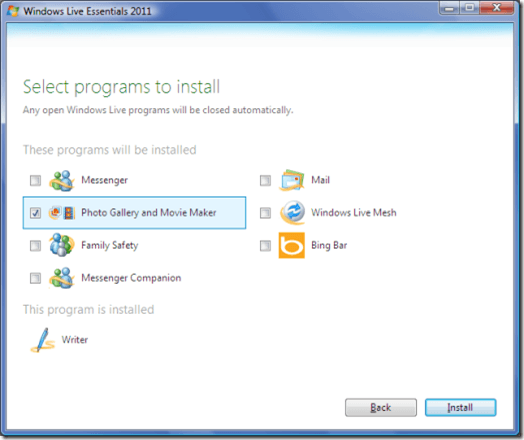
You can use these sound editing tools to add pre-recorded music, sound effects and narration to your videos. If you haven't already, you can install Windows Live Movie Maker by installing Windows Live Essentials. After you start the installer, just click Choose the programs you want to install. Then click Photo Gallery and Movie Maker and click Install.

Install Windows Live Movie maker

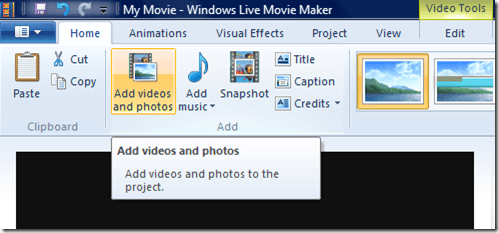
To get started, start Windows Live Movie Maker and select the Home tab. Then click Add videos and photo files to add your video or image files to your movie project. Then click the Add music button. The sound file types you can use with Windows Live Movie Maker include WMA, MP3, WAV, AIF, AIFF, M4A and OGG. When you’ve found and selected the sound file you want to use, click Open.

Add Videos and Photos

The sound file will automatically be added to your movie project. Click the Music Tools tab. Select the sound track in your video project. Select the Music volume button. Move the slider to the left to lower the volume. Move it to the right to raise the volume.

Music Volume

Select the drop-down menu beside Fade in. This option will cause the beginning of your sound track to slowly increase in volume as it starts. Choose Slow, Medium or Fast, depending on how quickly you want the track to fade in. Select Fade out to apply a similar fading effect to the end of your audio track.

Keep in mind that this option fades the sound in or out at the beginning or end of a sound clip, not at the beginning or end of your video. If you have multiple sound clips in your movie project, make sure you select the right ones when adding a fade effect.

Fade Music Track

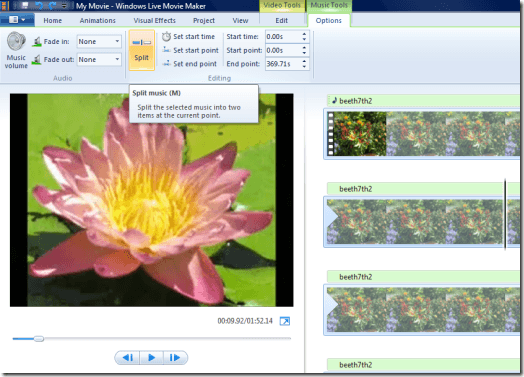
If you want to divide a single sound clip into several sound clips, select the point in your video where you want to cut the sound track. Then click the Split button. This will split only the sound track into multiple clips, leaving your video intact. Once you've split your sound clips, you can click and drag them around your video or right click to Cut, Copy and Paste them to another location.

splitsound1

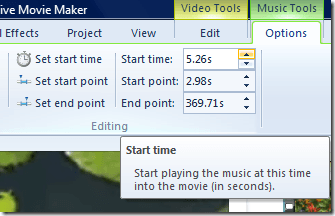
The Start time, Start point and End point will usually be set automatically. However, you can edit these values manually if you need to. Select a value and press the up and down arrow buttons to trim or extend the sound track.

Start and End Points

If there is a conflicting sound track on your video file, click the Video Tools tab. Select the video track, then select Video volume. Slide the slider all the way to the left to completely mute the volume on the video track.

Mute Video Volume

For more tips, read Import Network Files into Windows Live Movie Maker.


Copyright © 2007
Online Tech Tips.
Aseem Kishore (digitalfingerprint: a59a56dce36427d83e23b501579944fcakmk1980 (74.125.94.82) )

Post from:

Edit Sound in Windows Live Movie Maker


Send Continuous Tweets the Easy Way

Posted: 30 Mar 2011 05:12 AM PDT

The most popular Twitter feeds are the ones with constant, consistent tweets sent throughout the day. Obviously, sending tweets all day is time consuming, so most people write a mass of tweets at one time, then schedule them to be sent at specific times.

Buffer is an extremely easy way to schedule tweets, especially for Chrome users.

logo

Click the big, green Sign up for Free button to register for the service.

sign up

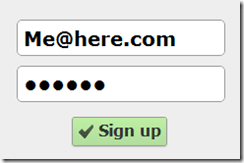
Enter your email address and a password, then click Sign up.

signup

You must then give the app access to your Twitter account. Click Add an Account, then allow the app to access your Twitter on the screen that follows.

add to twitter

You are then redirected back to your My Buffer page. From here, you can enter all of your tweets—up to 10 for free—and the entered tweets will send twice a day, at 9:30 AM and 4:30 PM.

add tweet

This works from any browser, but you can download an extension to do all of this straight from within Chrome by clicking the link on the top right of the page. The Chrome extension sits next to your address bar. Click it, and a box appears for you to quickly enter a tweet.

add from chrome

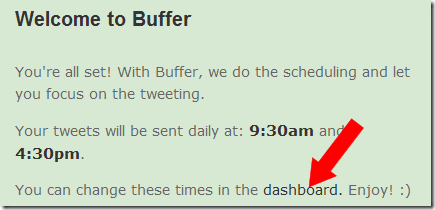
To change the time interval for when tweets are sent, click the dashboard link in the green box beneath the tweet entry box.

dashboard link

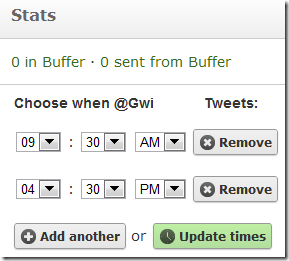
Use the dropdown selections to change the automatic times, or click add another to set another time for tweets to be sent.

stats

Buffer is definitely an easy way to tweet. Depending on the time interval set, it is possible to set all of your tweets for an entire week at one time. Paid accounts are allowed to store more tweets—up to 50 for $5 a month, and unlimited for $30.

The easiest way to use Buffer is from the Chrome extension. We hope the service will eventually create extensions for other popular browsers, as this is what sets it apart from the many other tweet schedulers on the market.


Copyright © 2007
Online Tech Tips.
Aseem Kishore (digitalfingerprint: a59a56dce36427d83e23b501579944fcakmk1980 (74.125.94.82) )

Post from:

Send Continuous Tweets the Easy Way


[Lettre d'information PC Astuces #3092]

  PC Astuces - L'entraide informatique francophone Jeudi 31 Mars 2011

 
2 logiciels achetés, le 3ème offert !
Pendant 48H, dans la sélection bonnes affaires du site avanquest.fr
Comment profiter de l'offre :
  1. Sélectionnez vos 3 logiciels sur la page :
    http://www.avanquest.com/bonnes_affaires.htm
  2. Suivez la procédure de téléchargement.


Dossier : Partager une imprimante multifonction avec un serveur d'impression

Raccordez votre imprimante multifonction à un serveur d'impression et profitez en permanence de votre imprimante et de votre scanner sur tous vos ordinateurs.

Découvrez dans ce nouveau dossier comment partager une imprimante multifonction avec un serveur d'impression.
Téléchargez et/ou imprimez gratuitement l’intégralité du sommaire des dossiers et guides pratiques de PC Astuces.
Plus de 75 pages pour optimiser, sécuriser, personnaliser votre ordinateur !


Astuce du jour : Enregistrer un document au format ePub - Word
Vous souhaitez adapter vos documents Word pour qu'ils puissent être lus sur une liseuse ? Avec le plugin gratuit Aspose.Words, vous pouvez ajouter le format ePub à Word pour pouvoir enregistrer vos documents dans ce format particulièrement adapté aux ebooks...


Astuce disponible dans la section Word de PC Astuces. Découvrez dans cette section plus de 235 astuces pour mieux utiliser Word.

Produit du jour : Garmin nüvi 1490T Europe

  • Tous les GPS

    Découvrez l'Europe en toute sécurité grâce au GPS nüvi 1490T de Garmin !

    Ultra fin avec son design de seulement 15 mm d'épaisseur, le nüvi 1490T est un modèle d'ergonomie avec son large écran de 5 pouces. Conçu pour vous faire gagner du temps, le 1490T intègre l'Info trafic Premium pour éviter les ralentissements, mais également l'EcoRoute qui calcule le trajet le plus économique pour vous en fonction de votre véhicule.

    Ajoutez à cela un détecteur de radars fixes et mobiles, 2 millions de points d'intérêt pré-chargés, un mode mains-libres Bluetooth et un mode Text to Speech qui annonce les noms des rues, et vous obtenez un GPS performant qui ne vous quittera plus !


  • Logiciel du jour : Schedulia
    Disponible gratuitement et en français, Schedulia combine les fonctionnalités d'un agenda et d'un organiseur.

    En effet, Schedulia permet de référencer et de gérer l'ensemble de vos contacts personnels et professionnels, de noter vos rendez-vous, les événements à ne pas manquer, les tâches à effectuer, etc.

    Vous pourrez programmer des alertes, visualiser votre tableau de bord de la journée et consulter votre planning de la semaine très rapidement.


    Fond d'écran du jour :   Les nouveaux logiciels et mises à jour :

    Fleur violette
     
    Jeu gratuit du jour : Johnny Finder 2

    Aidez Johnny à ramener le crâne de cristal au Louvre.


    Actualité informatique :   En direct du forum :
    30/03 - Dell prépare un Alienware M14x
    30/03 - La photo du jour : Windows 8
    30/03 - La Radeon HD 6790 dans les starting-blocks
    30/03 - Kingston corrige le firmware de ses SSD V100
    30/03 - Hanns.G HL245 : un 24 pouces LED et Full HD
    30/03 - Dossier : Créer une vidéo à partir de photos
    30/03 - Chrome OS sortirait en juin
    30/03 - L’hyperviseur Xen passe en version 4.1
    30/03 - AMD Catalyst 11.3 et nouvelle 11.4 preview
    30/03 - 12 nouveaux fonds d'écran à télécharger
    30/03 - Deux waterblocks pour la GeForce GTX 590
    30/03 - SGI Altix UV : 256 Xeon dans 1 serveur
    30/03 - Un lecteur Blu-ray « 3D » externe
    30/03 - Les OLED bleus, plus bleus
    30/03 - Intel lance (presque) l’Atom Z670 « Oak Trail »
      Tous les derniers sujets publiés | Les sujets sans réponse


    Pour vous désabonner de cette lettre d'information, rendez-vous à l'adresse : http://www.pcastuces.com/quotidien_desabonnement.htm
    Changement d'adresse e-mail : http://www.pcastuces.com/modif_email.htm
    Informatique et libertés - Nous contacter : http://www.pcastuces.com/libertes.htm
    Pour retrouver les archives de la lettre d'information : http://www.pcastuces.com/newsletter/lettres/

    mercredi 30 mars 2011

    Computer Tips From A Computer Guy

    Computer Tips From A Computer Guy


    How to use AutoText and Quick Parts in MS Word 2010

    Posted: 30 Mar 2011 04:12 AM PDT

    For several of the past iterations of Word, Microsoft has had an AutoText feature that allows users to capture a piece of text and then to use it over and over again in other parts of their documents, or even in other documents; Microsoft has added to that feature by including something it calls, Quick Parts, which are in essence, still AutoText, but offer users a little more flexibility.

    To see how AutoText works with Quick Parts, type some text into a test document;  in this example, an address will be used:

    Dummy Address

    Next, highlight the text and then click the Insert tab on the main ribbon, then click on the Quick Parts icon:

    Quick Part Icon

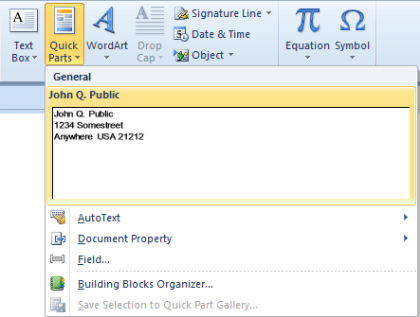
    You should get this drop-down menu:

    Quick Parts Icon DropDown

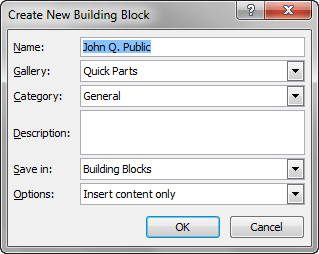
    Choose Save Selection to Quick Part Gallery, you should get a popup that looks like this:

    Create New Building Block PopUp

    In most cases you can go with the default options, though if you wish you can change them to suit your purposes, then click on the Ok button.

    Note: The Name of the Quick Part you are creating, defaults to the first line of your text.

    To see the results of your efforts, move to another part of your document, then click once again on the Quick Parts icon, you should see the text you captured in a little window:

    Quick Parts Showing in Window

    Clicking on the Quick Parts window with your text in it causes your text to be inserted into the document at the current position.

    After Inserting Quick Text

    There's an even faster way to get your Quick Parts text into your document though; move to an empty spot, and start typing the same text you have saved as Quick Parts text, you should get a little popup showing you that Word recognizes that you're trying to type in your Quick Parts text, in this case, all you have to do is press the Enter key, and Word will fill in the rest of the Quick Parts text for you.

    Note: You can also type in just a couple of the first characters of your Quick Parts text, and then press the F3 key, and Word will insert the Quick Parts text it thinks you want.

    This is the quick part of Quick Parts, by clicking just one icon, you immediately see the text you've captured and can insert it with just one more click, or have it inserted automatically when it recognizes what you're trying to type.

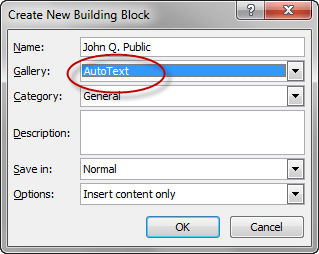
    Word does still have the old AutoText feature; to use it, follow the same path as you did with the Quick Parts, only when you get the Create New Building Block popup, instead of going with the default of Quick Parts under Gallery, instead choose AutoText:

    Create New Building Block - Auto Text

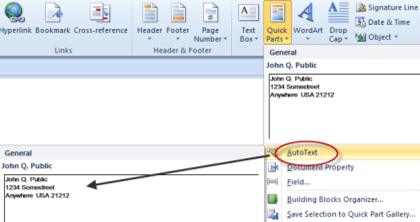
    Then, to use it, click once again on the Quick Parts icon, then instead of choosing one of the text boxes for Quick Parts, click instead where it says AutoText, you should see a drop-down menu that looks something like this:

    Insert AutoText

    Clicking on where you see your saved text causes the text saved to be inserted into your document just as with Quick Parts.

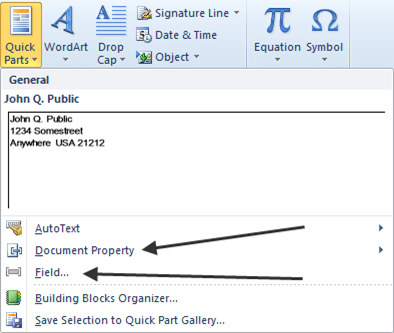
    The other two insertion choices from the Quick Parts menu are Document Property and Field:

    Document Property and Field Menu Choices

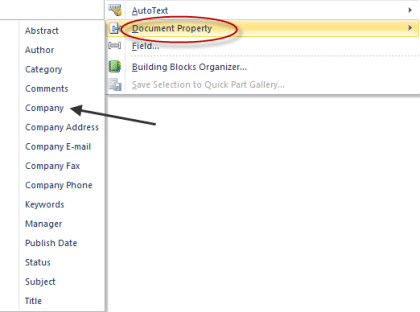
    Document Property allows you to insert text with a predefined heading into your document; to see how this works, click on it, then choose one of the available titles from the popup menu.

    Document Property with Drop-Down

    In this example, we'll choose Company. After choosing it, we get this inserted into our document:

    Company Field Inserted Into Document

    It's waiting for us to type the name of our company, once we do so, it looks like this:

    Company Name Typed In

    Then, clicking anywhere else in our document causes it to look like regular text. But, the next time we need to type in the name of our company, we can instead click on the Quick Parts icon, choose Document Property, and then Company from the drop down menu, and the company name will be inserted into the document.

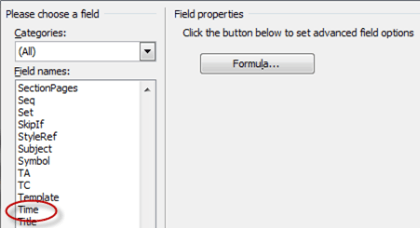
    The other option, Field… is used to insert predefined Word elements into your document; for example, if you wish to have the current time inserted in your document, you would click on Quick Parts, then choose Field… then choose Time from the category window. The current time will then be inserted into your document.

    Insert Time

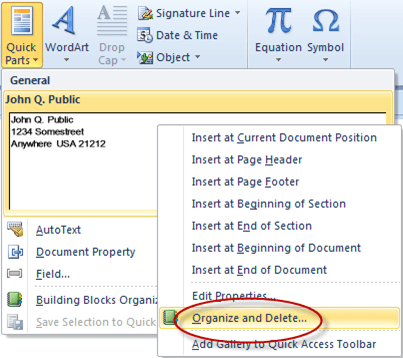
    Finally, to delete Quick Parts text entries, click on the Quick Parts icon, then right click in the window that holds the text you wish to delete, then click where it says Organize and Delete:

    Organize and Delete menu Choice

    Then click on the Delete button at the bottom of the Organize and Delete PopUp menu.

    Quick Parts and AutoText are most useful when you find yourself retyping some bit of text over and over again, especially if it's cumbersome typing, such as long numbers or hard to spell names or places.


    Copyright © 2007
    Online Tech Tips.
    Aseem Kishore (digitalfingerprint: a59a56dce36427d83e23b501579944fcakmk1980 (74.125.94.85) )

    Post from:

    How to use AutoText and Quick Parts in MS Word 2010


    Track Activity with the Windows 7 Resource Monitor

    Posted: 29 Mar 2011 05:58 AM PDT

    In our continuing quest to find ways to make Windows 7 more comfortable to a Mac user switching over, we went searching for an equivalent to OS X’s Activity Monitor.

    Activity Monitor is a utility that helps you pinpoint bottlenecks in your system by reporting stats on the fly like CPU usage, RAM usage, and frozen programs all listed by process. We quickly found our answer not in third-party software, but in a surprisingly robust utility built right into Window 7: Resource Monitor.

    Now, Resource Monitor isn’t new to Windows 7, but it got a massive overhaul and upgrade from the Vista iteration. In fact, it’s quite a bit similar to Mac OS X’s Activity Monitor, but we aren’t going to complain that Resource Monitor is a copycat — it’s more of a respectful homage, incorporating ideas from the original and building upon them to create an original work. Let’s delve a bit into the inner workings of Windows 7′s Resource Monitor now.

    Basics of the Resource Monitor

    Is a program not responding? Is something in the background chugging along, hanging up, and slowing everything down, but you can’t figure out which is is right away? Try firing up Resource Monitor to pinpoint the problem.

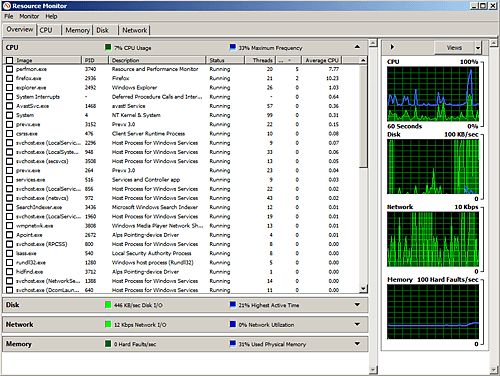
    Click the Start button, and in the search box type either “resmon” or “resource monitor” to bring up the program. Click the result to open Resource Monitor and take a gander at the pure awesome of it all. (Resource Monitor is located at Start >> All Programs >> Accessories >> System Tools >> Resource Monitor.)

    resmon1.png

    For this article we’re going to focus on the Overview tab, which gives you an overall picture of what your computer is up to at this moment in time. The Overview tab’s default is to display CPU activities, which is probably the most interesting bit to delve into.

    resmon2.png

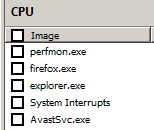
    The first category, Image, lists all of the processes that are running. You see here that some system files, like perfmon.exe, are active, along with applications like Firefox and an antivirus program.

    resmon3.png

    The second category, PID, simply displays the process ID of whatever’s running, which is always a number.

    The third category, Description, is the most informative way to identify what applications are running. Here is listed the common name for the process. For instance, we find out the the arcane-sounding perfmon.exe is actually the Resource and Performance Monitor, or the very utility we’re using. Try not to think of Resource Monitor looking at itself in an endlessly repeating hall of mirrors. Too late? We thought so.

    The fourth category, Status, tells you if a program is running properly. If it isn’t, it will show up in red.

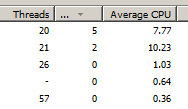
    The fifth column, Threads, tells you how many sub-processes are running for a particular application.

    The sixth column, CPU, lists what percentage of your CPU’s power is being used. It’s likely variable. The CPU column is one place to look to find answers to system slowdowns or bottlenecks, because an application may be hogging the CPU and slowing everything else down. The seventh column, Average CPU, is just how it says: the average amount of CPU the application is using.

    resmon4.png

    Once you know what the different columns in the Windows 7 Resource Monitor indicate, you’re armed with the knowledge to begin to troubleshoot basic issues like slow performance or frozen processes.


    Copyright © 2007
    Online Tech Tips.
    Aseem Kishore (digitalfingerprint: a59a56dce36427d83e23b501579944fcakmk1980 (74.125.94.85) )

    Post from:

    Track Activity with the Windows 7 Resource Monitor