

Computer Tips From A Computer Guy |

| Use Windows 7 Advanced Clock Features Posted: 29 Mar 2011 04:04 AM PDT Sometimes it seems that Microsoft assigns a team of software engineers to take a look at every single aspect of their Windows operating team between versions, and then tells them to make suggestions as to what might make their part cooler; how else to explain the update to the simple clock in Windows 7? In its normal default status, the clock is pretty simple, it's just what we've all come to expect with the clock on our computer; in Windows 7, it looks like this:
Then, when you click on it, you get this:
But clicking on Change date and time settings… brings up this popup menu:
Under the Date and Time tab, are buttons for allowing you to change your date and time, as well as your time zone; nothing new here. Under the Additional Clocks tab however, there is something new:
Here you can add two additional clocks to your computer. To do so, click the check box, then click on the down arrow to bring up a list of possible places you'd like to keep track of the time for:
Then, type in a name for your clock, and then add another clock as well if you like:
Once you're satisfied, click on the Apply button, then Ok to return to your regular screen. To see how your clocks work, hover over the time:
Then, click on the time:
If you have family living overseas, for example, this is a great option to help you keep track of when is a good time to call them. There's one more feature you can use with Windows 7 Clock, and that is under the third tab, Internet time:
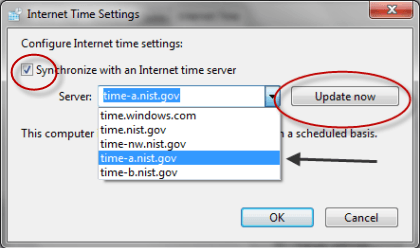
This option allows you to have your computer clock set automatically by choosing one of the government time sites. Choosing this option is a good idea because despite what you may think, computer clocks are not all that accurate; they tend to go out of time far faster than most would suppose; to get around that problem, have your computer check the real time and update your computer automatically. To use this option, click on Change settings… you should get this popup:
Click the check box that says Synchronize with an Internet time server; then click the down arrow to choose a site. Then click the Update now button, and then Ok. From here on in your computer will have its clock updated automatically once a week from the site you've designated By giving Windows Clock a little update, Microsoft has made this one tiny aspect of your computer, just a little more useful.
Related postsCopyright © 2007 Online Tech Tips. Aseem Kishore (digitalfingerprint: a59a56dce36427d83e23b501579944fcakmk1980 (74.125.94.82) ) Post from:
|
| How to Convert MIDI Files to MP3 Files Posted: 28 Mar 2011 05:11 AM PDT It’s easy to listen to MIDI files on your computer, since most media players can play them. However, since MIDI files are sets of musical instructions rather than sound files, your portable devices probably won’t be able to play them back. Fortunately, it’s a simple process to convert your MIDI music files to MP3 sound files. These methods will help you convert your files quickly and easily. Convert MIDI to MP3 with a Sound RecorderThe preferred method to convert MIDI files to MP3 files is to record them in real time. You can play them in any media player, then simultaneously record them using a sound recording software program. Winamp is one of the best free media players to use, since it has its own equalizer with several presets. Free Sound Recorder is a good sound recorder to use to record the music in MP3 format, since it lets you control the input volume and balance. It even lets you edit your finished MP3 sound files after conversion. To get started, download and install Free Sound Recorder. Also download and install Winamp. Start Winamp and let the software program search your library for music files. You can re-scan your music library at any time in Winamp by selecting File and Add Media to Library. Navigate in the Media Library to find and select the MIDI file you’d like to convert.
Select Options, Preferences and Input. Select Nullsoft MIDI Player and click Configure. In the Device tab, select DirectMusic/Microsoft Synthesizer (with output), then click OK. This will allow the equalizer to work with the playback of MIDI files.
Click View and Equalizer. Change the equalizer settings manually by moving the sliders. You can also load an equalizer preset by clicking Options, Equalizer, Load Preset and Preset. Select the equalizer preset the best matches the type of MIDI file you’re converting to MP3.
Open Free Sound Recorder. Click the Mixer button, which looks like a small speaker. Beside Recording Device, select your sound card. Make sure you don’t select your microphone, since this will distort the sound quality. Move the sliders below to change the volume and balance of your recording if desired. If the Recording format displayed is not MP3, click Options, click the General Settings tab, then select MP3 file as the Output File Type.
In Winamp, press the Play button. Let the song play all the way through.
Watch the Status screen in Free Sound Recorder and listen to make sure that the volume level is right. Adjust the volume and balance of the input in Free Sound Recorder as necessary. Also adjust the output volume in Winamp. When you’re satisfied with the input and output settings, stop the playback in Winamp. In Free Sound Recorder, press the Record button, which has a circle at the center. Then press the Play button in Winamp again and wait for the song to finish. Press the Stop button in Free Sound Recorder to complete the conversion.
Fast and Batch Conversion of MIDI Files to MP3 FormatIf speed and ease is more important than control over the quality of your sound file, you can use Free MIDI to MP3 Converter to convert your files. This is a very simple software program to use. Just press the Add button to browse the music your hard drive.
Select the MIDI files you’d like to convert to MP3. To select multiple files, click one file then press the shift key while you click the last file. Alternatively, you can press the control key while you click to select non-contiguous MIDI files to convert. Click Open to add the files.
When you’ve finished adding files, select the Output folder. You can either output the MP3 files to the same folder as the source MIDI files, or you can select a different folder by clicking Other. If you select Other, then click the button with the ellipsis to browse your hard drive for the desired output folder. Either select an existing folder or create a new folder and give it a name you can remember. When you’re finished, click Convert to MP3. The software will quickly convert the MIDI files and automatically save them as MP3 files in your chosen folder.
While this method is far faster than recording the MIDI file in real time, the chances are good that it will dramatically reduce the sound quality of your MP3 sound files. For the best possible sound quality, use the sound recording method in the first section of this article. To add even more songs to your library, read Convert YouTube videos to MP3, MP4, WAV.
Related postsCopyright © 2007 Online Tech Tips. Aseem Kishore (digitalfingerprint: a59a56dce36427d83e23b501579944fcakmk1980 (74.125.94.82) ) Post from:
|


| You are subscribed to email updates from Online Tech Tips To stop receiving these emails, you may unsubscribe now. | Email delivery powered by Google |
| Google Inc., 20 West Kinzie, Chicago IL USA 60610 | |
0 commentaires:
Enregistrer un commentaire