

Computer Tips From A Computer Guy |
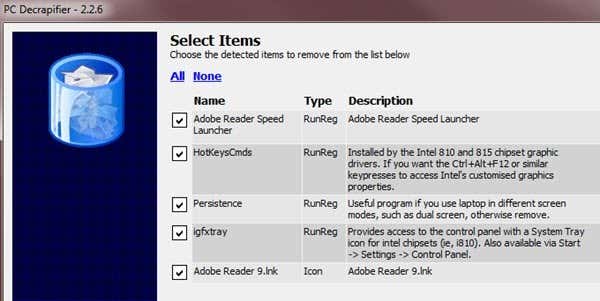
| How to Automatically Remove Unwanted Pre-Installed Software from Your Computer Posted: 26 Aug 2014 07:42 PM PDT So you just bought a new computer and can’t wait to start using it right? So you fire up that bad boy eagerly awaiting the cool new features and instantaneous loading of programs with a single click of the mouse, but what do you get? Annoyingly and shockingly, your new computer boots up and greets you with popup ads, lots of shortcuts to useless programs and useless services with enough icons on your desktop to fill up half the screen on your new widescreen display! It’s 2014 and the only computer I have bought that doesn’t have any bloatware on it is the Google Chromebook. Otherwise, HP, Dell, Toshiba and to a lesser degree Lenovo too, all install a lot of software you simply don’t need. Before you can even click on anything, your computer is automatically connecting to the Internet to download the latest updates for all of the trial anti-virus or anti-spyware software and speaking out alerts to you about dangers you didn’t even know existed! So your new computer experience has now turned into the software equivalent of computer hell. Just to uninstall all of those applications manually would take several hours depending on how many pre-loaded applications there are. Instead of wasting time doing it yourself, you can use software specifically designed to get rid of crapware automatically. In this article, I’ll mention a couple of programs, both free and paid, that do a great job and can even be used later on, not just when you first buy a computer. PC DecrapifierOne really nifty program called PC Decrapifier, which is free and very easy to use, is one of my favorites. It’s been around for a really long time and it works with every version of Windows from Windows 2000 all the way up to Windows 8. PC Decrapifier was written by people like yourself who became annoyed at the fact that big companies like Dell, HP, Toshiba, Gateway, etc sell advertising space on new computers so that they can make more money at your expense. PC Decrapifier will find the “crap” on your computer, allow you to choose what you would like uninstalled, and then automatically start removing each application. The program has a large list of trial software applications that are usually loaded onto new computers, which if it finds, will show up in the list to be removed. These applications include QuickBooks trial, NetZero, AOL, Norton trial, Microsoft Office trail edition, PC-cillin, and lots more.
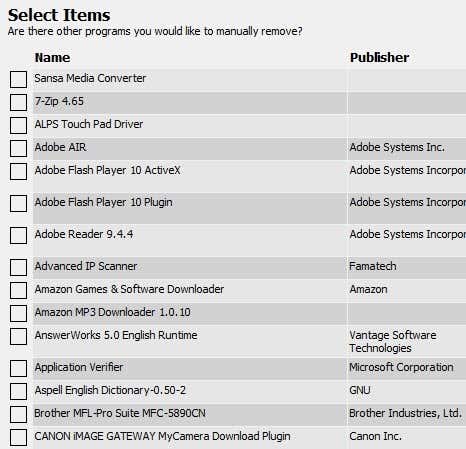
Once installed, the program will first create a system restore point just in case anything goes wrong. After that, you simply select the items from the list and click Next. In addition, it will give you a list of all the other programs installed on your machine and you can choose to have something uninstalled from there too if you no longer need it.
PC Decrapifier is free for personal use and only $25 if you want to buy it for commercial purposes, i.e. you’re a computer technician, etc. I have used the programs several times and can say that it’s really handy. Actually, I’ve used it quite often on clients computers that were several years old, but had accumulated lots of programs over time. Revo UninstallerAnother great program that is very popular is Revo Uninstaller. The program does come in a free edition, though it doesn’t have a ton of features. The paid version is $39, but if you are someone who likes to keep their computer clean and neat, this program is pretty awesome. However, it’s good to know that the paid version of the program has a 30 day trial and it’s a fully functional copy without any restrictions. So if you wanted, you could just download the trial, use it to uninstall programs and clean up your system and then just uninstall it. But first try the free version because for a long time that was enough for me.
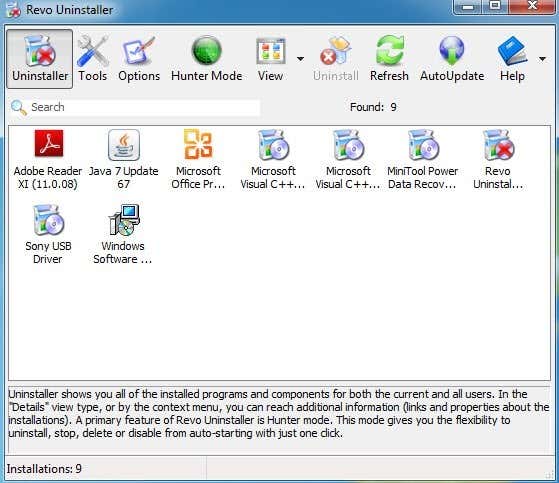
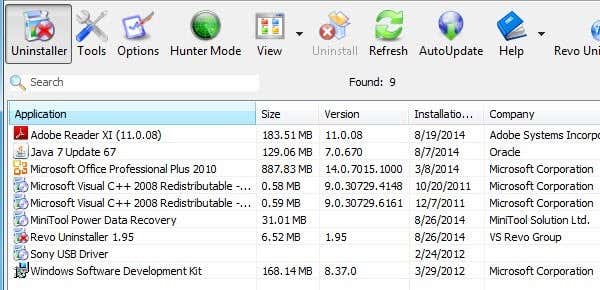
When you first load it, Revo Uninstaller will give you a list of all installed programs for all users on the system. By default, it’s in icon view, but you can click on the little View button and change it to details if you want more information about the programs like the date it was installed, the size, etc.
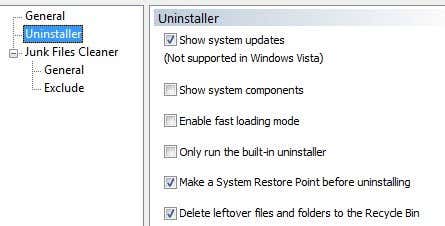
Just select a program and click the Uninstall button to get rid of it. The free program has a lot of other features and one that I like is being able to uninstall system updates and system components. Just click the Options button and then click on Uninstaller and check the appropriate boxes.
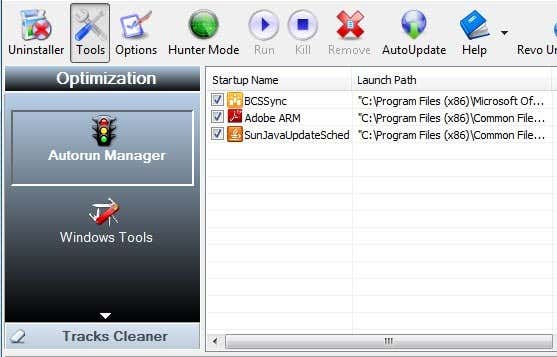
If you click on Tools, you’ll find Autorun Manager, which will show you all the processes that start when the computer boots up. Windows Tools has a few links to some of the most useful tools already on the operating system. You can get network information, edit group policy, manage services, defragment the disk and lots more.
I won’t go into too much more detail since we’re just focusing on uninstalling junk software from your computer, but you can play around with Revo Uninstaller because it can do a lot more. The Pro version is just full of features and even supports 64-bit Windows. IObit UninstallerIObit Uninstaller is another free program you can use for removing software completely from your system. Remember that these last two uninstaller programs are useful for completely removing all traces of a program. You can obviously manually uninstall programs yourself, but a lot of programs leaves remnants all over the place, i.e. the registry, temp folders, etc, so these programs supposedly do a better job at removing these programs.
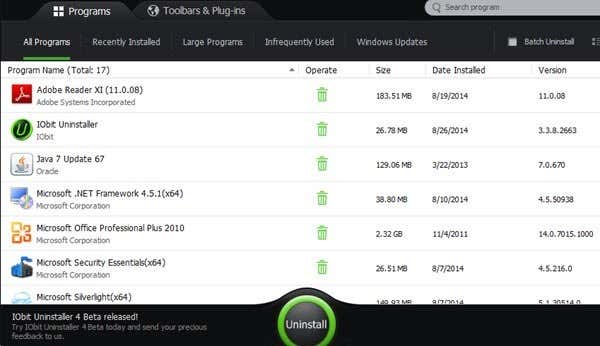
Once you install IObit, you’ll see a similar interface with a list of all the installed programs found on the computer. Just select one and click Uninstall. You can also click across the tabs at the top to find recently installed programs, large programs, infrequently used programs, etc. It also has a tab at the very top for Toolbars and Plug-ins, which is handy because you’ll be surprised how many plugins and add-ons get installed in your browser without your knowledge. It will even tell you which ones are trusted and which ones are not.
So those are three different ways you can get your computer cleaned up and running smoothly again. There are lots of other programs you can use like CCleaner, etc, but this article is really all about removing junk software from your PC. If you have any of your own suggestions, please let us know in the comments. Enjoy! The post How to Automatically Remove Unwanted Pre-Installed Software from Your Computer appeared first on Online Tech Tips. |
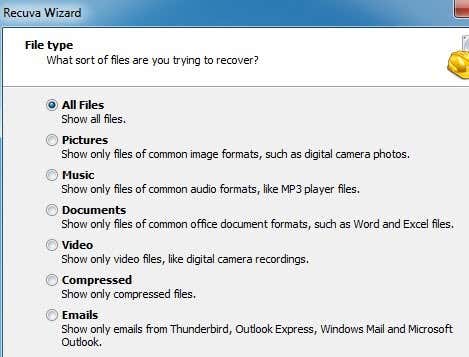
| How to Recover Accidentally Deleted Files Posted: 26 Aug 2014 03:59 PM PDT If you’re reading this article, you’ve probably deleted something important on your computer that you need to recover ASAP! Hopefully, the files or folders that are now gone were deleted only a short while ago because the more data that gets written to the disk, the more chance that the section of the hard drive that contained the data will be overwritten with new data, thereby making your recovery chances a lot lower. Before we get into the different ways to recover deleted files, first make sure you check a couple of things: 1. Always check the recycle bin to make sure your files are not still in there. If so, just right click to restore them. 2. Make sure you close out of all other programs, even programs running in the taskbar. 3. Don’t create new files, move data, copy data or anything else. For this article, we’re going to focus on recovering data from your computer hard drive. If you are trying to recover photos from an SD card or USB stick, check out the link to my other article. As with most simple data recovery, we always start out with data recovery software. That’s usually the cheapest option to start off with. If free and paid software can’t get your data back, then you have to use more specialized data recovery companies that charge anywhere from $500 to $1500 to recover data directly from the hard disk platters. Here we will only talk about software. I’ll go through a couple that I have used and tested. RecuvaRecuva is probably one of the more popular choices for data recovery and I’ve had very good results with this program myself. The freeware version lets you recover data without having to pay. Let’s see how we would use the program. Once you install it and run it, the wizard interface will start up. I would recommend using the wizard. Click Next and you’ll first be asked what type of files you are trying to recover.
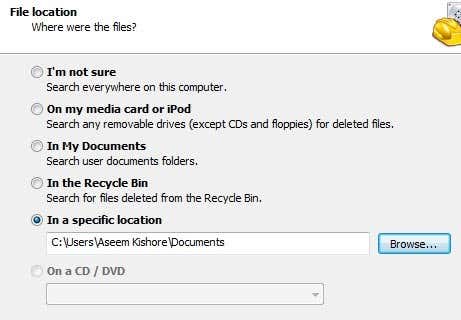
If you know exactly what you are trying to recover, then feel free to choose that type, otherwise just stick with All Files. Next, you’ll be asked where you want to search for the deleted files.
If you know the location of the deleted files, you can choose In a specific location and then click Next. However, if nothing is found in that location, it does not mean the files still can’t be recovered. In my test, I deleted a folder from My Documents and then emptied out the recycle bin, but chose the My Documents location for the search. Nothing came up and I decided to try to search the entire drive. Sure enough, the files were found, but in the hidden recycle bin folder on the drive. So you should always choose I’m not sure and let it search the entire drive also if the other locations were not successful.
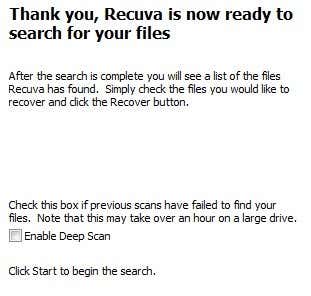
Finally, you can check whether or not you want to perform a Deep Scan or not. This will take longer, but you’ll have a better chance of recovering more data. Go ahead and click Search and Recuva will start scanning your hard drive.
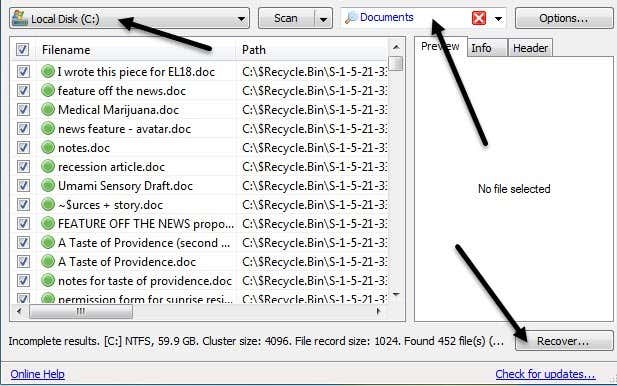
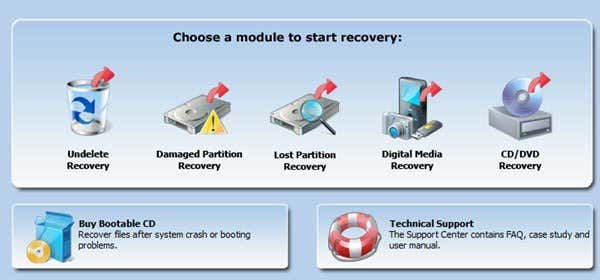
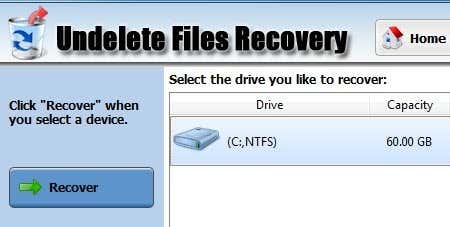
By default, the program breaks the files down into categories like Documents, Music, Videos, etc and you can change that via the drop down box. You can also change the scan location and if you click on any of the files, you can get a preview. Click the top checkbox to select all the files and then click Recover. You’ll need to choose a location for the files, which should be on another drive other than the drive data is being restored from. If data is being recovered from your C drive and you have no other drive, then use a USB stick. Don’t restore to the same drive! The program will even give you a warning about that. In my test, Recuva was able to recover 122 MB out of 128 MB of image, document and music files without deep scanning, so it’s definitely a good program to try first since it’s also free. MiniTool Power Data RecoveryThe next tool is actually better than Recuva in terms of data recovery and features, but the free version only lets you recover up to 1 GB of data. After that, you have to purchase a personal license, which is $69. That’s a bit pricey, but it all depends on the importance of the data you have to recover. If they are precious family photos, $69 is nothing. Once you install it, you need to choose what type of recovery you are looking to perform. For deleted files, you would choose Undelete Recovery. As you can see, you can also use the program to recovery from digital media, recover data from CDs/DVDs, etc.
Choose the drive you want to recover data from and then click on the Recover button.
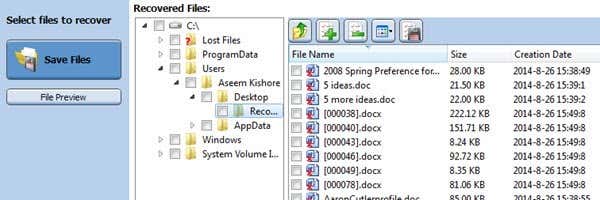
The scanning process is actually fairly fast and you will get a tree like view of the different files and folders that were recovered. You want to navigate to the folder where your files had been saved and see if that path exists.
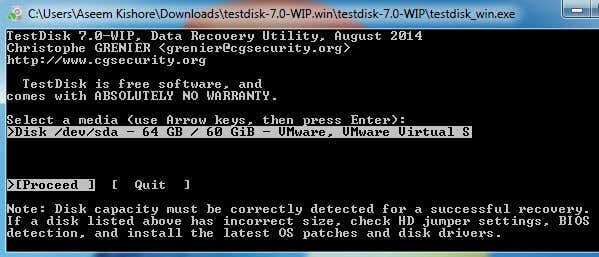
Then select the files via the checkboxes and click Save Files. Again, save the files on a different disk so that you don’t risk overwriting the deleted data while it’s being recovered. TestDiskOne last program worth trying out is TestDisk, which is freeware. The program also comes bundled with PhotoRec, which is a program I talked about in my other post on recovering photos from SD cards. The TestDisk program is for recovering files on hard disks. When you download the zip file, extract it and then run the testdisk_win application that is in the directory. You’ll see that a command prompt pops up and that’s actually how the program runs! It’s a bit intimidating, but it is actually really easy to use. It’ll first ask you if you want to create a log file, append one or not use one at all. I would suggest just leaving it highlighted on Create and pressing Enter. Now you’ll be asked what disk you want to scan.
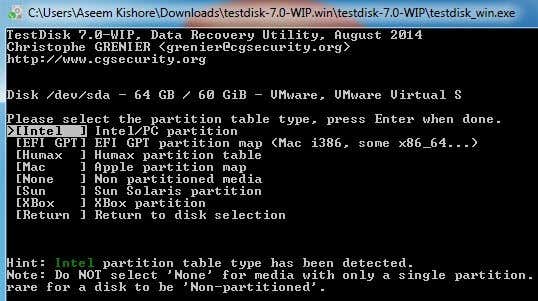
Use the arrow keys to select the disk and then make sure Proceed is selected before pressing Enter. Next it’ll ask you what type of disk you are using.
If your computer is running Windows with NTFS or FAT partitions, then leave it at Intel. They also have options for Mac formatted drive, Sun Solaris systems and even an XBox partition.
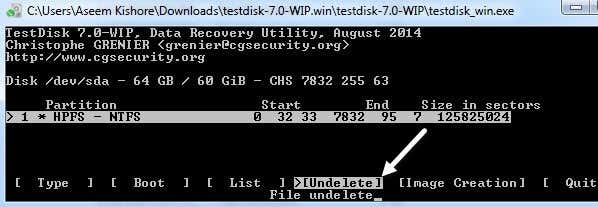
Finally, choose Advanced to get to the advanced file tools. Make sure you use the right arrow key to move to Undelete and then press Enter.
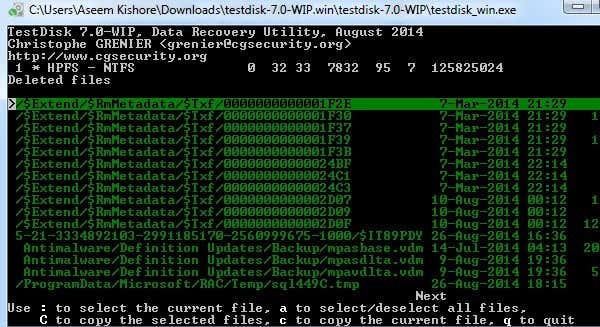
After a little bit, you will get a list of all the files that were found. You can either select individual files using the : or you can press A to select all files. When selected, the text will turn green. Then press C to copy the files.
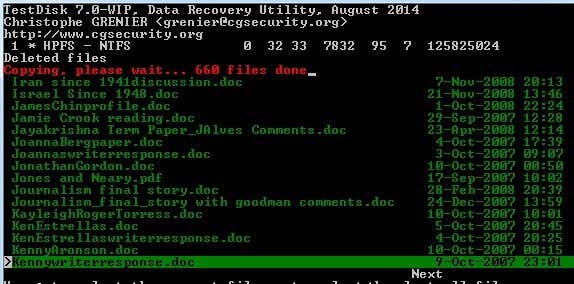
Notice that if you have multiple files selected, you need to press uppercase C and not lowercase c. I didn’t realize this at first and kept only getting one file and couldn’t figure out why! Lastly, it will ask you for a destination, so make sure to choose a location off the disk with the deleted files.
If you managed to get through all that, you should see a red line at the top telling you how many files have been copied. Once completed, you should hopefully have some or all of your data recovered. So those are three really good programs you can use to recover files deleted on your PC. The main things to understand are time is of the essence, don’t use the computer at all, don’t install the recovery software on the same drive as the deleted files and don’t recover the files to the same drive. If you have any questions, let us know in the comments. Enjoy! The post How to Recover Accidentally Deleted Files appeared first on Online Tech Tips. |


| You are subscribed to email updates from Online Tech Tips To stop receiving these emails, you may unsubscribe now. | Email delivery powered by Google |
| Google Inc., 20 West Kinzie, Chicago IL USA 60610 | |
0 commentaires:
Enregistrer un commentaire