

Computer Tips From A Computer Guy |
| How to Create, Mount, and Burn ISO Image Files for Free Posted: 28 Aug 2014 01:47 PM PDT Most online tutorials that I have found describing the process of creating, burning, and mounting ISO image files are written separately or are only about doing one process, so this guide is going to describe some free software that you can use to create and manipulate ISO images files for all purposes. Basically, the software is split into three categories: software to create an ISO image file from a folder on the hard disk or from a CD/DVD, software to burn an image file to a CD/DVD and software to mount an image file as a drive in Windows. How to Create an ISO Image FileThere are two free software applications that are very lightweight and get the job done quickly when it comes to creating ISO images: Folder2ISO and ImgBurn.
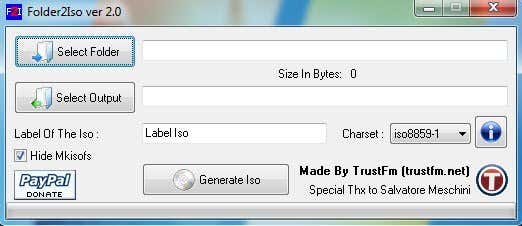
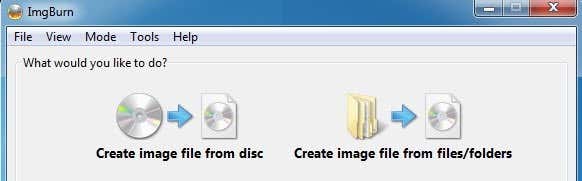
Folder2ISO can be used to burn a folder to a CD or DVD. Actually, Folder2ISO takes your folder and creates an ISO image file first, then you can burn that ISO image file to a CD or DVD. You might be wondering what is the point of creating an ISO image of a folder and it’s really only useful when you’ve used a program like DVD Decrypter to extract the contents of the DVD onto your computer. Usually, you’ll see two folders under the movie folder called VIDEO_TS and AUDIO_TS. To use Folder2ISO, simply click Select Folder and choose the folder you want converted into an ISO image. Then click Select Output and choose the destination folder. Finally, type a name for your ISO image file in the label box. Click Generate ISO and your file is created! In addition to creating an ISO image from a folder, you can create ISO images from CDs or DVDs that you might have laying around. You can use ImgBurn for handling this case. Once you install it and run it, you’ll see a couple of options, two of which are Create image file from disc and Create image file from files/folders. So as you can see, ImgBurn can also handle what Folder2ISO does by itself.
So what’s the purpose of creating an image file from a CD or DVD you ask? Well, it’s great for backup purposes in case you lose your original CDs or DVDs. Basically, you can mount the image as a virtual drive on your computer at a later point and run anything off the CD just as if it were the actual CD itself. So if you buy Photoshop and create an image file, later on if you lose the CD, you can burn the image file to another CD and it’ll work exactly the same as the original CD or you can mount it and run the install straight from the ISO file. How to Burn an ISO Image FileWell, if you ran ImgBurn, you probably realized it can do a lot more than just create ISO image files! It can also burn images files too!
Once you have created your image file from the method above, just pop in a CD or DVD and choose Write image file to disc.
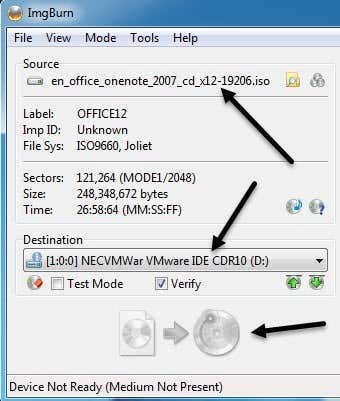
Go ahead and select the ISO image for the source and choose your CD/DVD drive as the destination. You’ll need to have a disc inserted in order for the burning button at the bottom to not be grayed out. That’s pretty much it for burning ISO images! How to Mount an ISO image File in WindowsFinally, if you have downloaded an ISO image file or if you have created one from a CD or DVD, to actually use it on your computer, you have to mount it. Mounting an ISO image simply means creating a virtual CD/DVD ROM drive that Windows will then access just like the physical CD/DVD drive. There are also two free ways you can go about doing this: one program is a small utility from Microsoft called Microsoft Virtual CD-ROM Control Panel and the other is Virtual Clone Drive. I would suggest just using Virtual Clone Drive because the Microsoft tool is about 13 years old now and it doesn’t even work on 64-bit operating systems, just 32-bit. Plus, the instructions for installing it are a pain, but if you really want something from Microsoft, it still exists!
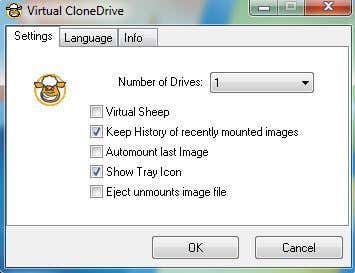
Once you download the program, you can read the instructions to install it. It’s not as easy to use as Virtual Clone Drive, but it’s very small and works well. You just have to make sure you run the VCdControlTool.exe file as an administrator. However, if you want something a little easier to use, check out Virtual Clone Drive. Once you install it and run it, you’ll get a very simple interface with a few options:
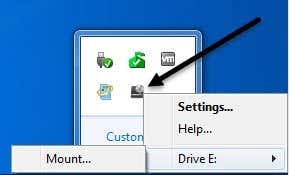
Basically, you choose how many virtual drives you want and then go down to the taskbar and right-click on the tray icon.
It will automatically pick the next free drive letter and show that in the options. Click on the drive letter and then click on Mount. Choose your ISO image and you’re all set. You should also know that in Windows 8, you no longer need any third-party software for mounting ISO images because support is now built-in. You can read my post on how to mount ISO images in Windows 8 for full instructions. The post How to Create, Mount, and Burn ISO Image Files for Free appeared first on Online Tech Tips. |
| How to Disable Settings, Services, and Programs in Windows 7/8.1 Posted: 28 Aug 2014 12:43 PM PDT Even though most people never change the settings on their computers, there are some situations where it’s very useful to be able to turn off or disable a certain program, service, or setting in Windows 7 or Windows 8. For example, over the last few years working as an IT Professional, there have been many occasions where it has been proven very useful to disable the firewall in Windows, to disable the popup blocker in IE or to disable the autorun/autoplay feature for the CD/DVD drive. Disabling items such as regedit, task manager, hardware devices, cookies, etc should only be performed if there are other people who use your computer and you want to prevent them from accessing system settings. Disabling items such as System Restore, MSN Messenger, and startup programs can help save computer resources. However, disabling System Restore without knowing what it is used for and not having another backup, would not be a good idea. So only disable items if you are sure you want to disable them! Disable Windows FirewallYou can turn off the Windows Firewall in Windows 7/8.1 by navigating to the Control Panel and opening the Windows Firewall dialog. In Windows 8, you need to right-click on the fake Start button and then choose Control Panel. Now you will see a link on the left that says Turn Windows Firewall On or Off.
You’ll notice immediately that there are settings to turn the firewall on and off for both public and private networks. This is really useful because you can turn off the firewall on a private secure network like your home network, but make sure that whenever you connect to a public network like free Wi-Fi at the airport, the firewall will remain on and protect your computer.
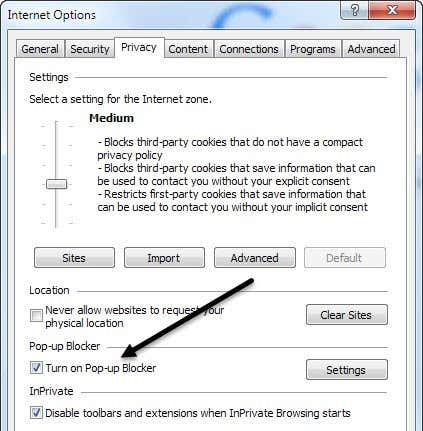
Again, you should always keep the firewall on for both networks, but this is assuming you know what you are doing and you want to turn it off for a specific reason. Disable Popup Blocker in IESometimes IE will block a legitimate popup or you might have another third-party popup blocker application that you want to use instead of IE, so you can disable it by clicking on the Settings icon at the top right that looks like a small gear.
Click on the Privacy tab and uncheck the Turn on Pop-up Blocker box.
If you simply want to allow a few sites that you know are safe, but still block the rest, you can click on the Settings button and add in the websites that you want to always allow popups from.
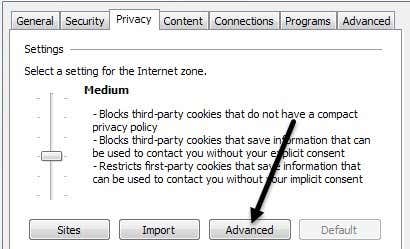
Disable Cookies in IECookies are small files that are stored on your computer by web sites such as Yahoo, Google, Amazon, etc that store your preferences for services that you can personalize, such as color theme or items on your home page. Some sites will use cookies for statistics, demographics and identifying purposes. You can disable cookies by going to Internet Options and the Privacy tab again like shown above. This time you will click on the Advanced button under the Settings header at the top.
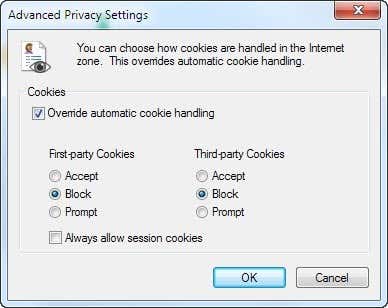
Finally, check the Override automatic cookie handling option and choose either Accept, Block, or Prompt for First-party cookies and Third-party cookies. First-party cookies are created by the web site you are currently visiting and third-party cookies are set by a different site than the one you are visiting.
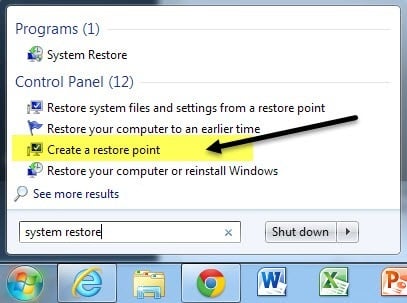
Disable HibernationOn my laptop running Windows 8, I haven’t used the hibernate function even once, so I was happy to disable the feature and recover some precious hard disk space. To disable hibernation in Windows 7 and Windows 8, you can run a command at the command prompt to delete the hibernation file. Check out my previous post on disabling hibernation in Windows for the full guide. Disable System RestoreSystem Restore is a built-in feature of Windows that allows you to take snapshots of the operating system at specific moments in time, such as before you install a new driver or application. If something goes wrong and the computer blue screens, etc, you can go to System Restore and restore the operating system to a previous point when it was still working. If you want to disable it, first click on the Start button, type in System Restore and then click on Create a restore point.
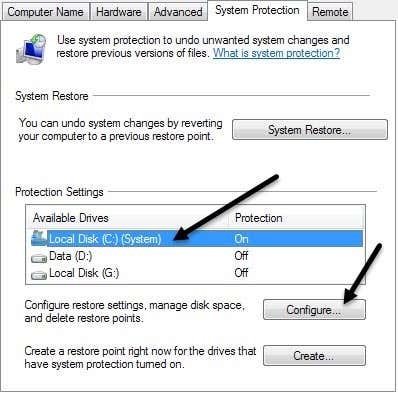
Next, click on the disk you want to disable System Restore on and then click the Configure button. . Personally, the best way is to keep System Restore turned on for your C drive (or whichever drive has Windows installed on it) and to turn it off for all of the other drives or partitions.
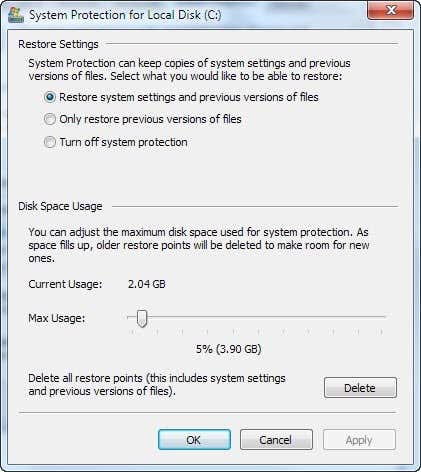
In the Restore Settings section, you can choose the Turn off system protection radio button to disable system restore.
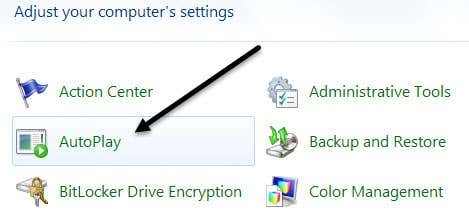
You can also adjust the amount of space used on the drive for system restore and delete all the restore points on the system if you like. Disable Autorun/Autoplay for CD/DVD drivesI usually like to keep the autorun feature turned off because I find it very annoying when it automatically pops up asking me what I want to do with a CD that I might just want to access via a different program, etc. Also, you never know what kind of virus could be on a CD someone burned, which will then be executed automatically since autorun is turned on. You can disable autorun by going to the Control Panel and clicking on the AutoPlay icon.
You will see a whole slew of settings here that you can adjust. You have two options: either turn of AutoPlay completely by unchecking the Use AutoPlay for all media and devices box at the top or adjust the settings for the particular device or media you want to turn it off for.
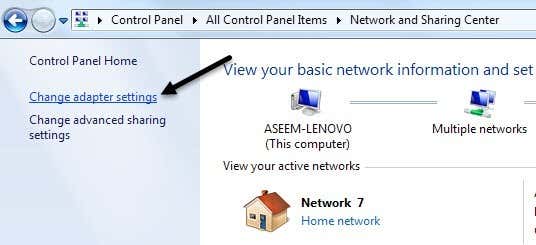
Disable Wireless connectionSometimes disabling your wireless connection can be useful if you’re at work with a laptop and are plugged into a wired network. If you’re already connected and your wireless network keeps trying to connect too, it can cause problems and be annoying. You can disable your wireless connection in Windows by going to the Control Panel and clicking on Network and Sharing Center. Then click on the Change adapter settings link in the left menu.
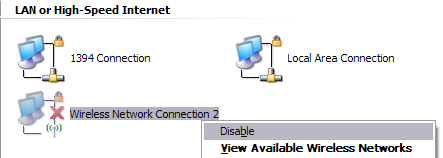
You’ll see several connections possibly called Wireless Network Connection or Local Area Connection. Just right-click on the adapter and choose Disable.
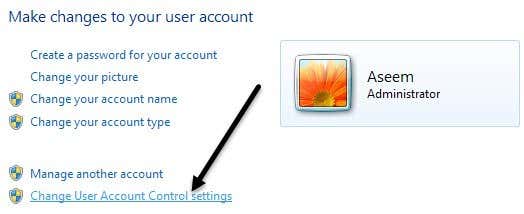
Disable User Account ControlIn Windows, User Account Control is a built-in security feature that helps prevent unauthorized or rogue programs from running on your system without your permission. If you want to disable UAC in Windows 7, you just open Control Panel, click on User Accounts and then click on Change User Account Control Settings.
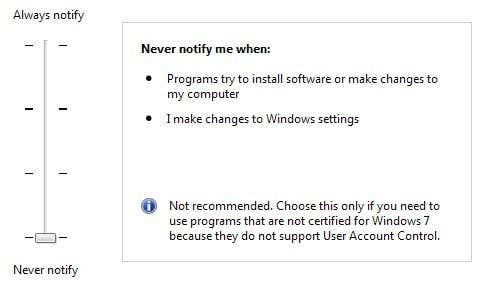
Move the slider bar down to Never Notify and you’re good to go.
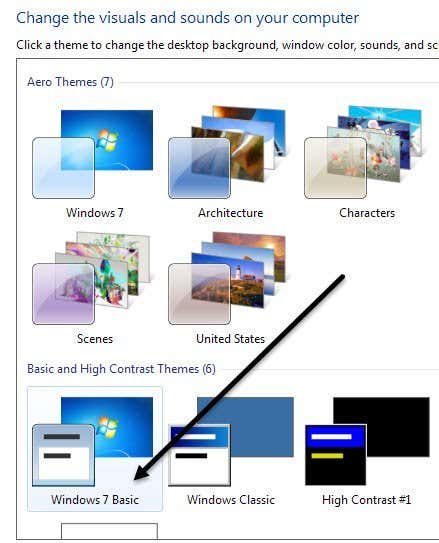
In Windows 8, things are a bit different. Setting UAC to Never notify doesn’t actually disable UAC completely. Read my post on how UAC works in Windows 8 to learn how to disable it properly. Disable Aero ThemeYou can disable the Aero theme in Windows 7 and Windows 8 very easily by right-clicking on the desktop and choosing Personalize. Here you will see the Aero themes and then towards the bottom you will see the basic themes, even the classic Windows theme, which will make your computer look like Windows 2000 again.
So those are just some of the major features of Windows that you can disable in Windows. There are a lot more things you can disable, but the ones above are the features my clients ask me to disable the most often on their computers. If you need to disable something else in Windows, post a comment and let me know. Enjoy! The post How to Disable Settings, Services, and Programs in Windows 7/8.1 appeared first on Online Tech Tips. |

![microsoft virtual cdrom[6]](http://www.online-tech-tips.com/wp-content/uploads/2007/09/microsoft-virtual-cdrom6.png)


| You are subscribed to email updates from Online Tech Tips To stop receiving these emails, you may unsubscribe now. | Email delivery powered by Google |
| Google Inc., 20 West Kinzie, Chicago IL USA 60610 | |
0 commentaires:
Enregistrer un commentaire