

Computer Tips From A Computer Guy |
| Remove Desktop Background Wallpapers in Windows Posted: 21 Mar 2015 12:54 PM PDT Looking for a way to delete desktop wallpapers from your Windows PC? If you have ever changed the wallpaper in Windows, you've probably noticed the ridiculous number of useless wallpapers that come with the system by default. I have NEVER used any of the built-in wallpapers and therefore wanted to figure out a way to delete them permanently! This is probably a useless endeavor for most people, but if you are into customizing your machine to the max, then this might be worth your time. If you right-click on the desktop, choose Personalize, and click on Desktop Background at the bottom you’ll see all the default wallpapers that are included in the system listed there. In Windows 7, you have categories like Architecture, Characters, etc.
In Windows 8, you have more annoying categories like Flowers and Lines and colors. Again, I really would rather all of these wallpapers not show up.
Windows 10 has another set of newly created wallpapers that will be shipping when it’s released this summer. Luckily, deleting the wallpapers is as easy as navigating to the correct folder and deleting everything there. How to Remove Desktop WallpapersIn Windows XP, there are a few locations where these annoying wallpapers are stored. In Windows 7, Windows 8 and Windows 10, the wallpapers are all stored in just one location. The main place to look in every version of Windows is:
In that folder you will see the default wallpapers installed on the system. In Windows XP, you’ll see some JPG and BMP images, the most famous being Bliss.bmp, which is the default desktop background for that operating system.
In Windows 7 and higher, you might find a couple of folders and those are the categories that I was mentioning above.
Now you can simply delete all the images in this folder and they will be removed from the desktop background dialog the next time you open it. If you think you may actually want to use the wallpapers later, you can just cut them and paste them into a temp folder. Copy them back later on to have them show up in the list again. One problem that you might run into when trying to delete wallpapers in Windows 7, 8 or 10 is an error message saying that you first need permission from TrustedInstaller.
This is a major annoyance in later versions of Windows and it’s meant to prevent non-technical people from messing up the system by deleting important system files. In order to delete the files or folders, you will have to change the owner to yourself first and then give yourself Full Control permissions. Thankfully, I’ve already written a detailed article on how to delete files protected by TrustedInstaller. If you want to add your own wallpapers into the C:\Windows\Web\Wallpaper directory, you can do so, but you will have to follow the same procedure and reset the permissions on the Wallpaper directory. Once you do that, you can copy over any image files you want in JPG format and they should show up in the desktop background dialog.
As you can see, I also created a folder inside the Wallpaper folder called My Wallpapers. Instead of the default wallpapers included with Windows, you can add a bunch of your own favorites. You can obviously add pictures from anywhere by simply clicking the Browse button and navigating to that folder, but the point here is to customize the look of the dialog so that it shows your custom wallpapers instead of the default ones. As a side note, Windows XP also has a bunch of wallpapers stored in the C:\Windows directory. Make sure to be careful here because there are also many important files stored in the Windows directory and you don’t want to accidentally delete them. Note that you only want to delete the .BMP files, so leave everything else alone. I would suggest viewing the directory in Thumbnails mode and then slowly browsing and deleting the wallpapers as you see them.
So that’s how you can remove background wallpapers from Windows if you like. It’s not something most people would care to do, but if you’re someone like me who likes to tinker, then it’s fun little experiment. If you have any questions, post a comment. Enjoy! The post Remove Desktop Background Wallpapers in Windows appeared first on Online Tech Tips. |
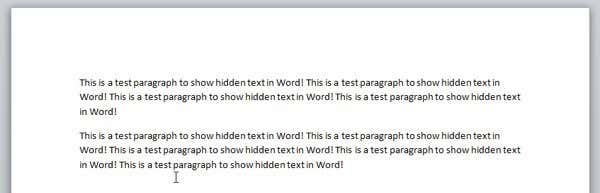
| Hide Text and Show Hidden Text in Word Posted: 21 Mar 2015 08:27 AM PDT Microsoft Word has a feature whereby you can hide text so that it does not visibly appear in the document. If you don’t want to delete text completely, hiding the text is a good option. So why would you ever want to hide text in a Word document? Well, one reason would be if you wanted to print out two different versions of the same document, but didn’t want to create two separate files. In this case, you could hide some text, print the file and then print the document again, but choose to print hidden text in the printing options dialog. In this article I will show you how to hide text in Word, how to view hidden text, and how to hide text and how to make it so that someone else can’t edit the hidden text. Note that you can hide text in Office for Mac in the exact same way as shown below. Hide Text in Word 2007, 2010, 2013First open any document you might have that has a fair amount of text in it. Here is an example document I am using for illustrative purposes.
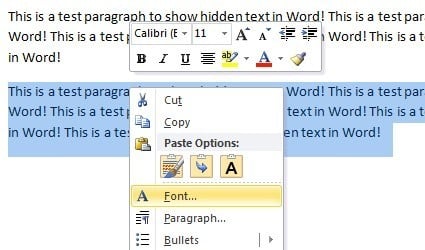
Highlight the text that you would like to hide and then right-click on it and choose Font.
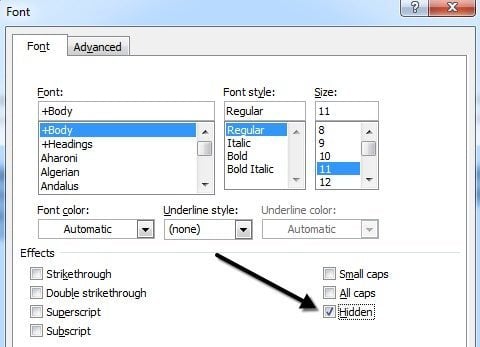
In the Font dialog box, you’ll see the Hidden checkbox in the Effects section. Go ahead and check that box.
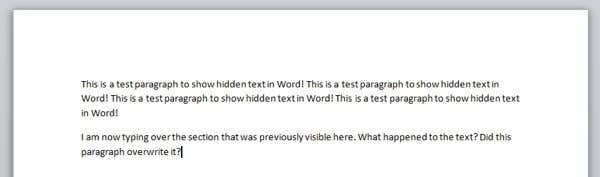
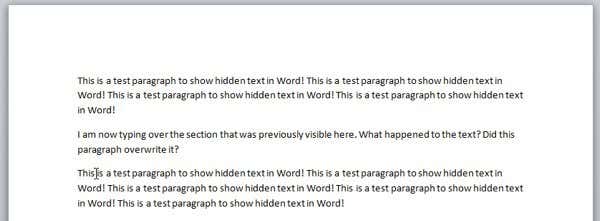
Click OK and POOF, your text is now gone! All I am left with is one paragraph with no sign of the other paragraph. The paragraph still exists and there are some interesting questions that arise now that it’s hidden.
The first question that popped into my mind was what happens if I start typing in the blank area that held the text earlier? Well, I went ahead and tested it out by typing another paragraph where the hidden text was previously.
So what happened? Well, I’ll explain that in the next section when I talk about viewing hidden text in Word. View Hidden Text in WordOk, so how do we go about getting the hidden text back to show up again the document? We basically follow the same procedure that when we hid the text. Press CTRL + A to highlight everything in the document, right-click on any highlighted portion and choose Font again. This time you will see the Hidden checkbox does not have a checkmark in it, but is instead fully green.
This means that some of the text selected is hidden and some is visible. Clicking on it once will change it into a checkmark, which means all the text in the document will be hidden and clicking on it again will remove the checkmark, meaning no text in the document should be hidden.
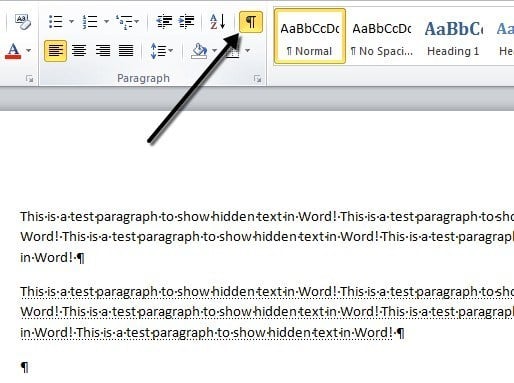
The hidden text is now visible, but as you can see, it’s in a slightly different location. It’s now located under the paragraph that I had typed when the text was hidden. So instead of being overwritten, it simply gets pushed down. If you want the text to remain in a certain place, you can click on the Show/Hide Paragraph Marks button and it will show you the hidden text with a special dotted underline.
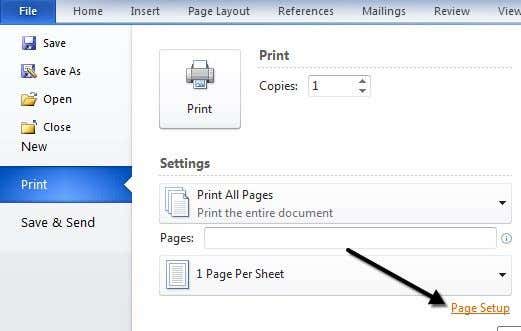
You can then start a new paragraph in the location you want and then click the button to hide the text again. Now that you know how to hide and show hidden text, let’s talk about how to print it. Printing Hidden Text in WordPrinting hidden text in Word requires heading into the options section of the Print dialog. When you go to File and then Print, click on Page Setup at the bottom.
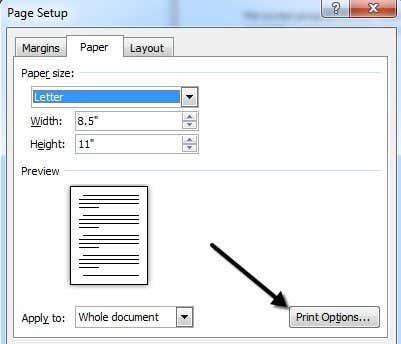
In the Page Setup dialog, click on the Paper tab and then click on Print Options.
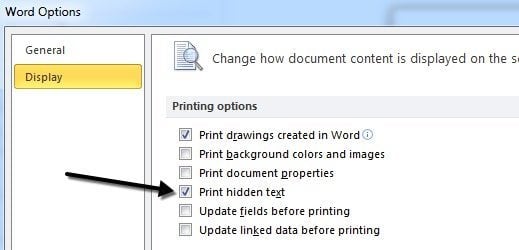
This will bring up the Word Options dialog box with the Display tab already selected. Here you will see a Print hidden text box under Printing Options.
You can also get to this dialog by clicking on File, then Options and then clicking on the Display tab. This setting is global, so you’ll have to go back and uncheck it later on if you don’t want to print hidden text for a different document. So now that we know how to hide and show text, maybe you also want to prevent others from editing the hidden text? Well that is also possible as I show below. Protect Word DocumentUnfortunately, there is no way to completely hide hidden text in Word. If you send a document to someone that has hidden text, they will be able to view it if they know any of the procedures shown above. You can, however, prevent anyone from editing the text. Protecting the document will prevent anyone from making any changes to any text. It will allow users to view the document, but not make any changes. Click on the Review tab and click on Protect Document or Restrict Editing depending on your version of Office.
Check the Limit formatting to a selection of styles box and click on the Settings button.
In the Formatting Restrictions dialog, check the box again and click on None to make sure nothing can be changed in terms of formatting and style.
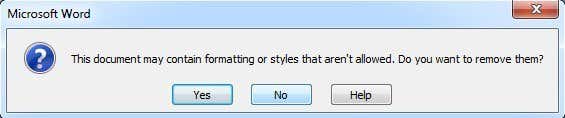
Click OK and you’ll get a pop up message asking if you want to remove some formatting styles that aren’t allowed. Make sure to click NO. If you click Yes, it will remove the hidden attribute from the hidden text and it will become visible again.
Next, check the box Allow only this type of editing in the document and leave it as No Changes (Read only).
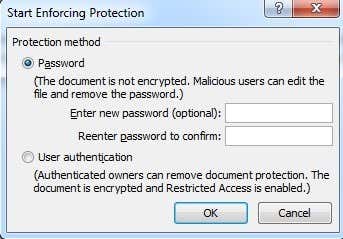
Under Exceptions, you can leave everything unchecked. Finally, click on the Yes, Start Enforcing Protection button and enter a password to protect the Word document. Try to make the password more than 8 characters, especially if you are using an earlier version of Office.
Even though others can view the hidden text, none of the text in the document can be edited. If you need the text completely hidden, you would actually have to remove it from the document. If you have any questions, feel free to post a comment. Enjoy! The post Hide Text and Show Hidden Text in Word appeared first on Online Tech Tips. |


| You are subscribed to email updates from Online Tech Tips To stop receiving these emails, you may unsubscribe now. | Email delivery powered by Google |
| Google Inc., 1600 Amphitheatre Parkway, Mountain View, CA 94043, United States | |
0 commentaires:
Enregistrer un commentaire