

Computer Tips From A Computer Guy |
| Ultimate Guide to Repairing a Damaged or Corrupt Word File Posted: 29 Mar 2015 03:36 AM PDT Need to repair or fix a corrupt Word document? Sometimes when opening a Word document, you will give you an error stating that the document cannot be read because it is corrupt or because there is some other problem with the file. Word documents can become corrupt in a number of different ways, but usually it’s just a problem with the headers in the file and the data can be recovered most of the time. Here is a typical error message you might see when Word can’t open a document.
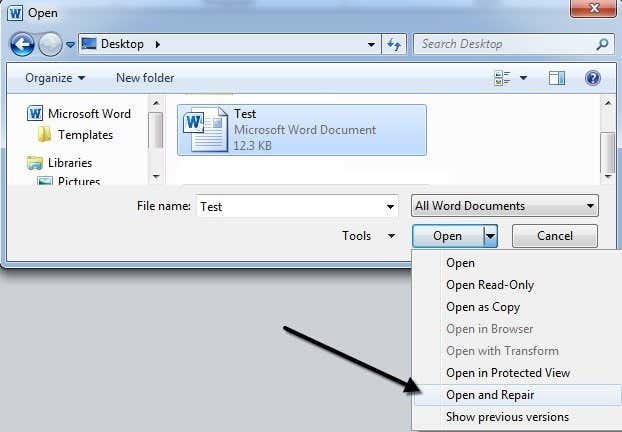
By default, Word shows you two possible ways to open a corrupt document: Open and Repair the file or open with Text Recovery converter. In addition to these two options, there are other tricks you can try inside Word to open a corrupt file. You should definitely try all of these options before moving on to third party tools, etc. For testing purposes, I intentionally corrupted a Word document and then tried to repair it using all the different tools and methods mentioned below. I’ll point out the results for each recovery option. Unfortunately, there aren’t very many free ways to recover a Word document, as you’ll probably be able to tell when you perform a Google search. I’ll make sure to mention all the free options I could find before mentioning paid software. Built-in Recovery OptionsBoth of the built-in repair options mentioned above can be accessed via the File Open dialog. Click on File, then Open and then single click on the file you want to repair. Do not double-click on it, otherwise Windows will try to open it normally and you’ll just get an error message.
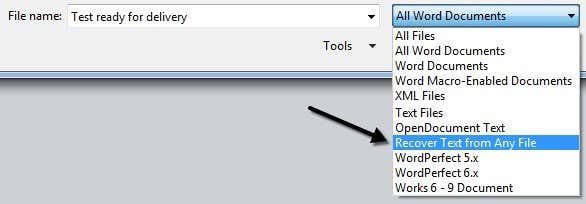
Now instead of clicking on the Open button, click on the black arrow that is located on the right side of the button. You’ll see a bunch of extra options, one of them being Open and Repair. Word will attempt to repair the corrupt document and if you’re lucky, you’ll be able to view the file. In my simple test, Word was able to recovery my file completely, though it only contained about two pages of plain text. Always try this option first as it does a pretty good job and doesn’t require any additional software. The second built-in feature is the recovery converter, which you can also access via the Open dialog. In the drop down box that says All Word Documents, go ahead and choose Recover Text from Any File.
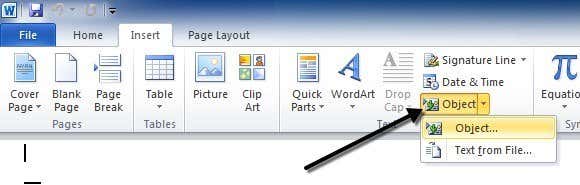
Word will attempt to recover any text it can from the file. In my test case, it failed and only returned a message stating that the file appears to be corrupt. Depending on the type of corruption that your file has suffered, your results will vary. If neither of these two methods worked, you can try to insert the corrupt document into another Word doc. To do this, open a new file and then click on the Insert tab.
Click on Object and then click on Object again from the dropdown. Click on the Create from File tab and then click the Browse button. Choose your corrupt Word file and see if it is able to insert the contents into the new document.
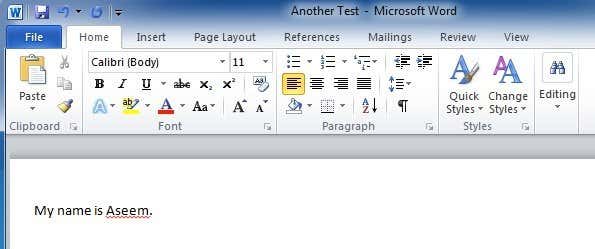
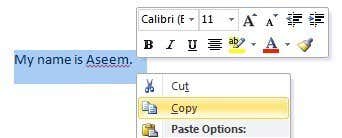
In my test, Word could not insert the document into the current file. Instead, I got some strange error message stating that the program used to create the file was Word, but Word was not installed on my system! Again, your results will vary, so give it a shot, but don’t expect much. Open File via LinkThis method is a bit convoluted, but it might work for you depending on the type of damage your document has sustained. Basically, we create a document, type any text into it, copy that text, then paste special that text to a new document as a link and finally update that link to point to the corrupt file rather than the original file. Whew! Let’s start. First, open a new Word doc and type in anything like “My name is John.” and then save the document somewhere.
Now select the text you just typed and copy it to the clipboard. You can select it and press CTRL + C or just right click on it and choose Copy.
Next, create a new Word document by going to File and then New. Choose blank document if asked. Now click on the small arrow on the Paste button and choose Paste Special.
Here you have to select Paste link and then choose either Formatted Text (RTF) or Unformatted Text. It doesn’t matter which one you pick. If you get any kind of error message when trying to paste the link, go ahead and close the new document, recopy the text and then create a new document again.
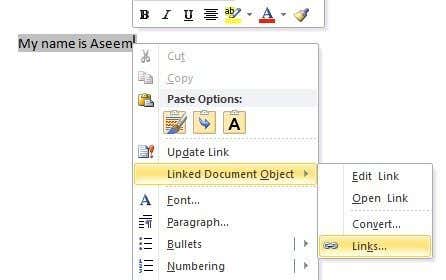
We’re getting close to the end now. Right-click on the pasted link text, select Linked Document Object and then select Links.
Click the Change Source button here and navigate to the directory where your corrupted file is located. Select the file and then click Open.
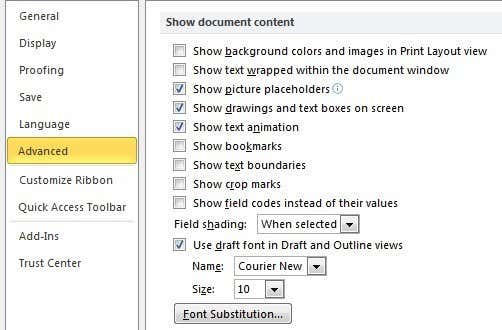
Once the link source has been updated, click OK and hopefully the text from the corrupt document will appear instead of the text you had copied earlier. In my case, I got an error message and could not open my corrupt file. However, my test file was corrupted in several ways and that could have been the reason the text was not recovered. You should still give it a try. Open in Draft ModeAnother thing you can try is opening the file in Draft mode, which doesn’t look at some of the header info, etc and therefore might be able to open the file. To do this, click on File and then Options. Click on Advanced and then scroll down to the Show document content section.
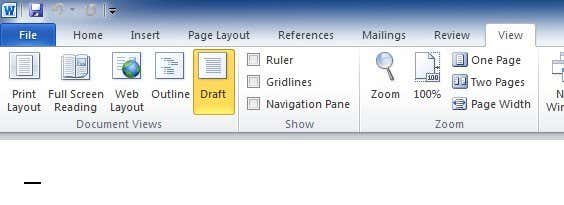
Go ahead and check the Show picture placeholders box and the Use draft font in Draft and Outline views box. Now go back to Word, click on View and then click on Draft under the Document Views section.
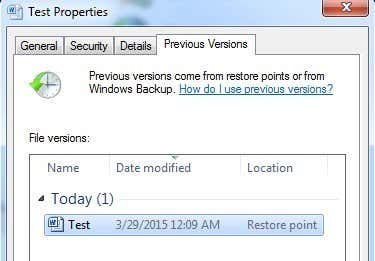
Now try to open your corrupt file and see if it opens. If not, you’ll have to keep reading for other possible methods to fix the corruption. Previous VersionsAnother option that might help you recover your Word document is Previous Versions. In Windows 7 and higher, System Restore will automatically make backups of your documents whenever a new restore point is created. This means that System Restore has to be enabled, which it is by default. If you manually turned it off, you won’t be able to recover any data using this feature. If it’s enabled, Windows automatically creates restore points fairly frequently, usually at least once a day. You can check to see if there are any backed up versions of the file by simply right-clicking on it, choosing Properties and then clicking on the Previous Versions tab. If you don’t see the tab, then System Restore is not turned on.
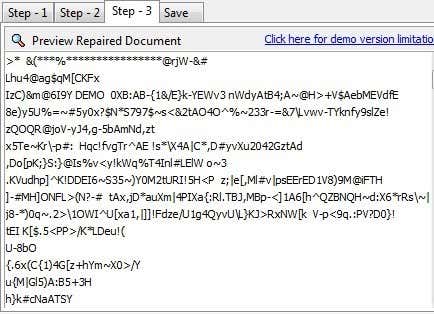
Any previously saved versions will show up in the list box below. Obviously, you will lose any data that was added after the last backup was created and before the corruption occurred, but it’s still better than nothing. Third-Party Recovery ToolsWhen using third-party tools, I’ll only mention the ones that have free demos because no one wants to shell out cash only to find out nothing can be recovered. The demos usually let you see a portion of the text and will tell you if it was able to recover everything else. At that point, you can choose to pay if you feel the program will get your the results you want. You also want to make sure you make a copy of the corrupt file before you start using recovery tools. One program may end up corrupting the file more and a second program that may have been able to recover the original corrupt file might not be able too due to the changes the first program made. Repair My WordIf you have a Word file created from an older version of Word, you can use Repair My Word to repair the file for free. It’s one of the few freeware apps out there and there’s a big reason for that. Unfortunately, it only works with Word 6.0, Word 95, Word 97, Word 2000, Word XP and Word 2003. It won’t work with the new docx file format used in Word 2007 and higher.
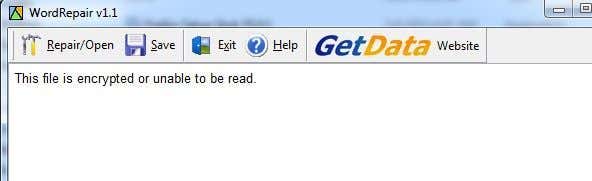
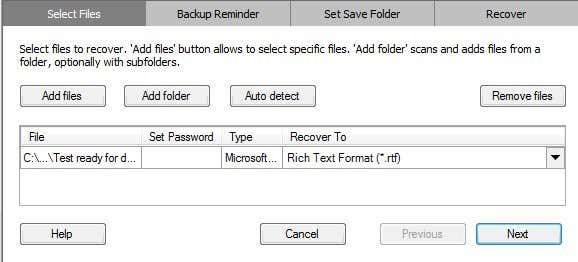
I created a Word 2003 document, corrupted it and then tried to recover it using the WordRepair program, but I only got a message stating the file was encrypted and unable to be read. The file was not encrypted, but I’m guessing the problem was caused by the fact that I used Office 2010 to save the file in Office 2003 format. Even so, if you have a corrupt file in .DOC format, go ahead and give this program a shot since it’s free and it’s been around for a long time. Recovery for WordRecovery for Word costs $69, which is pretty steep, but works only all versions of Word from 95 to 2010. The demo will also recover a small portion of the file to help you decide whether to pay that much. Once you install it, click on Start Recovery Wizard and then click Add Files.
Click Next and the program will remind you to backup the file before you try to recover it. Click Next and choose a location where you want to save the file. Lastly, click Start to begin the recovery process.
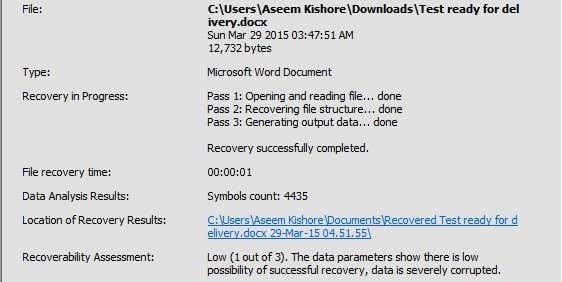
The program also gives you an assessment score from 1 to 3, the former being the least likely and the latter having the most chance of recovering data. In my case, I had a 1 out of 3 and my file was completely unreadable. This was good to know because I wouldn’t have to spend $70 to find that out later. DocRepairDocRepair costs $79 and works from Word 95 to Word 2010. It’s also fairly costly, but again, you can download the demo and check the preview to see whether any data can be recovered. Once you install it and run it, click Browse and find the corrupt file. Click Next and don’t check any of the advanced options yet.
Click Next and the program will start to repair your document. Once it completes, it will show you a preview of any content it was able to retrieve. The demo version will replace recovered words with the word demo, so you have to pay to show the actual words. If nothing shows up in the preview window or if something is missing, go back to Step 2 and check the Use salvage content retrieval mode box.
It will find more content, but it will also create more garbage characters. In my test, this program couldn’t recover anything from my corrupt file either. Kernel for WordKernel for Word is only $49, so a bit cheaper than the other programs. Again, the demo version will attempt to recover some data from your file as proof that it actually works.
Once you install it, just click Add Files and then click Repair Files. It will ask you for a location to save the recovered files and then begin the recovery process. Again, this program failed when trying to recover text from my corrupt file. To be fair, my file was purposely corrupted to the max. I wanted to test whether any program would be able to recover a severely damaged file. The answer was pretty much no, but hopefully your Word doc is nowhere near as messed up as mine. There are also a bunch of other paid programs out there you can try, just make sure to download the trial or demo before purchasing. Good luck! The post Ultimate Guide to Repairing a Damaged or Corrupt Word File appeared first on Online Tech Tips. |
| Posted: 28 Mar 2015 11:09 AM PDT Are you looking for a way to track changes made to an Excel spreadsheet? There are many cases where you have to distribute a file to multiple people and keep track of what changes were made. You might want to track when the change was made, who made the change, what cell the change occurred in and what data was changed. Excel has built-in tracking features that can handle all of the above cases. You can easily review all of the changes directly on the worksheet and you can also accept or reject each change. There are a few points to remember about the tracking features of Excel: 1. Turning on tracking does not mean that you can revert the spreadsheet back in time to a previous state by undoing the changes. It’s basically a log file that records everything and that’s it. You can manually go and see what data was deleted or added, but you’ll have to make the changes to the spreadsheet yourself. 2. Turning on tracking doesn’t mean every single change you make will be recorded. Any data stored in a cell is tracked, but other changes like formatting are not. Other changes that are not tracked include hiding/unhiding rows and columns, comments, and cell values that change to due a formula recalculation. 3. Change history is only kept for 30 days by default. If you make changes to an Excel worksheet and then open the workbook again 45 days later, then you’ll be able to see the change history for all 45 days until you close the workbook. When you close it, any change history older than 30 days will be gone. That means the next time you open it, you won’t be able to see that change you had made 45 days earlier. 4. Whenever your turn on tracking, the workbook becomes a shared workbook. This means that multiple users will be making changes to the document. Now that you know some basics of how tracking works in Excel, let’s talk about how to enable it, change settings and keep track of changes! Enabling TrackingLet’s go ahead and turn on tracking first. Open Excel and click on the Review tab on the ribbon. At the far right, you should see an option called Track Changes under the Changes section.
Click the button and choose Highlight Changes. You’ll get a dialog box where you now need to check off the option "Track changes while editing. This also shares your workbook".
You have several options here including When, Who, and Where. For When, All means every change will be highlighted. You also have the option of highlighting changes from the last time you saved the document, since a specific date, or changes that have not yet been reviewed. If you check Who, you can choose to track changes made by anyone or changes made by everyone except you. The Where option allows you to track changes only for a specific portion of the spreadsheet. Just click the button at the right and select the range of cells you want to keep track of. Finally, you can un-check the Highlight changes on screen option if you do not want others to know you are tracking changes. By default, once you start tracking and this option is selected, any changed cell will show a small arrow at the top left to indicate it was changed.
Also, if you click on a changed cell (with Highlight changes on screen turned on), you’ll get a little popup window showing what the value was changed from and changed to and at what time. If you deselect the Highlight changes on screen option, that little black triangle won’t show up.
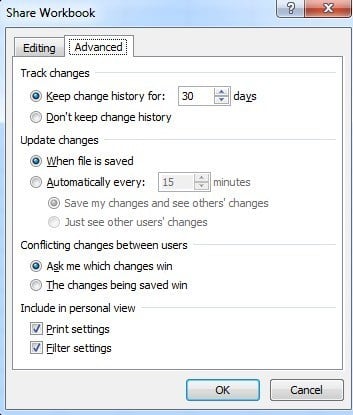
So what you can do, for example, is hide the changes on the screen by not checking the box, send out your file to everyone who has to make changes to it, and when you get it back, just go to Track Changes and recheck the box. Configure TrackingThe next step is to take a look at the settings for tracking and adjust them to fit your needs. To do this, click on the Share Workbook button that is directly to the left of the Track Changes button. Click on the Advanced tab when the Share Workbook dialog pops up.
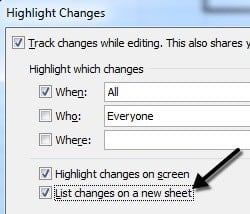
Here you can change the number of days for keeping change history to something other than 30 days. By default, changes are updated when the file is saved, but you can make it so that it is automatically done every few minutes. Lastly, you can choose how you want to deal with conflicts: either by being asked or simply letting the last change when saving the file win. Viewing ChangesOnce you have enabled tracking and made a few changes, you can click on the Track Changes button again, click on Highlight Changes and you’ll notice that the List changes on a new sheet box is no longer grayed out.
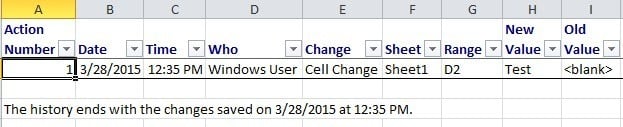
Check that and click OK. A new worksheet called History will be added that will let you view all the changes that have been made to that workbook.
At some point you’ll need to either approve or reject the changes. You can review all the changes and then pick and choose which ones you want to keep or discard. Simply click on Track Changes again and choose Accept/Reject Changes. Select the options to choose which changes you want to accept or reject. If you want to review all changes, just leave When checked and make sure it is set to Not Reviewed. Click OK and Excel will begin to show you each change that was made and give you the option to Accept or Reject. You can also Accept All or Reject All changes if you like.
If you reject a change, it will immediately revert back to what was originally in that cell. It’s worth noting that if another cell references the contents of the rejected cell, then that value will also change when the referenced cell value reverts back. This can cause formulas to break, etc, so be careful. That's it! Now you can track any changes made to your Excel spreadsheet easily by using this built-in feature. If you have any questions, post a comment. Enjoy! The post How to Track Changes in Excel appeared first on Online Tech Tips. |


| You are subscribed to email updates from Online Tech Tips To stop receiving these emails, you may unsubscribe now. | Email delivery powered by Google |
| Google Inc., 1600 Amphitheatre Parkway, Mountain View, CA 94043, United States | |
0 commentaires:
Enregistrer un commentaire