

Computer Tips From A Computer Guy |
| How to Print a List of Files in a Windows Directory Posted: 01 Jan 2015 02:04 AM PST Recently, I had to send a friend a list of all the files and folders in a particular directory on my computer and it took me some time to figure out the best way to go about it. After playing around with various methods, I was able to create a nice looking Excel spreadsheet with all the data on the files and folders plus additional info like the size of files, last modified date, etc. In this article I’m going to mention the two main ways to generate a directory listing: using the command line or using a third-party program. If your needs are very simple, the command line method is the easiest and doesn’t require any additional tools. If you need a more fancy report, then check out the freeware utilities. Command LineSo let’s start with the command line method first since it’s easy and will probably be enough for 90% of the people reading this article. To get started, open Explorer and browse to the folder directory above the folder that you want to get the directory listing for. If you want to print out the file and folder listing for C:\Test\MyTestFolder, then navigate to C:\Test, press the SHIFT key and then right-click on the MyTestFolder. Go ahead and select Open command window here from the menu.
At the command prompt, you have to type a very simple command: dir >filename.txt The dir command generates a list of files and folders in the current directory and the right angle bracket says that the output should be sent to a file rather than onto the screen. The file will be created in the current folder and if you open it using Notepad, it’ll look like this:
By default, the command will give you the last modified date/time, the size of the files, the list of directories and the actual file names. If you want different information, you can add parameters to the command. For example, if you don’t want all that extra information, you can print just the names of the files and folders using the following command: dir /b >filename.txt In the above examples, you’ll notice there is a folder called Word Stuff, but the output doesn’t list any of the files inside that directory. If you want to get a listing of all files and folders including subdirectories of the current directory, then you would use this command: dir /b /s >filename.txt Note that you can also get rid of /b if you want the full directory and subdirectory listing with the extra data on size, etc. Here is the output of dir /s >filename.txt below.
The dir command has a bunch of other command line parameters which I won’t mention here, but you can check out a full list of them on Microsoft’s website. Using the extra parameters, you can also show file attributes (hidden, compressed, etc), show file ownership and more. You can then import the data into Excel and choose tab-delimited so that the data will be separated into individual columns rather than being bunched into one. Third-Party FreewareDirectory List & PrintOne of the best utilities for printing directory listings is Directory List & Print. When you download it, you’ll notice that some of the features are disabled. That’s because the free version doesn’t include all the options that are included in the Pro version. To unlock everything, you’ll have to pay $20. However, unless you really need to print out directory listings on a daily basis, the free version will be more than enough for just about anybody. Once you install it, you have to first choose the directory that you want to print out. You can also choose from a list of favorites on the right hand side.
Note that at this point, you should see the output previewed in the bottom text window of the program. I really like this because you can play around with the different options and see the results updated instantly. Now click on the second tab named Selection.
By default, Provide subdirectories and Provide files are checked. This means it’ll print out the list of files in the current directory and will include any folders also in the current directory. It will not list out the files that are in subdirectories. If you want to do that, you have to check the Run through subdirectories box at the bottom. As you can see, you can include the creation date, modified date, file size, path, etc in the free version, but if you want file owner, file attributes, etc, you’ll need to unlock the software. In the example below, I checked Show file size and Run through subdirectories to get this output:
I’m going to skip the third tab (Filter) because it’s completely disabled in the free version. The paid version has some pretty advanced filtering options, but really only needed if you have thousands or millions of files. On the Output tab, you can choose where you want to export the listing out to.
You can print it, copy to clipboard, or export out to Word and Excel. To be annoying, they disabled copy to Notepad and export to file in the free version. The Action tab is also completely disabled so won’t go into it here. Overall, the free version of the program does a great job and more than enough to get a complete and thorough listing of a directory. Karen’s Directory PrinterKaren’s Directory Printer is pretty old (2009), but still does a great job of exporting out directory listings. It doesn’t have as many options as Directory List & Print Pro, but compared to the free version, it’s quite close.
You have to pick from the Print tab or the Save to Disk tab first. Both are exactly the same, one just prints to a printer and the other saves the output to disk. Probably didn’t need two separate tabs for that, but it’s an old program. Pick your folder and choose whether you want to print file names only, folder names only, or both. You can also tell it to search sub folders and print them out also. In addition, you can include or exclude system, hidden and read-only files. Clicking on the Show Network checkbox will allow you to see all network drives and shares and print out their structures too! This is great for office networks that have folder shares on servers. You can also sort by file name, file extension, file size, date created, date modified and more. You can also put a file filter so that only certain types of files are printed, such as images only, sound files, executables, documents, etc.
Finally, you can choose from a large number of attributes that you want to include in your file print list. By default, it has a couple of items checked that I don’t care about like attributes, date last accessed, etc. Just uncheck them and make sure to click on the Folder Info tab and do the same there.
When saving the file to disk, the program inserts a bunch of useless comments, which can thankfully be removed by checking the Omit COMMENT Lines box. You can also get rid of the column that shows whether the row is a file or folder by checking the second box.
Finally, one other great feature of the program is that it adds an option to your Explorer context menu so that you can simply right-click on any folder and choose “Print with DirPrn“.
There really isn’t much else to the software than what I have shown above. It runs fine on Windows 7 and Windows 8, so that’s great. So those are all the different ways you can generate a directory listing for free with as much or as little information as needed. If you have any questions, post a comment. Enjoy! The post How to Print a List of Files in a Windows Directory appeared first on Online Tech Tips. |
| Add Google Maps Driving Directions to Your Website Posted: 31 Dec 2014 05:15 AM PST Even though there are so many mapping apps and services out there to get you from point A to point B, the definitive king of maps is Google Maps. I use it on my computer, tablet and 90% of the time on my smartphone. It’s got the best data, the most navigation and routing options and cool features like Street View and walking, biking and mass transit info. But what if you need to use a map or directions outside of Google’s website? Suppose you have your own wedding website or a personal blog and guests could visit your site, type in the address they will be coming from and automatically get directions to the event location! Well, there are a couple of ways you can go about accomplishing this. The easiest way is to simply embed the map onto your webpage using the embed code generated by Google Maps. The second way is a bit more technical, but more customizable and dynamic. I’ll mention both methods below. Embed Google MapIf you only want to display directions from one location to another, the easiest thing to do is to embed whatever map you are viewing using the embed code. First, go ahead and setup whatever directions you want in Google Maps and then click on the gear icon at the bottom right of the page.
Click on Share or embed map and then click on the Embed map tab. Here you can pick a size for your map and then copy the iframe code and drop that onto any webpage you like.
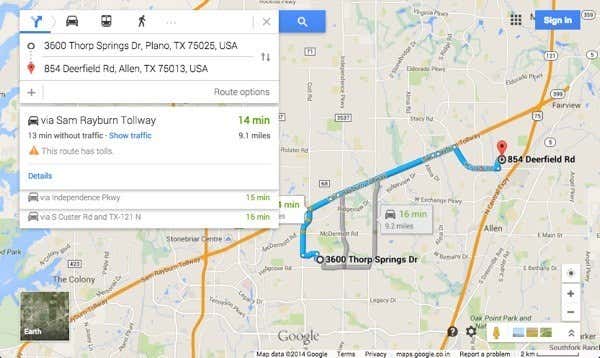
The only downside to this method is that the user just sees a static map. In the second method below, you can create a form whereby the user can type in any starting address and it will generate a map from that address to a destination address of your choosing. Create Google Maps FormTo illustrate what I mean by the second method, go ahead and type a US address in the box below to get directions from your location to my house: Cool huh? You can easily create this little form on any website, blog, or anywhere you can put in some HTML code! This is also great for small business web sites as you can throw it up on your contact page and people can get directions quickly, rather than having to copy your address, open a new window, and then type in their starting address. So how do we go about creating this modified get directions box? Well first, we’ll need to get the correct syntax for the URL that Google uses for directions. Luckily, we can figure that out by getting directions between two places and then just copying the URL from the address bar. You can also click on the tiny gear icon at the very bottom right of the page and choose Share or embed map.
The Share link tab will contain the URL, which is the same URL in your browser address bar. I ‘ve gone ahead and pasted the entire URL below just to show you what it looks like.
Yikes! That’s pretty long! There’s a lot of stuff in there, most of which doesn’t make any sense! Google Maps URL parameters used to be very straightforward and easy, but the new URL structure is quite complicated. Thankfully, you can still use the old parameters and Google will convert them into the new version automatically. To see what I mean, check out the link below. http://maps.google.com/maps?saddr=start&daddr=end Go ahead and give it a shot. Put in an address in quotes for the starting and ending address and paste the URL into your browser! I replaced start with my home city New Orleans and end with Houston, TX, so this is what my Google Maps directions URL looks like: http://maps.google.com/maps?saddr=”new orleans, la”&daddr=”houston, tx” It works! As you can see, though, Google Maps converts the links into something far more complicated once the map fully loads. Ok, so now that we have a sane URL that we can pass into Google Maps, we need to create a simple form with two fields, one for the starting address and one for the destination address. If you want people to just type in their address and get directions to your place, then we’ll want the second field to be hidden and already set to the destination address. <form action=”http://maps.google.com/maps” method=”get” target=”_blank”> Check out the code above. The first line starts out form and says that when the submit button is clicked, the data should be sent to maps.google.com/maps. The target=blank means that we want the result to open in a new window. Then we have a text box for the starting address, which is blank. The second text box is hidden and the value is the destination address that we desire. Finally, there is a submit button with the title “Get Directions”. Now when someone types in their address, they’ll get this:
You can customize the directions and map even more with a few extra parameters. For example, let’s say you don’t want the default view to be maps, but instead want it to be Satellite and show Traffic. Notice the layer=t and t=h fields in the URL. layer=t is for the traffic layer and t=h means hybrid map! t can also be set to m for normal map, k for satellite and p for terrain. z is the zoom level and you can change it from 1 to 20. In the above URL, it’s set to 7. Just tack those on to your final URL and you’ve now got a highly customized Google Maps Get Directions form on your site! Have any issues with this, post a comment and I’ll try to help! Enjoy! The post Add Google Maps Driving Directions to Your Website appeared first on Online Tech Tips. |


| You are subscribed to email updates from Online Tech Tips To stop receiving these emails, you may unsubscribe now. | Email delivery powered by Google |
| Google Inc., 1600 Amphitheatre Parkway, Mountain View, CA 94043, United States | |
0 commentaires:
Enregistrer un commentaire