

Computer Tips From A Computer Guy |
| How to Record Cassette Tapes to PC/Computer Posted: 01 Dec 2014 12:21 AM PST So you have a bunch of old audio cassettes that you want to copy or transfer to your computer? There are many gadgets and programs out there that you can buy which will make the process as simple as possible, however, since I’m a techie and my blog is all about easy to understand computer tips, I’m going to try and teach you how you can transfer audio cassettes to your computer for free! I’ll also mention a couple of those gadgets at the end for those of you who don’t have the time or patience do follow the instructions below. Using Audacity to for Audio TransferWhat you’ll need before you can copy cassettes to your computer or PC: 1. Audacity – Free recording and editing software
2. Cassette Tape Deck with RCA output jacks or tape player with 3.5mm mini-plug (hopefully you already have this if you own a lot of cassettes)
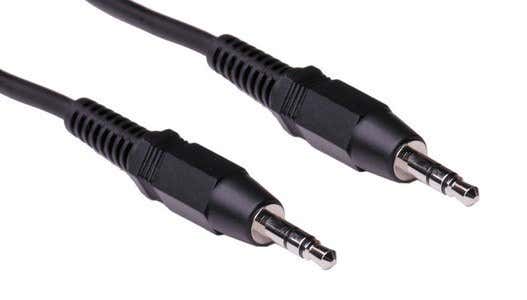
3. Stereo RCA cable with mini-jack connector or mini-male to stereo mini-male cable
4. Sound card with line-in jack (usually in blue)
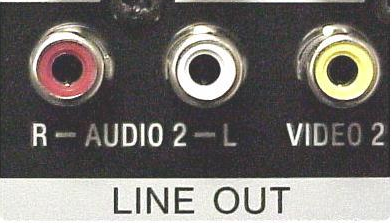
Step 1: Connect tape deck to computerThe first thing you’ll need to do in order to record the audio from a cassette tape is to connect the tape deck or tap player to the computer itself. You’re going to need the Stereo RCA cable with mini-jack or the mini-male to mini-male cable for this step. Go ahead and connect the male RCA side of the cable (red and white) into the female RCA connectors on the tape deck. Make sure that the RCA jacks on the tape deck say “Line Out” or “Audio Out“.
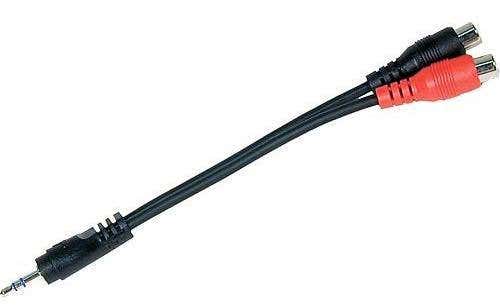
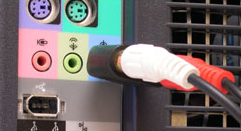
Now it’s time to connect the other end of the cable to your computer. If you’re using the RCA cable with mini-jack connector on the other end, then simply plug it into the female Line-In jack on the back of your computer (the blue one out of the three). However, if you have an RCA cable that has red and white RCA connectors on both ends, you’ll need to buy a mini-male to 2 RCA female adapter as shown below.
However, if you’re going to be buying this, you may as well buy a cable with the mini-jack already on the other end! Using an adapter may cause a loss of audio quality.
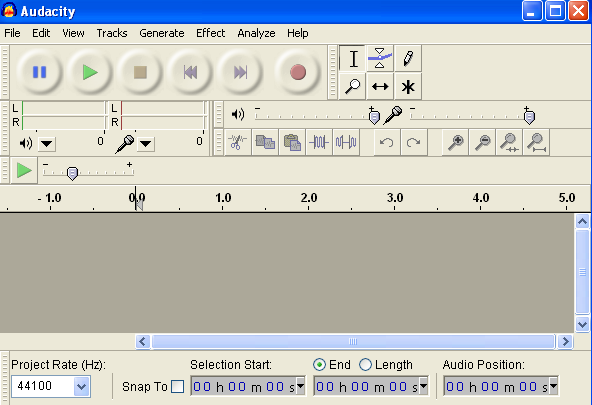
If you’re using a desktop PC, it should be color coded, which makes it much easier to figure out where to connect it to. Basically, it’s the blue colored jack that is your Line In. Step 2: Record audio from cassette tape using AudacityNow that you have your cassette tape deck connected to the computer, we can use the open-source audio recording and editing software Audacity to capture the audio. Firstly, open Audacity and click on Edit and then Preferences way at the bottom. If it’s not already there, click on Audio I/O in the left hand menu. This is where you can select the Input Source that you want to record sound from. You should see a section heading called Recording and under that a drop down menu called Device.
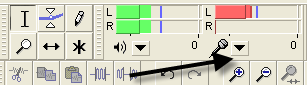
Make sure that you do NOT pick Microsoft SoundMapper if you’re on a Windows machine. It should be something similar to what you see above or something like “Line-In:Realtek HD Device“, etc. You can try all of the options in the drop down until you actually get the sound to record, one of them will work. Now you simply need to adjust the volume for your recording by clicking on the downward pointing arrow on the right hand (red) VU recording level meters.
Now click on Monitor Input or Start Monitoring. Now when you begin recording by clicking the Record button, if you see the sound is going too far to the right (red bars), then you can adjust the input volume level by dragging the slider to the left in the Mixer Toolbar (which is slightly lower and to the left of the recording levels meters.
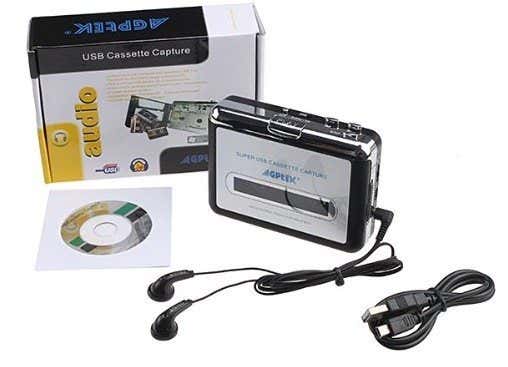
When you are finished recording, go ahead and click the Stop button (yellow color) and go to File and choose Save Project As. This is will save it as a Audacity project so that you can come back and edit it later. To export the final edited version of your recording to MP3 or WAV format, click on File and choose Export As. You can then take these MP3s and burn them to CD or import then into iTunes. You can choose between WAV, AIFF, OGG, FLAC, and MP2 format for exporting. Remember you can always pause the recording at any time if there are parts of the cassette tape you don’t want transferred to your computer. Otherwise, you should now a digital version of your audio cassettes! Other Methods to Transfer Audio CassettesIf you don’t mind throwing down some cash, there are a couple of handy gadgets you can purchase to make the transfer process a lot easier. USB Cassette PlayerMy favorite and your cheapest option is the USB Cassette Player like the one from Amazon shown below for $22. You just plug the thing into your computer’s USB port and use the accompanying software to record the audio into MP3 format.
Tape Deck with CD RecorderThe more expensive option is to purchase a tape deck like I have shown in the tutorial above, but instead buy one that includes a built-in CD recorder. A normal tape deck will cost you anywhere from $50 to $150 whereas the tape deck with CD recorder option will set you back anywhere from $200 to $350.
Teac is a popular brand and has one model that lets you play and record directory on the device itself. It’s a bit expensive at $335, but possibly worth it if you have hundreds of cassettes you want to convert to digital format. Hopefully, this is enough information to get your cassettes into digital format without a lot of trouble. If you have a question, post a comment! Enjoy! The post How to Record Cassette Tapes to PC/Computer appeared first on Online Tech Tips. |
| How to Remove Your Name from Search Engines Posted: 30 Nov 2014 10:12 PM PST Looking for a way to remove your name from Google? Have you tried to Google your own name lately? Anything inappropriate or damaging come up that you would rather not appear in the first page for everyone to see? Googling my own name brings up a lot of results, mostly all related to my online blogging profession. Luck for me, there’s nothing bad out there on me yet! The main issue with the Internet is that you may have never done anything outrageous in your life, but someone else could easily defame or slander you without you even knowing it! Either way, there are a couple of things that you can try to do to remove your name from the search engines, but none of them have any guarantees.
To start, there are literally four ways to remove bad press from Google and other search engines if there is already something out there ranking well:
Method 1 – Contact Site OwnerBefore you try anything else, you should definitely try to contact the site owner to see if they can have the information removed. You can find out the contact information for any website by looking it up in the WHOIS database. Here are three tools that might get you an email address or contact number for the registered person of the site: http://www.networksolutions.com/whois/index.jsp http://www.internic.net/whois.html Some websites have private registration, which means you will see the contact information for a proxy company rather than for the individual. You should still go ahead and send an email as it is usually just forwarded to the site owner. Method 2 – Contact Hosting CompanyIf someone is out to get you, they probably won’t respond to your requests to take down the content, so your next step is to try and contact the hosting company. I’ve had quite a few hosting companies take down content on my DCMA requests, mostly due to copyright violations. Your name probably won’t be cause enough for a DCMA request, but if the information that is posted about you is hateful or defaming or slanderous, you can pretty much guarantee that the site is violating the terms of service for that hosting company. Most hosting companies are very helpful when it comes with spammers or abuse violations. Even if they can’t take down the content, they will usually send a warning email to the site owner about your issue. You can easily find out who is hosting a website by reading my previous post. If you’re unlucky and find out the hosting company is sketchy and won’t help you, then you’ll have to skip this step and try another. Method 3 – Get a Court OrderIf the content is illegal and the person refuses to take it down, your only option other than Method 5 is to contact a lawyer and sue or get a court order to have the content removed. Usually this isn’t as hard or expensive as it sounds. I’ve seen several occasions where the person simply got a lawyer to draft up an official letter of intent to sue if the content was not removed immediately and that was enough to scare the other party into listening.
If someone doesn’t respond to that, then you would have to get a court order, which would take more time and money. Your chances of this working go down significantly if the person or hosting company resides in another country than where you reside. Trying to get a court order in another country could prove it be very difficult, if not impossible. Method 4 – Right to be ForgottenIf you happen to live in the EU or Argentina, then you have another tool at your disposal. The Right to be Forgotten concept basically was created so that people could ask search engines to remove specific results for searches of their name if the person’s privacy rights outweigh the interests of the content in those search results. In order to request a removal, you simply have to fill out a form that Google provides. However, this isn’t a surefire way to remove whatever you want from search results. Google looks at each request carefully and make the final decision on whether to remove it or not. According to Google, they have only approved about half of all removal requests. Also, stuff like criminal convictions, malpractice lawsuits, public misconduct, financial scams, etc will probably not be removed using this tool. Method 5 – Outrank Bad ResultsThe last step would then be to try to bury the bad results as far down in the search results as possible. Most people don’t look past the first page of results when performing searches, but if someone is trying to find information about you specifically, they may go several pages deep. You’ll basically have to create as many good results as you can and hope they show up higher. There are a couple of websites, services, tools, etc that you can use to accomplish this. First, let’s talk about what you can do yourself. Ways to Create Good Search ResultsNormally when searching a name in Google, you’ll see a lot of results for social networking sites. The first plan of actions should be to create accounts on all the major social sites like Facebook, Google Plus, Twitter, YouTube, Instagram, Vine, Linkedin, PinInterest, FourSquare, Meetup, etc, etc. It’s also worth noting that you really have to actively use these services for Google to show the results higher. Don’t expect blank profiles with your name to show up high in the results. There are also many other sites that you could try out to get your name to show up higher. For example, if you search my name “Aseem Kishore”, you’ll see I show up for GitHub, Quora profile, SEOmoz profile, Amazon.com profile, Klout, etc. Wherever you can create a profile, create one and try to add content to it! Remember all of these methods will take weeks possibly months to actually work. You won’t be able to just create a few profiles and have them suddenly appear in Google! It takes times and patience. Another way to do this is to search other people’s names and see what sites they show up for and then go sign up on those yourself. Finally, if none of that works, you can actually use some paid services that will remove your name from search engines for various prices. Most of them at least honestly state that it’s going to take 4 to 6 months to truly have all the bad stuff pushed further down in the rankings. Anyone touting instant removal or anything like that is a fake because it’s impossible to remove information from search engines permanently! Services to Remove Your Name from Search ResultsIf you don’t have the time to do all this legwork yourself or it’s not working as well as you would like, then it might be worth spending the money and having a professional team of people create and publish the content for you. It’s probably easier for them to create content that will rank higher faster anyway since they have systems setup already to do this regularly.
BrandYourself.com – An interesting website with a free DIY tool, a cheaper HeadStart package and a more expensive concierge service. The HeadStart package costs $800 initial and then $20/month to maintain and includes creation of all your profiles and even custom websites with custom domains. The concierge service is simply $400 a month and includes everything from HeadStart, but also includes monthly creation of new content for you on all the sites. Reputation.com – Will basically create positive content around your name using various techniques to rank higher than negative results. Pricing varies depending on your needs; starts at around $3000 and goes up to $15,000. RemoveYourName.com – Uses the technique described above of pushing down bad or unwanted results. Pricing also varies on the package that you get. Note that there really is no way to COMPLETELY erase information that is already indexed by the search engines because not only do they keep cached copies of the pages, but there are also services out there that go through all of the web pages on the Internet and create copies of them at specific times. So even if you were to get a site to remove some bad content and have it removed from the Google index, someone could always go to Internet Archive and view a past version of the page. In conclusion, getting search results removed or pushed down is a fairly hard process with absolutely no guarantees of success. Your best bet is to put continuous effort for an extended period of time. If you have any questions, post a comment. Enjoy! The post How to Remove Your Name from Search Engines appeared first on Online Tech Tips. |


![input volume[6]](http://www.online-tech-tips.com/wp-content/uploads/2008/03/input-volume6.png)


| You are subscribed to email updates from Online Tech Tips To stop receiving these emails, you may unsubscribe now. | Email delivery powered by Google |
| Google Inc., 1600 Amphitheatre Parkway, Mountain View, CA 94043, United States | |
0 commentaires:
Enregistrer un commentaire