

Computer Tips From A Computer Guy |
- Copy Large Files Over the Network Faster with TeraCopy
- How to Change Folder Icon Color in Windows
- 4 Free Tools to Remove Duplicate Files and Photos
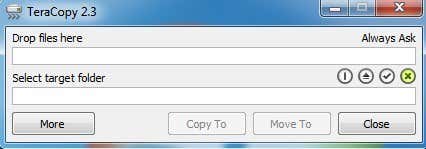
| Copy Large Files Over the Network Faster with TeraCopy Posted: 03 Dec 2014 01:05 AM PST With large iTunes libraries, huge photo collections, and massive video files taking up more and more space on our cheaper and cheaper disk drives, we can all use some better file copy tools than Windows provides out of the box. The freeware TeraCopy makes copying large files over a network faster than using the default Windows copy feature. What does TeraCopy do that Windows Explorer doesn't? Well, have you ever started to copy a large number of files and find out later on that it stopped in the middle of the copy because of one corrupt file? Or what if the network connection dies in the middle of the copy and you want to resume from where you left off? TeraCopy can take care of those types of situations. Here’s a quick breakdown: Pause and resume file copy - If you need to pause the copy process for any reason, TeraCopy lets you do it with one click. Click again to resume the copy! Error recovery, continue file copy - TeraCopy can continue to copy files when one file has an issue like already existing in the target directory or not being readable due to corruption. TeraCopy can be set to handle these scenarios with one of several options and can continue copying the rest of the files. After everything is completed, you can fix the issues and recopy only the problem files. Check target file accuracy - TeraCopy can run a check on the copied files against the source files to verify the accuracy and integrity of the copy. Fast file copying - TeraCopy claims its technology can reduce copy times using dynamically adjusted buffers and asynchronous copying. Shell Integration - TeraCopy also integrates into Explorer in two ways: you can right-click and choose TeraCopy from the menu or you can simply perform any copy operation normally and a popup window will appear asking if you want to use Windows copy or TeraCopy to perform the operation. Now let’s go through the different ways you an use TeraCopy. Firstly, you can just run it by double-clicking on the desktop or Start Menu icon. This will bring up the main GUI interface, which is pretty streamlined and to the point.
To start, you just drop and drop the files you want to copy onto the program window. Once you do that, click on the Select target folder text and then click on Browse to choose the target location. You can also click the Copy To or Move To buttons to choose a target folder.
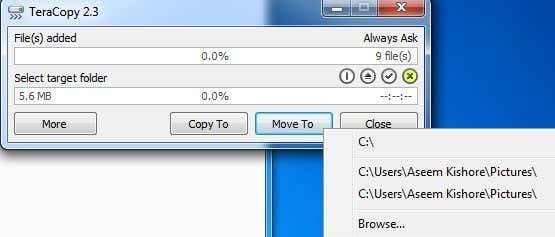
The current version of TeraCopy (2.3) will not let you do anything until it fully calculates the size of all the files added, which means it can take some time for large directories. The next version (3.0) coming in the beginning of 2015 will fix this issue and start the copying immediately. You can now click the More button to see the full list of files.
Once you choose a target folder to copy or move to, the process starts immediately and you’ll see the results in the listbox. If a file was copied or moved properly, you’ll see the green checkmark on the left. You can also click the Verify button after the copy process is complete to check the integrity of the file after the copy.
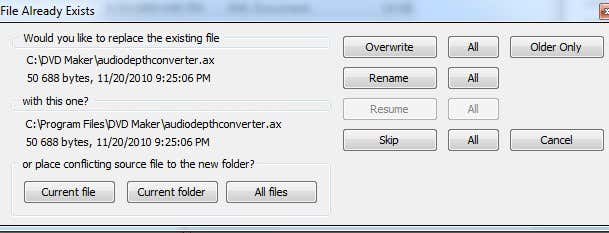
At the top, you’ll see a quick summary of processed files, errors or skipped files. The only time you’ll get a popup dialog is when the file already exists in the target directory and you have to manually decide what to do. It doesn’t make much sense for the computer to decide, as it doesn’t have any idea about your files.
The dialog is a bit complicated, so I’ll explain it here. The buttons on the bottom are only for moving files to a new folder. If you click Current file, it will only move the current file to another folder and you’ll get another popup if the problems comes up again with another file. If you click Current folder, it will move any files in the current folder that it is copying to a new folder if the file already exists. When it starts copying another folder, the dialog will pop up again. If you click All files, then it will simply move any file in the copy process to a new folder when the file already exists. The buttons on the right hand side will keep the files in the same folder as the original directory, but either overwrite them or rename them. Clicking Overwrite will simply overwrite one file and clicking All will overwrite all instances where the dialog would normally pop up. Clicking Rename will rename just one of the files with a different name and clicking All will do it for all files. You can also choose to skip, which will not copy the file. If you go to Explorer and perform a normal copy or move operation using CTRL + C, CTRL + V or via the right-click menu, you’ll get a popup dialog asking which copier you want to use.
If you uncheck the Show this dialog next time box, then it will remember what you have chosen and use that copier the next time. When using TeraCopy in this way, it will load the interface will the source and target already filled in and should start copying automatically. The only annoying thing that I noticed was that UAC (User Account Control) kept popping up and I had to allow the application each time I wanted to perform a copy operation. Check out my previous post on understanding UAC in Windows and how to disable it. You can also check out this post that explains how you can bypass UAC for a single application. In my own tests, TeraCopy was faster copying many smaller files over the network and was about the same speed as Windows when copying fewer very large files. Either way, the fact that you can pause and resume a transfer, recover from errors and have it integrated right into the shell is worth using it over Explorer. Enjoy! The post Copy Large Files Over the Network Faster with TeraCopy appeared first on Online Tech Tips. |
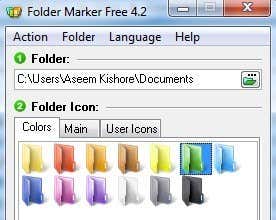
| How to Change Folder Icon Color in Windows Posted: 02 Dec 2014 08:55 PM PST Are you a very organized person who likes to color-code all of your folders at work or at home? If you’re into visually organizing your paperwork, then you might also be excited to know that you can do the same thing for all of your digital folders too! Imagine being able to change the icon color for folders so that your financial folder can be green (like money) and your tasks folder can be red (urgent maybe?). Well there are two nifty little programs out there, one free and the other paid, that you can use to easily change the color of any folder on your computer. You can also use them to change the folder icon to represent the state of that folder, for example if you have a folder with private data, you can change the icon to have a small lock appear. Folder MarkerThe first program is Folder Marker and once installed, you can markup folders in two ways. Firstly, you can simply launch the application, choose the folder you want to mark, and then pick the icon you want to replace for that folder. If you want to color code more than one folder at a time, click on Folder in the nav bar and then check Multiple Folders.
You can choose from the Colors tab, the Main tab and User Icons. The Main tab basically has a set of icons corresponding to a various states like upload, download, private files, notes, etc.
If you already have icons that you like or that you have created yourself, you can actually click on the User Icons tab and add them to Folder Marker. You can then mark folders with the custom icons. Read my previous post on converting images into icon format that you can then use with Folder Marker. You can also find more icons by extracting them from the executable files of programs installed on your computer. Also, if you click on Action, you’ll see a couple of useful options. Firstly, you can always select a folder and choose Restore Default Icon for Chosen Folder(s) to revert back to whatever the original icon happened to be. Secondly, you can change the actual default system icon for a folder to something else so that all normal folders will use that new icon by default rather than the default Windows folder icon. You can also restore the default system folder icon easily. If everything is a mess, you can click Rollback All Changes and everything you’ve done will be cleared.
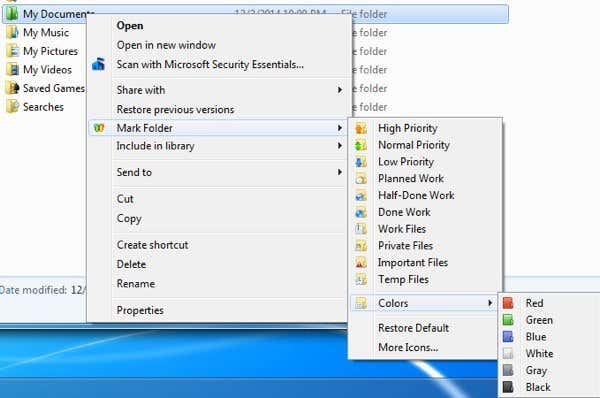
The second way you can mark folders with these special icons is by simply right-clicking on them and navigating to the Mark Folder menu! If this program didn’t have the option in the right-click context menu for changing the folder icon, I would not have recommended it, because having it makes it so much easier to use.
And that’s it! You can now organize your folders in Windows in a visually appealing and recognizable way! Check out my My Documents folder after color coding and using some of the preset icons in the program.
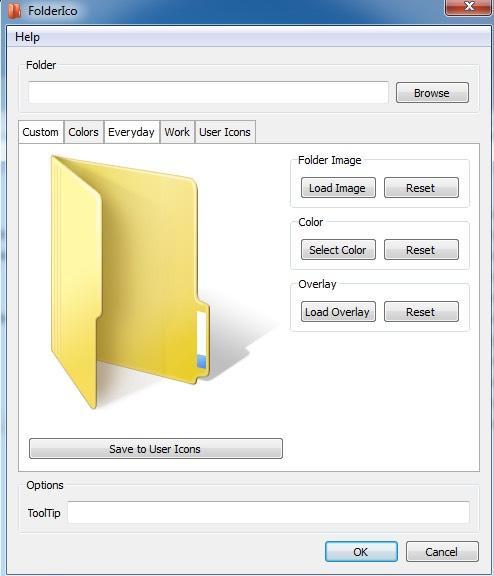
Now I can easily see which are my secure folders, my important folders, my work folders, and so on! Overall, Folder Marker is a great and free way to organize your folders in Windows by color coding them or changing the folder icon. The free version was fine for me, but they also have two paid versions, for $25 and $35, that include more icon sets and have a few extra features like the ability to select all subfolders, etc. FolderIcoAnother good program for changing the folder icon colors in Windows is FolderIco. It’s actually got more icons and better ones than Folder Marker, but I mention it last because it’s not free. You can download and play around with the trial version, but once it expires, you’ll have to pay $10 for a license. It’s not a bad price, but if you can manage with Folder Marker, then there really is no reason to buy this program. Once you install it, you can adjust the folder icons in the same way as Folder Marker: either use the main program interface or use the right-click context menu.
You select the folder and then choose your custom icon by clicking on one of the tabs. You can pick from colors, a couple of predefined icons or choose a custom icon on the User Icons tab. This program also lets you change the tooltip for a folder, which is a nice little feature. Secondly, you can pick an overlay also for the icon. So those are two options for changing the colors on your folder icons in Windows. FolderIco is a little bit more professional looking and has some nicer icons, so it might be worth the $10 for some. Otherwise, you can do it all for free using Folder Marker. Enjoy! The post How to Change Folder Icon Color in Windows appeared first on Online Tech Tips. |
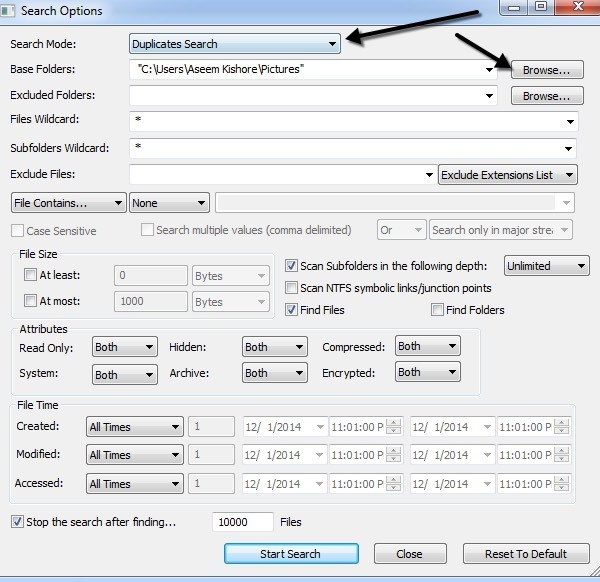
| 4 Free Tools to Remove Duplicate Files and Photos Posted: 02 Dec 2014 09:13 AM PST Looking for some utilities to find duplicate files and photos on your computer quickly and easily? I recently organized all the data that my father had stored on multiple computers and multiple external hard drives into one safe backed up location, but found that there were duplicates of pretty much everything. There was no way I was going to manually try to figure out what was the same and what was a duplicate, so I went ahead and tried out a couple of duplicate finder programs. In this article, I’ll mention the ones I used and give a short overview of how the program works, its effectiveness and any issues that I ran into. It’s worth noting that you should never completely trust the results of a duplicate finder program because there are always scenarios that can confuse the search algorithms and give you false positives. So always double-check once before you delete anything. Also, it goes without saying that you should definitely make a backup of all data before you start this process just in case. Once you are certain the correct data was deleted, then you can get rid of the original backup. NirSoft SearchMyFilesIf you’re looking for some of the most useful software tools for Windows, then NirSoft should be the first place you look. One of their tools is SearchMyFiles, which is basically a super search engine for your local files and folders. It has a ton of filters that let you search by wildcard, by file dates, by file content, by file size, by file attributes, etc. It also has a search mode called Duplicates Search. Once you download and run it (no need to install), just click on the drop down at the very top and change the value to duplicates search.
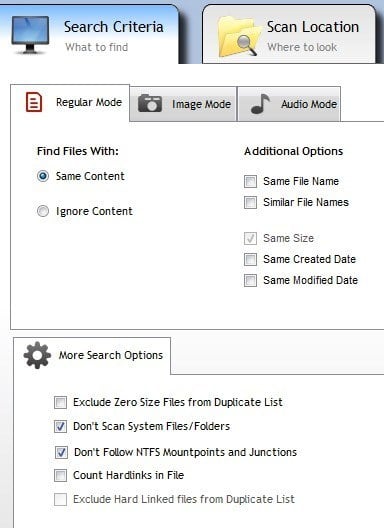
Next, you choose the base folder where you want the search to start from. As you can see, everything else is self-explanatory. If you’re only looking for duplicate files and want to find all of them, then don’t change any of the filters or settings. By default, they are configured to search everything. If you want to restrict the types of files scanned, then you should use the filters. Go ahead and click Start Search and you’ll get the results in a pop up window. I tried my tests on the sample photos included with Windows 7 and it worked fairly well. Even though the file names for the photos were different, it seems to find duplicates based only on size. If they are the exact same size, the files are considered duplicate. When I resized one of the photos, it no longer showed them as duplicates even though it was the same photo, just a different size. This method of searching is good, but it’s not perfect for photos because there may be times when you have the same photo with two different names or the same photos in different sizes. I also ran into issues with documents that had the same contents and even the same name, but were slightly different in size and therefore didn’t show up in the results. It would have been nice if they also showed files with the same name even if they have different sizes. It really depends on what your goal is, but I’ll mention other programs that search differently in case this is not what you’re looking for. Duplicate CleanerDuplicate Cleaner Free is a bit better than the NirSoft utility because it has more advanced options for the search criteria. Firstly, you have to choose whether you want to find files with the same content or if you want to ignore the content. Then you can also choose options like Same File Name, Similar File Names and Same Size. Using these criteria, you can perform more complicated searches for duplicates like searching for all files with the same name, but not necessarily the same size and searching for all files with the same content, but not necessarily with the same name.
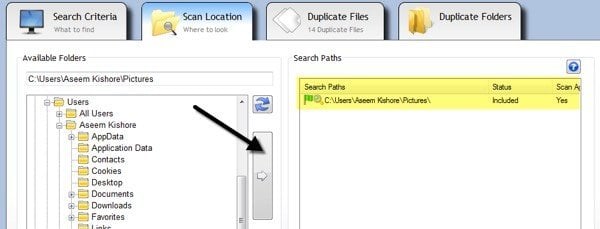
Once you choose the search criteria, you then have to add the search locations. Go ahead and navigate to the folder and then click the little arrow button to move that folder to the Search Paths side.
When you are done, click the Scan Now button at the top and the results will show in the Duplicate Files or Duplicate Folders sections.
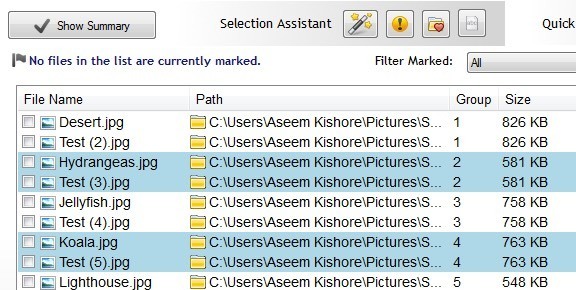
Now to get rid of the files, you have to click on the little magic wand icon next to Selection Assistant, click on Mark, then Select by group, then select All but one file in each group.
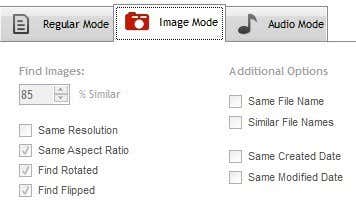
This will mark all files in a group of duplicates except for one. In order to delete the duplicates, you have to click on the circular File Removal icon at the top. You can mark files with different criteria also, but this is the easiest way when trying to get rid of duplicates. You may have also noticed the Image Mode and Audio Mode under Search Criteria and both work very well, but not all of the features are free. The image mode option is the best, but it requires you to purchase the Pro version for $30. I would highly recommend the Pro for anyone who really has to deal with a ton of duplicates including photos and audio files because I used it and it saved me a lot of time the free version could not accomplish.
With image mode, you can find similar images even if they have a different resolution or have been rotated or flipped. Audio mode will let you search for duplicate songs by metadata for free, but if you want to compare the actual audio data, you’ll have to purchase the Pro version. Fast Duplicate File FinderIf you’re looking for just finding exact duplicates, then Fast Duplicate File Finder is a good choice. The free version will let you find unlimited exact duplicates, but only 10 groups of similar files. The similar files functionality is quite useful since it can help you find documents like Word docs that are exactly the same in terms of content, but for some reason have different sizes and other slight variations.
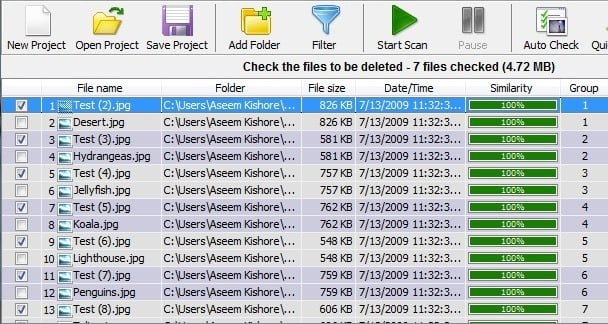
However, that functionality along with a few other features like filters and the ability to delete the duplicate files will set you back $40, which is a way too high for a program that just finds duplicates. However, the free version does a good job of finding exact duplicates. Just click Add Folder at the top to select the folders you want to search for duplicates, then choose your search method and finally click the Start Scan button. By default, the free version will give unlimited results for 100% Equal Files, which means they have to be the exact size.
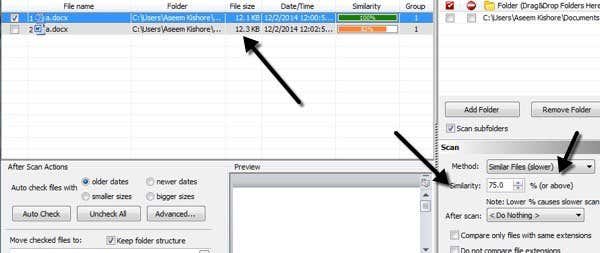
Again, this program would not show me the two Word files that had the same name and had the same contents because they were slightly different in size. When I chose the Similar Files option and set the Similarity value to 75%, then it showed them correctly. However, it will only show you 10 groups of similar files in the free version, which is kind of annoying.
Overall it is a good program, but only useful for exact duplicates. Works best with multiple copies of pictures, videos or audio files and not so well with documents. Anti-TwinIt’s got a funny name, but Anti-Twin is another good duplicate finder that has a clean interface and doesn’t try to bombard you with ads. As with most of the other programs mentioned above, it doesn’t quite catch all the duplicate documents unless you search by identical file name. Usually with documents, it’s rare that you’ll have duplicates with a different name, so these programs will still work for most people.
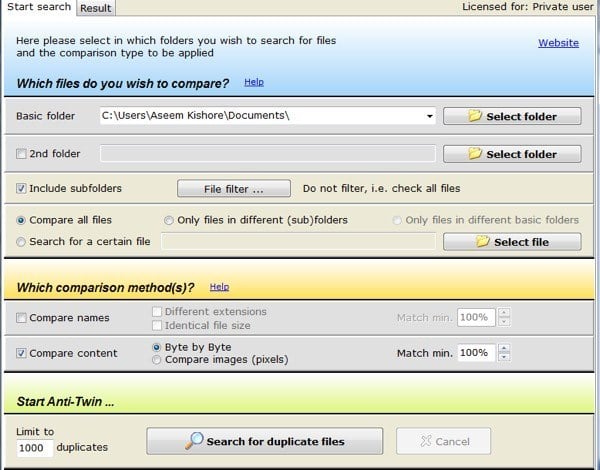
In Anti-Twin, you have to choose from either one or two “base” folders and then from a couple of options. If you have two folders under a main folder, then you can simply choose the top-level folder as a base folder and then check the Include subfolders box. You would then select Only files in different subfolders for comparison. If you have two folders that are in completely different locations, choose one base folder then check the 2nd folder box and choose the second folder as another base folder. Then you would check the Only files in different basic folders box. You can also select Compare all files to compare everything in the base folders and/or subfolders to each other. For Comparison methods, you can either Compare names or Compare content or compare both. Note that if you check both boxes, the comparison will before an AND operation meaning that both criteria will need to match in order for it to show as duplicate.
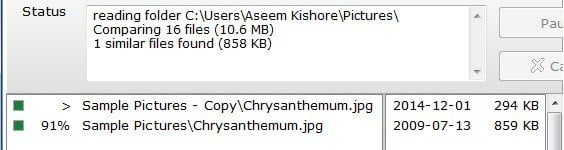
Click the Search for duplicate files button and you’ll be brought to the next screen where you can see the results. What I really like about this program is the ability to compare images (pixels) when searching for duplicate pictures. Basically, if you have two images that are the same, but one is of lower resolution, you’ll want to click Compare Content and then click the Compare Images (pixels) radio button. Reduce the percentage to 95% of less and then perform the search.
As you can see, I had two files with the same name, but different sizes due to the resolution. When you reduce the match percentage, you’ll see a new checkbox called inc. 100%, which basically will show you the pictures that are exact duplicates also. Otherwise, you’ll only see the ones that are similar, but not exact matches. So there you have four programs that have different advantages and disadvantages, but get the job done. There are a ton of other duplicate remover programs, but a lot of them have ads or come bundled with junkware. If you have any questions or issues, post a comment. Enjoy! The post 4 Free Tools to Remove Duplicate Files and Photos appeared first on Online Tech Tips. |


| You are subscribed to email updates from Online Tech Tips To stop receiving these emails, you may unsubscribe now. | Email delivery powered by Google |
| Google Inc., 1600 Amphitheatre Parkway, Mountain View, CA 94043, United States | |
0 commentaires:
Enregistrer un commentaire