

Computer Tips From A Computer Guy |
| 14 Ways to Speed Up Windows Boot Times Posted: 04 Dec 2014 10:50 PM PST Every day millions of Windows machines are booted up and everyday millions of people sit idly by waiting for Windows to load onto the desktop. The amount of time wasted can probably be measured in weeks considering how slow most Windows PCs boot up! Thankfully, there are a lot of steps you can take to speed your computer’s boot time. In this article, I’m going to mention 14 different ways I have speed up my PC over the years and hopefully you’ll find that they work for you also. Some you can implement immediately whereas others would require buying new hardware or changing your operating system. I’m not going to mention buying a new computer as that’s an obvious solution. The point is to speed up boot times without having to drastically change your current setup. Before we get to the list, I wanted to mention that I had written separate articles on quite a few of the tips for improving boot times, so it’s a good idea to check out each link as it will go into detail on how to implement that particular suggestion. Free Up Disk SpaceThe first thing I do on any computer running slow is clean up the disk space because I have found that to be the culprit more often than I would have ever imagined. There are a lot of features of Windows that use up quite a bit of disk space like the recycle bin, system restore, hibernation file, backed up service pack files, then WinSxS folder, temp directories, etc.
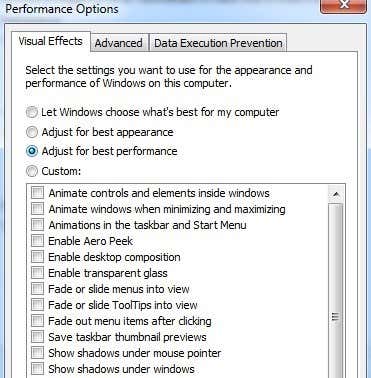
On top of that, you might have a lot of data sitting on your hard that you might be able to move to an external hard drive or delete like duplicate files. Check out my previous posts on clearing all the above-mentioned stuff off your hard drive: Reduce the Size of the WinSxS Folder Remove Duplicate Files and Photos Disable Visual EffectsOn most modern PCs, this tip won’t really make much of a difference, but one older machines, it can make a pretty big difference. It can also make a difference if you have a decent computer, but a crappy graphics card.
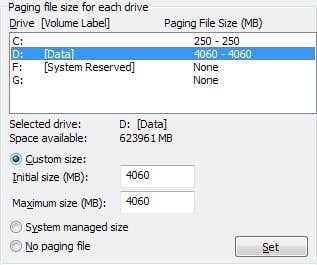
Disabling visual effects in Windows will basically make your computer look more like Windows 2000 since it will get rid of the Aero theme and remove all transparency and animations. When it comes to boot times, disabling the visual effects will bring up the desktop slightly faster. Disable Visual Effects in Windows Optimize Paging FileThe paging file always plays an important role in Windows and even though most people never mess with the paging file, it can be used to boost Windows performance and reduce boot times if configured properly.
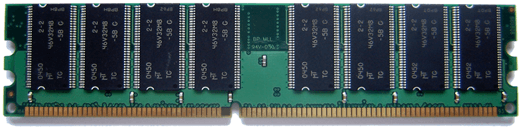
It’s especially important to optimize the paging file if your computer doesn’t have a lot of RAM. Anything less than 4GB of RAM is reason enough to play around with the paging file. Optimize Paging File in Windows Install More RAMI’ve run into a lot of modern machines running Windows 8 with Core i3, i5 or i7 processors, but managing with only 2 or 4 GB of RAM! 4 GB is not bad and should be enough for most people, but there is no reason any modern computer should have less RAM than that installed.
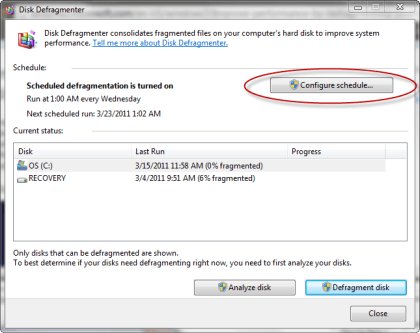
If you’re running 64-bit Windows on a desktop, then you should try to shoot for 8 GB of RAM. Note that if you have a 32-bit OS, Windows can’t see more than 4 GB of RAM anyway, so that’s the max you should have installed. Determine If You Are Running 32-bit or 64-bit Windows Defragment Hard DriveAgain, this particular tip will help those who are running older versions of Windows like Vista or XP because Windows 7 and Windows 8 automatically defragment hard drives.
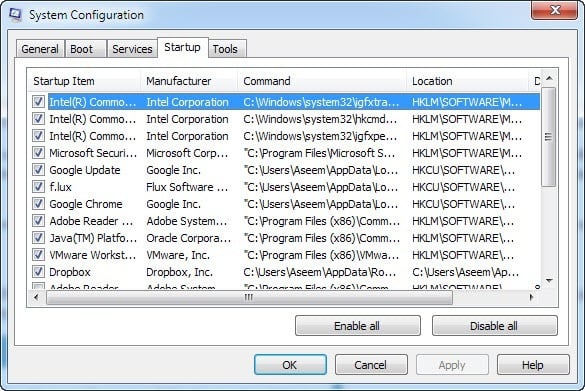
Also, if you are using a SSD (solid state drive) instead of a traditional hard drive, you want to make sure NOT to defragment the drive. Defragment Hard Drives in Windows Disable Startup ProgramsStartup programs are the other major factor in slow Windows boot times. If you are one of those people who have anything over 5 icons showing up in the notification area of the taskbar, then your boot time can probably be reduced. Using the MSCONFIG utility, which comes with pretty much every version of Windows, you can disable startup programs quickly and easily.
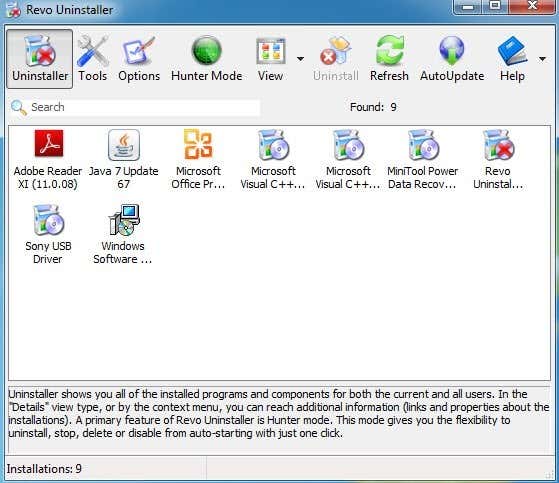
Most startup programs can be disabled because they are for third-party programs like Adobe, Dropbox, Google Update, etc. You can manually run all of these yourself when you need to use them thereby reducing the amount of times it takes Windows to load. Disable Startup Programs in Windows Uninstall ProgramsIn addition to disabling startup programs, you should also uninstall any programs that you no longer use or need. I’ve seen a lot of PCs with tons and tons of apps from years bygone that just sit on people’s computers like dust on a fan. There comes a time when you need to get rid of those programs because they add registry entries that will slow down the boot process.
Uninstall or Remove Programs Automatically Run Cleanup UtlitiesOne problem you can run into with uninstalling a bunch of programs is that the registry entries they created don’t necessarily get removed. In those types of cases, I always recommend running a cleanup utility like CCleaner because they are very safe and do make a difference in boot times.
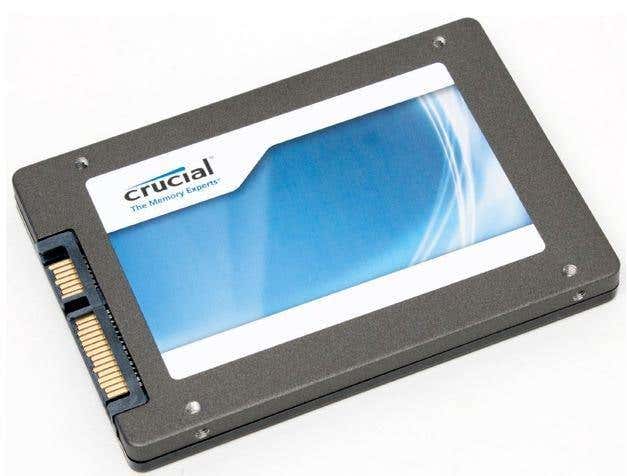
Software to Clean and Speed Up PC Upgrade to an SSDI didn’t want to mention much hardware stuff, but this can be a fairly cheap option with huge benefits. You can grab a 64 or 128 GB SSD for probably less than $100 today and install only Windows on that drive. Obviously, moving your current installation or installing from scratch is a lot of work, so this is not something everyone can do, but it’s definitely worth a shot.
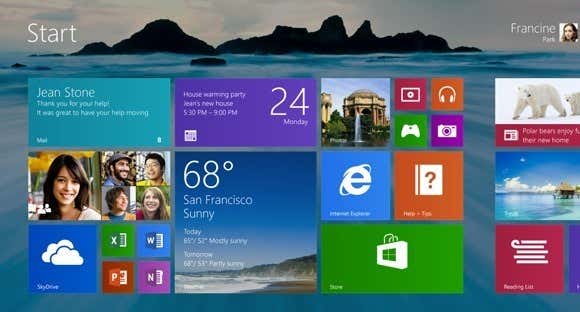
An SSD has significantly improved the boot time on my Windows 7 machine and it makes running programs in Windows a lot faster too. Even though it’s not an easy task, it’ll give you far better returns than most of the software tips I mention here. Upgrade to Windows 8.1Even though a lot of people hate Window 8, including myself, it boots up extremely fast. I have a three year old machine with a Core i3 processor, 4 GB of RAM with a cheap SSD and Windows 8 boots up from complete shutdown to the desktop full loaded in about 10 seconds. My Windows 7 machine on the same hardware (dual boot) takes about 45 seconds.
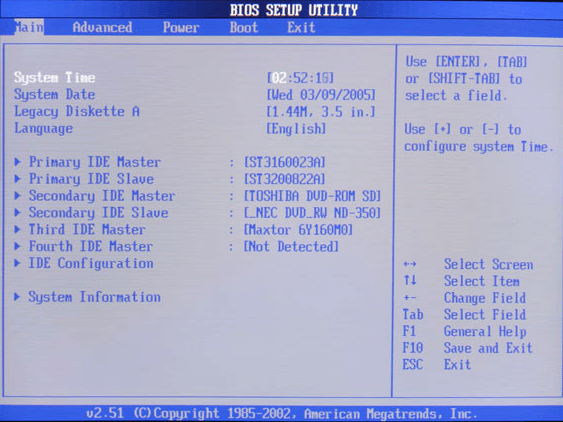
Windows 8.1 now bypasses the annoying start screen and brings you right to the desktop, but it still lacks a real Start button. That apparently is making its way back in Windows 10, but we will have to wait till the end of 2015 before we see that OS released. Either way, if you can live with the annoyances of Windows 8, you will see a huge reduction in boot time even with semi-old hardware. Change BIOS SettingsWhen your computer first boots up, it loads the BIOS, which in turn loads the operating system. A significant amount of the boot time can be spent in this particular phase and none of the tips mentioned so far will help speed this process up at all.
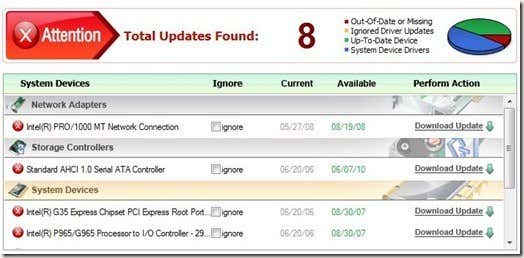
This is because the BIOS is stored on a memory chip on the motherboard and therefore isn’t affected by anything else on the system, including the hardware like RAM, hard drive, etc. There are basically two ways to speed up the BIOS process: change the boot order so that the hard drive with the OS is listed first and enable quick boot, which will disable all hardware checks that are initially done during the boot process. You’ll have to Google around a bit to see if your BIOS supports it or you can enter the BIOS by pressing F2 or whatever key it tells you on startup. It also might be worth upgrading the BIOS if you haven’t done it in a very long time or ever. Keep PC UpdatedWhen Windows loads, it has to load a lot of drivers to make sure everything works properly like your USB ports, the graphics card, the sound card, the hard drive, the network card, the memory chips, etc, etc.
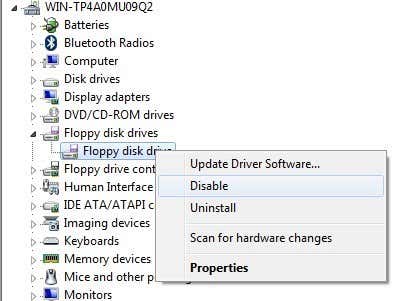
It’s important, then, to keep all of these drivers updated as the latest versions contain fixes, speed improvements, compatibility improvements, etc. Thankfully, there are lots of software tools out there that can automatically update drivers for you. In addition, you should always install the latest Windows updates using the Windows Update tool in Control Panel. Automatically Update Device Drivers Disable Unneeded HardwareIf you can reduce the number of drivers that Windows has to load on startup, then you will reduce the boot time also. If you go into device manager, you’ll see there are a couple of items you can disable if you no longer use them.
Some of the items I have disabled include floppy disk drives and controllers, bluetooth controllers and radios, modems and virtual Wifi adapters. Obviously, you only want to disable the stuff you know you’re not going to be using. I never use bluetooth on my desktop, so why waste resources right? Use a Static IP AddressI really didn’t believe in this tip when I first heard about it, but when I tried it out on my computer, I was surprised to see a few seconds shaved off the boot time. Apparently, your computer has to contact the router’s DHCP server in order to get an IP address on boot up and this process can be quickened if you just set a static IP address for your router.
I only recommend doing this if you make a note to yourself that you have done this because having a static IP address can sometimes cause a lot of problems for people which are hard to figure out unless you are technically savvy. For example, if you remove the computer from your local network and connect to another network, you may not be able to access any resources or the Internet because your subnet doesn’t match the subnet of the new network. So it’s a good idea to only do this if you understand how it works. Assign a Static IP Address in Windows That’s about it. Hope you enjoyed the list and some of the tips helped speed up your boot time. If you have any questions, feel free to leave a comment. Enjoy! The post 14 Ways to Speed Up Windows Boot Times appeared first on Online Tech Tips. |
| Best Free Clipboard Managers for Windows Posted: 04 Dec 2014 05:26 AM PST Probably one of the most used features of Windows is the Windows clipboard: the feature that allows you to copy and paste text, images, and files between different programs and folders. However, with all the use it gets, the clipboard can only hold item at a time. Luckily, there are a lot of free clipboard managers that can significantly enhance the clipboard so that it can hold multiple items, change the formatting or case of text, let you search clips, create permanent clips, join two clips together, sync clipboards between computers, etc. In this article, I’m going to mention a couple of my favorite clipboard replacement utilities for Windows. DittoDitto is an amazing clipboard manager that is somehow regularly updated and comes with 64-bit support for free. I would gladly pay a small fee in order to use it, but since it’s free, I am even happier. It’s also one of those programs that looks super simple on the outside, but contains a huge number of features and options when you really dig into it. What’s great about it is that anyone can get started with it easily and then slowly learn or play with the options and features later on. Once you become a pro at using it, you’ll wonder how you ever lasted without it. Ditto lets you store an unlimited number of items on the clipboard by way of using a database on the backend to store everything. This means you can copy something and then go and search for that copied item 5 days later and it’ll show up instantly. Let’s see how to use some of the basic features. Once you install it, a small blue icon will appear in the Windows taskbar. Go ahead and copy a few things like files or text, etc and then click on the icon.
As you can see, the interface is deceiving simplistic. I find this to be good because I don’t necessarily need to see all the options right on the main GUI interface. So there are multiple ways you can paste content once you have items in the clipboard, so let’s talk about them. Firstly, you certainly don’t want to have to click on the taskbar icon every time you want to paste something, so it’s a good idea to learn the global hotkey: CTRL + ~ (tilda). The tilda key is the one normally right underneath the ESC key or immediately to the left of the 1(!) key. Press and hold CTRL and then press the tilda key and the little clipboard manager will popup wherever your cursor is located. Now to paste anything from the list, you can do one of three things: 1) Double-click on the item in the last and it will be pasted into the currently active window or text box 2) Drag and drop the item from the list into the location you want to paste it to 3) Press CTRL + number, where number can be from 1 to 10. The quickest option for me is to use method 3 since it only requires using the keyboard. Once you have a whole bunch of clips, you can open the clipboard manager using the CTRL + tilda shortcut and then just start typing. You don’t have to click in the search box, which is convenient. The results will be filtered immediately and then you can just double-click on the item to have it pasted. There are way too many options to go through in this article, but you can play around with everything by right-clicking anywhere in the list and choosing Options.
In addition to options, when right-clicking on a clip, you’ll see a bunch of other options that you can adjust from the menu. These include being able to edit the clip, see the details about the clip like when it was created and last used, having the ability to make the clip sticky so that it is always at the top or bottom, deleting a clip, pasting a text clip as plain text only, etc. In the Options dialog, there are basically 5 tabs full of settings and options, which is way too much to explain in detail. Thankfully, they have a help page that explains each option in detail so you don’t have to try and figure out what it does.
The only thing to note is that sometimes when you try to paste, nothing seems to happen. In reality, Ditto couldn’t figure out where to paste the item so it just copied it to the clipboard. If you press CTRL + V, that item that you selected in Ditto should paste properly. ShapeshifterAfter Ditto, I would recommend Shapeshifter because it’s got a great looking interface, which Ditto kind of lacks. It also supports 64-bit and Windows 8. It’s very stable and was last updated in 2012, which makes it fairly new compared to some of the other clipboard managers out there.
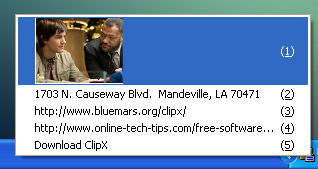
I’ve already written a post about Shapeshifter and how to use it, so check out that post to get an idea of how it works. ClipXClipX is a tiny program that does the same thing as the other tools, but with fewer features. Unfortunately, it hasn’t been updated since 2008, but works just fine on Windows 7 and Windows 8 64-bit. The premise is the same: you copy items normally and then use a shortcut key to access those items. Once installed, you can start copying text or images to test out ClipX. For example, I have copied four pieces of text and one image. ClipX has recorded this and if I click on the system tray icon, I will see all of my copied items, which I can then choose by simply clicking on any item or by pressing the number that is listed next to the clip.
The cool thing is that I can actually see the images in the clipboard queue, which makes it very easy to quickly pick the item I want. If you’re already in a program, let’s say Word, you can bring up the same display above and paste any item into the document by pressing the Windows Key + V and pressing the number corresponding to the item in the clipboard.
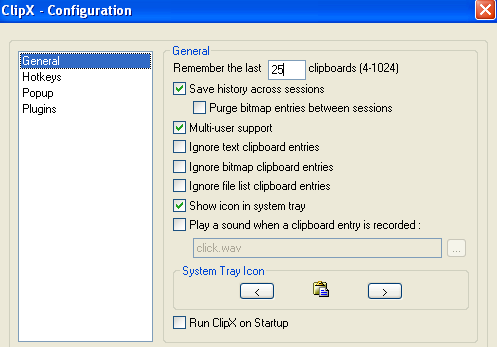
In a nutshell, there’s not a whole lot outside of this that ClipX does. It does have a search feature to let you easily find a clip, but by default it only stores the last 25 clips. You can increase this to 1024, but not higher than that. It also has the ability to edit text clips, which can come in handy. If you right-click on the tray icon and go to Configure, you’ll see all of the different options you can set for the program.
You can set the number of items to store and whether you want it to auto-start with Windows. It also lets you save the history across sessions (computer restart), which is an essential feature in my opinion. One nice feature of ClipX is that you can save your entire clipboard to a file and re-load it later on the same computer or a different computer. Just right-click on the tray icon and go to Clipboard History and then choose Save History. Ditto has a network syncing option, which is definitely nicer, but this works too if you sync clipboards rarely.
Finally, ClipX itself can be enhanced via plugins. On the ClipX homepage, you’ll notice a section called Download Plugins, which extend the functionality of the ClipX program.
I don’t like to mention too many programs because I find that to be totally useless. I’ve tested many, but these three work well, have good features and don’t crash or contain any junkware/malware. Ditto is by far my favorite, but I felt the need to mention a few alternatives for those who like to have choice. Enjoy! The post Best Free Clipboard Managers for Windows appeared first on Online Tech Tips. |


| You are subscribed to email updates from Online Tech Tips To stop receiving these emails, you may unsubscribe now. | Email delivery powered by Google |
| Google Inc., 1600 Amphitheatre Parkway, Mountain View, CA 94043, United States | |
0 commentaires:
Enregistrer un commentaire