Computer Tips From A Computer Guy |
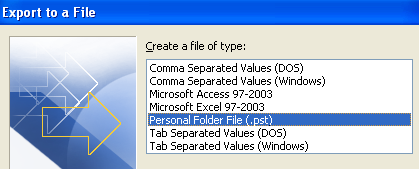
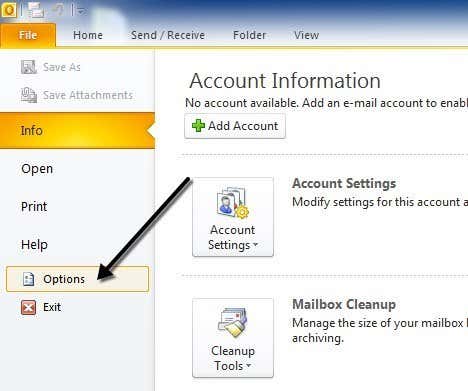
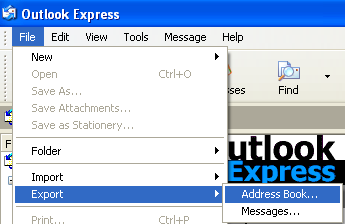
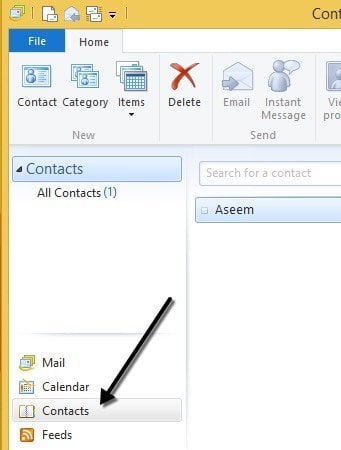
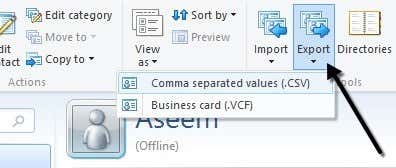
| Export Contacts from Outlook, Outlook Express and Windows Live Mail Posted: 02 Feb 2015 03:49 AM PST Need to export your contacts out of Outlook? I used to work at an office where there are multiple versions of Office installed on employee computers including Office 2003, Office 2007, Office 2010 and Office 2013! When someone switched computers, I usually end up having to export their email and their contacts to a different computer, which more often than not had a different version of Office installed. If you create multiple contact folders in Outlook, then you have to export each one of those individually. In this article, I’ll show you how to export contacts in the different versions of Outlook. I’ll also mention the process for Windows Live Mail, if you happen to be using that program. Export Contacts from Outlook 2003, 2007Let’s start with the older Office 2003! Note that the same procedure works for Outlook 2007. First open Outlook and then go to File and then Import and Export. If the menu option is greyed out, make sure to check out this Microsoft KB article. If the Import and Export option is missing altogether, then you have to simply add it to the File menu. You can do this by clicking on View, then Toolbars and then Customize. On the Commands tab, click on File under categories. Scroll down the list until you find the Import/Export command towards the bottom of the list. Now just drag it onto the actual File menu and drop it. From the list, choose Export to a file and then click Next. From the list, choose Personal Folder file (.pst). I prefer to export it out as a PST file so that it can easily be imported into another version of Outlook. Now you’ll get a list of all of your folders, including the Inbox, Calendar, RSS feeds, etc. Click on Contacts since we want to export Outlook contacts only. If you have created other contact folders inside the main contact folder, be sure to check off the Include subfolders box. Click Next and then choose the location for your backup file. Make sure to browse to some other location as Microsoft defaults to a hidden folder. You might also be asked if you want to add a password in order to protect the PST file. If not, just leave the fields blank and click OK. After that, click Finish and you’re done! Export Contacts from Outlook 2010, 2013The interface in Outlook 2010 and 2013 is a bit different, so getting to the Export to a file screen requires a different set of clicks. First open Outlook and click on File and then Options. In the left-hand menu, click on Advanced and then scroll down until you see Export. At this point, you’ll get the same Import and Export Wizard dialog that is shown in the above procedure for Outlook 2007. The only difference is the PST file is now called an Outlook Data File rather than the Personal Folder File. Export Contacts from Outlook ExpressIf you’re still running Windows 98, Me, 2000 or XP, then you may be using Outlook Express. Outlook Express has a slightly different procedure, but very straightforward also. First, open Outlook Express and then go to File, choose Export, and then choose Address Book. Click on Text File (Comma Separated Values) and then click Export. Click Browse to specify a location to save the file or type it in manually. Click Next and then choose all of the fields that you want to export for each contact, i.e. First name, Email address, Street, Company, Phone, etc. Click Finish and you’re done! Export Contacts from Windows Live MailThis is probably the easiest of all. Open Windows Live Mail and click on Contacts. It’s got a very similar look to Outlook, which makes it very easy to use. In Windows Live Mail, all you have to do to export contacts is to click on the Export button in the ribbon. Super easy! If you have any questions or issues getting your contacts out of Outlook, feel free to post a comment. Enjoy! The post Export Contacts from Outlook, Outlook Express and Windows Live Mail appeared first on Online Tech Tips. |
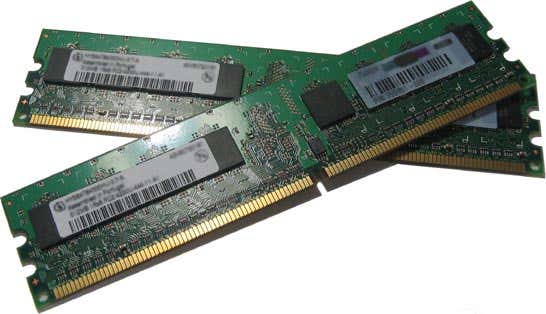
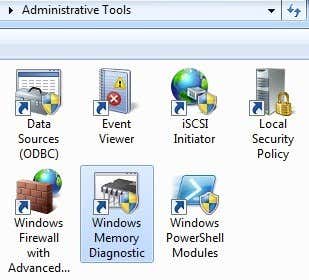
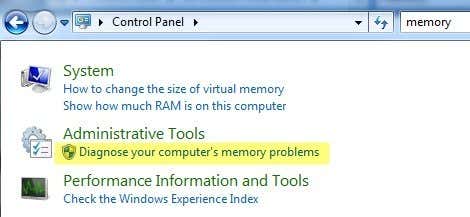
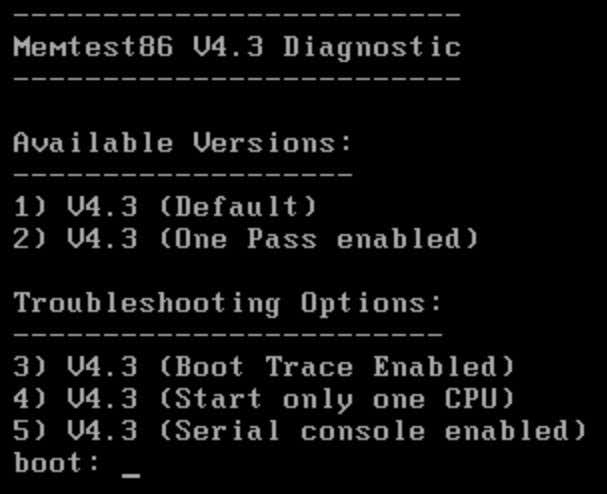
| How to Diagnose, Check, and Test for Bad Memory Posted: 02 Feb 2015 01:54 AM PST Though rare, there are times when the memory chips (aka RAM) on your computer can go bad. They usually outlast all other components on a PC because they have no moving parts and use very little power. Since memory chips are one of the most essential components to any computer, any problems or issues will immediately manifest themselves in strange and sometimes confusing ways. It’s also hard to instantly diagnose a problem as a RAM problem because most PCs have multiple RAM chips and not all of them will fail at once. When one fails and others work properly, a variety of odd behaviors will start to occur. Here are some symptoms of bad memory on a PC. RAM Issue Manifestations1. Windows will freeze for minutes at a time regardless of what application you are using. It may take 2 minutes to open Word or 3 to 4 minutes to open IE. Usually performance issues are the first to appear and can easily be misconstrued as a virus or malware. 2. You get the infamous blue screen of death, but without having added any new hardware or installed any new software. If you’re getting the blue screens and haven’t installed any new drivers or Windows updates, it could be a memory issue causing the blue screen. 3. The PC restarts randomly while you are in the middle of doing something. Random restarts can also be attributed to a lot of different factors, but if you are having this problem in combination with any of the other mentioned, then it’s more than likely a RAM issue. 4. You start to notice files becoming corrupt on your system. If you’re working with a lot with certain files and notice that they are not saving properly or the data is being corrupted, you can narrow it down to the hard drive or memory. If you’ve run diagnostics on the hard drive and all is fine, then these read/write errors can be caused when parts of the file are stored in RAM. 5. You start to see strange colors or lines appear on the screen or things look garbled suddenly. Sometimes the memory issue can be so bad that the data being sent to the screen becomes corrupt and therefore displayed incorrectly. 6. When you boot the computer, you hear a beep, multiple beeps and a continuous beep. Depending on your manufacturer, a memory problem will be reported with a series of beeps. I’ve seen this a lot of Dell machines. It’s almost always a RAM problem when the computer beeps. Diagnose RAM ProblemsThe next step is to actually determine whether it is physical RAM installed on your PC that is causing problems. You can test this in one of two ways: either run software that checks the RAM or physically open the computer and switch out the RAM. The ideal method would be to open the computer and take out one stick of RAM at a time and see if the problems go away. If you have two sticks, for example, take out one and restart the computer. If the problems persist, turn off the computer and put back the one you took out and take the other stick out. If you have more than two sticks of RAM, follow the same procedure. If you only have one stick of RAM, then you’ll have to purchase another stick or try to use a compatible stick from another computer, if possible. Each computer takes a specific type of RAM, so you really have to check to make sure a stick from another PC will be compatible with yours. On the software side, there are several programs and tools you can use to troubleshoot memory issues. Windows Memory Diagnostics ToolThe easiest way to start is to use the Windows Memory Diagnostics Tool built into Windows. To get to it, open Control Panel and then click on Administrative Tools. You can also open Control Panel and just type the word memory into the search box. You’ll see a link to diagnose your computer’s memory problems. It’ll then ask you if you want to restart immediately or run the test the next time you reboot. The computer will boot into the diagnostic tool and start running the test, which is broken up into two separate passes. At the bottom you’ll see a Status field, which will show you any problems that have been detected. You can also press the F1 key and change a couple of options like the test type (Basic, Standard, or Extended), the cache setting, and the pass count. I have found this default test to be very handy and accurate over the years. memtest86memtest86 is by far the most popular amongst the memory-checking crowd and works very well. It’s been around since the 1990’s and has been recently updated to version 5.1. There is also a beta v6 in the works at the time of this writing. In order to use it, you have to burn the ISO image that you download to a CD and then configure the PC to boot from the CD drive first. This is exactly what the Windows Memory Diagnostics Tool does, but it’s all built in and therefore doesn’t require these two extra steps. What I like about memtest86 is that it also works with Mac or Linux computers too. So if the memory on your Mac system or Linux system is possibly bad, you can easily check using this tool. Once you boot to the CD, you’ll get a menu with a couple of different options. If none of it makes sense, don’t type anything and it will automatically default to the first option. The memory test will begin and it’ll show you at the bottom right if there are any errors. Memtest86 has a bunch of memory tests that it runs on the system, so it takes quite a bit longer than the Windows memory tool. It’s a great tool and pretty much the industry standard for memory diagnostics. There are other tools out there that do similar memory checks, but memtest86 is the most exhaustive and accurate out of all of them. If your memory is bad, the best place to buy RAM is from Crucial.com because it will only show you RAM that is compatible with your specific system. Enjoy! The post How to Diagnose, Check, and Test for Bad Memory appeared first on Online Tech Tips. |
| You are subscribed to email updates from Online Tech Tips To stop receiving these emails, you may unsubscribe now. | Email delivery powered by Google |
| Google Inc., 1600 Amphitheatre Parkway, Mountain View, CA 94043, United States | |









0 commentaires:
Enregistrer un commentaire