

Computer Tips From A Computer Guy |
| How to Add Music to PowerPoint Presentations Posted: 14 Feb 2015 07:59 AM PST If you’re creating a PowerPoint presentation, adding a couple of music tracks, voiceovers or sound effects can go a long way in making the presentation more interesting and entertaining. Adding any kind of audio to PowerPoint is a simple process and PowerPoint also has the ability to perform simple tasks on the audio like trimming, fading and adjusting the volume. In this article, I’ll walk you through all the steps and different options for adding audio to your presentation. Depending on your version of Office, some menus may have different options and I will try to point those out as I go along. We’ll be talking about PowerPoint 2007, 2010 and 2013. Before we get started, let me mention the different audio formats supported by each version of PowerPoint. If your audio file is not in one of the compatible formats, you’ll need to first convert it using an audio conversion tool. PowerPoint 2007 & 2010 – AIFF, AU, MIDI, MP3, WAV, WMA PowerPoint 2013 – All of the above plus MP4 audio How to Add Music to PowerPointIn all recent versions of Office with the ribbon interface, you have to click on Insert and then click on Sound or Audio at the far right.
In all versions of Office, you’ll see the Audio from file and Record Sound options. In Office 2007, you’ll also see Sound from Clip Organizer and Play CD Audio Track. In Office 2010, you’ll see only the extra Clip Art Audio option, which is the same as clip organizer in Office 2007.
If you already have an audio file you would like to import, then go ahead and choose Sound from File. The audio file has to be in one of the formats mentioned above. Choose Sound from Clip Organizer or Clip Art Audio if you want to search Microsoft Online collections for free sounds. Just type in a search term and a list of available free sounds will appear. Click on any item to insert the audio into your presentation. Sometimes you won’t find very many or any sounds using this option, so check out my post on finding free sounds off the Internet.
If you have a CD with music tracks on it, you can actually have PowerPoint play the CD during your presentation using the Play CD Audio Track option (only Office 2007). Remember, though, that if you use this option, you need to make sure that the CD is inserted into the drive on whichever computer is playing the presentation.
You can tell it which track to start on and which track to stop on. You can also continuously loop the music if you like. Pretty neat feature if you have a CD from a store and you only want to play a specific part of it. The Record Audio option is straightforward and worked very well in my tests. A small audio recording dialog pops up and you just press the record button to start a new recording.
Press stop, click OK and the recorded audio will be inserted into current slide of your presentation. This is a super easy way to add some voiceovers to your slides. Once you have added the audio using any of the above methods to your presentation, you can click on it and you will see a new menu called Audio Tools appear at the very top.
If you click on Playback, you will see a bunch of options like Preview, Bookmarks, Editing, and Audio Options. Let’s go through each option here. Obviously, to hear the audio file, just click on the Play button. Bookmarks is an interesting option that is probably the only aspect of adding audio to PowerPoint that requires you to learn something. BookmarksIf you add a bookmark to an audio file, you can then trigger an animation to occur when that bookmark is reached. This is very cool and allows you to do some very neat stuff. For example, you can have text fly around or a picture to appear at certain points in your audio file. In terms of voiceovers, you can have the points you are talking about appear one at a time while you talk about them rather than all of them showing up at once. First, go to the point in your audio file where you would like to add a bookmark and then click the Add Bookmark button.
You should now see a small little circle at the point where the bookmark was added. If you hover your mouse over it, it will show you the name of the bookmark (Bookmark1 in my case) and the exact time where the bookmark was added. Now for the fun part! Click on any object on the slide and then click on Animations in the ribbon bar. Choose an animation from the list box and then set the options, duration, delay, etc as you desire.
Now click on Trigger, then click on On Bookmark and finally select the bookmark you had created under Recorded Sound. The animation will now only be triggered when the bookmark is reached in the audio file! Editing OptionsGetting back to the other audio tools, let’s talk about trimming. The audio editor in PowerPoint is very simplistic and basically lets you trim from the start and end of an audio file. If you need to cut and remix the music, you’ll need to do that yourself beforehand.
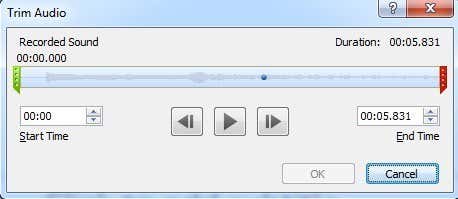
If you click on the Trim Audio button in the Editing section, you’ll get another popup with all the trimming options.
You can drag the green slider from the left and the red slider from the right to trim the audio. You will also see any audio bookmarks shown here too as small blue dots. Click OK and the audio will be trimmed. The Fade In and Fade Out text boxes are pretty self-explanatory. You can fade in the audio by any number of seconds and fade it out also. Audio OptionsThe last section is Audio Options and these are all pretty important for controlling how the audio plays in the presentation.
The first option controls the Volume, which is set to High by default. You can choose from Low, Medium or Mute. The Start option lets you choose from Automatically, On Click and Play Across Slides. The first option will play the audio automatically without any user interaction. On Click will only play the audio when you click the play button during the presentation. Finally, Play Across Slides will play the audio automatically also, but will allow the audio to continue to the next slide instead of cutting it off. You can check the Hide During Show box, but you wouldn’t want to do this if you have selected On Click in the Start option since you won’t be able to see the play button. Loop until Stopped will allow the file to continue to play even if it has reached the end. It will simply start over from the beginning again. The Rewind after Playing option will simply rewind it back to the beginning, but won’t start playing it automatically. That’s about it for dealing with audio in PowerPoint. If you have any questions or issues, feel free to post a comment. Enjoy! The post How to Add Music to PowerPoint Presentations appeared first on Online Tech Tips. |


| You are subscribed to email updates from Online Tech Tips To stop receiving these emails, you may unsubscribe now. | Email delivery powered by Google |
| Google Inc., 1600 Amphitheatre Parkway, Mountain View, CA 94043, United States | |
0 commentaires:
Enregistrer un commentaire