

Computer Tips From A Computer Guy |
| How to Fix USB Device Not Recognized in Windows Posted: 18 Feb 2015 03:00 AM PST Are you getting a "USB device not recognized" error whenever you plug in a USB mouse, keyboard, camera, or other device? I can’t live without USB ports and currently have 5 ports on my computer so that I can connect my mouse, keyboard, camera, phone, and printer to it all at once! For those of you with even more USB gadgets, you probably have connected a USB hub to one of your USB ports so that can you connect even more devices. Most of the time this works great, but occasionally your computer might stop recognizing USB devices. The odd thing about this error is that the ports are working just fine, as I was able to still charge my cell phone without a problem, but couldn’t get my camera recognized using the same port.
After spending a lot of time and trying a bunch of different ways to fix the problem, only one solution ended up working for me. I’ll mention that solution first, but will also mention the other possible solutions, as the first solution may not fix the problem for everyone. Method 1 – Unplug ComputerSo how did I finally fix the problem? Well, if you are lucky, it's a super simple solution! Try this method first and if it works, you’ll have saved a lot of time. Simply unplug your computer from the power supply. Yes that is it! Note that this does not mean just turning off your computer using the power button because most modern computers don’t actually turn off completely and the motherboard will still get power. This is useful sometimes if you want to remotely wake up a computer, etc. The motherboard is where all of hardware of the computer connects to, including the USB ports. Sometimes the motherboard needs to be "rebooted" because things can go wrong, i.e. all or some USB ports suddenly stop working. The small microprocessor on the motherboard will reload the drivers and your USB ports should hopefully be recognizing devices again. So first turn off your computer using the Shut Down option in Windows or pressing the power button and then UNPLUG the PC from the wall outlet. Let it sit for several minutes and then plug it back in. Method 2 – Update Device DriverIf Windows is not able to recognize the device, you may also see in Device Manager that the device shows up as an "Unknown Device". You can get to Device Manager by clicking on Start and typing in devmgmt.msc or by going to Control Panel and clicking on Device Manager.
In that case, you should right-click on Unknown Device, click on Properties, then the Driver tab and then click Update Driver.
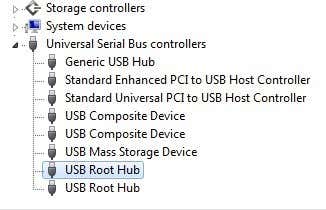
If this doesn’t work, you can also try to download the driver for your device from the manufacturer’s website. If the USB device is just a flash drive, then it’s probably not a driver issue. However, if you are installing a USB printer, drawing pad, etc, then it might be worth downloading the driver for that specific device. Method 3 – Restart & Disconnect USB DevicesThe next thing you can try is to disconnect all USB devices and then restart the machine. once you have restarted, try to connect the USB device that was causing the problem. If that particular USB port doesn’t recognize it, try another one. If the device is recognized by a different USB port, there could be a hardware problem with one of the USB ports. If no USB port recognizes the device, then keep reading because it’s probably something else. Method 4 – USB Root HubAnother thing you can try is to open Device Manager, expand USB Serial Bus Controllers, right-click on USB Root Hub and then click on Properties.
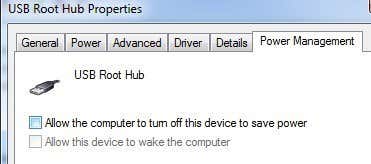
Click on the Power Management tab and uncheck the Allow the computer to turn off this device to save power box. If you have more than one USB Root Hub listed, you need to repeat these steps for each one.
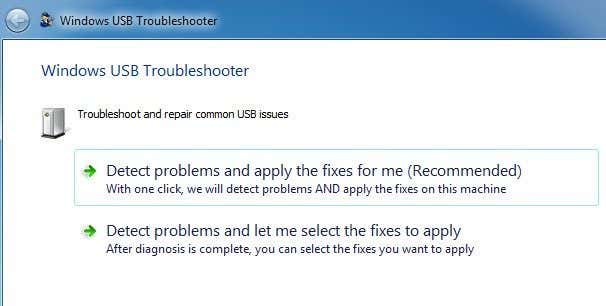
Click OK and then restart your computer. Try to reconnect the USB device and see if it is recognized. If not, go back to the power management tab for each one and check the box again. If it does recognize the device, then leave them unchecked. Method 5 – Connect Directly to PCA friend of mine ran into this issue and the cause ended up being his USB hub. He only had three USB ports on his computer, so he bought a hub where he could connect an additional 8 USB devices. I guess this proved too much for his computer and it just started sporadically not recognizing various devices. After removing the hub and connecting the device directly to the computer, it worked just fine. We haven’t really been able to find any other solution to this problem other than reducing the number of items connected to the hub. If you are having this problem with Windows 8 or Windows 8.1, then you might be in luck. Microsoft has released a fix for Windows 8 not detecting USB devices properly. Make sure to install this hotfix if running Windows 8. Method 6 – USB TroubleshooterIf nothing has worked so far, you can download the Windows USB Troubleshooter Fixit tool. It’s a free tool that works with Windows XP, Vista and 7.
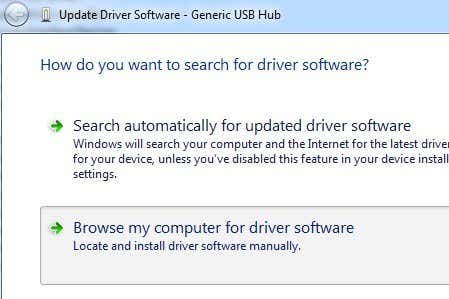
You can either have the troubleshooter fix the problems for you or select the fixes yourself. I would just let it fix them for you since the choices can sometimes be confusing and technical for the novice user. Method 7 – Update Generic USB HubIf you are getting the Unknown Device error in Device Manager, you can also try one other thing. Open Device Manager and then expand Universal Serial Bus Controllers. You should see at least one item called Generic USB Hub. On some computers, you might see two, three or more of these. Right-click on the first one and choose Update Driver Software.
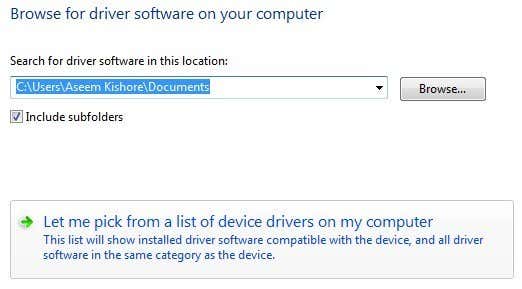
When the update dialog pops up, choose Browse my computer for driver software.
Then click on Let me pick from a list of device drivers on my computer at the bottom.
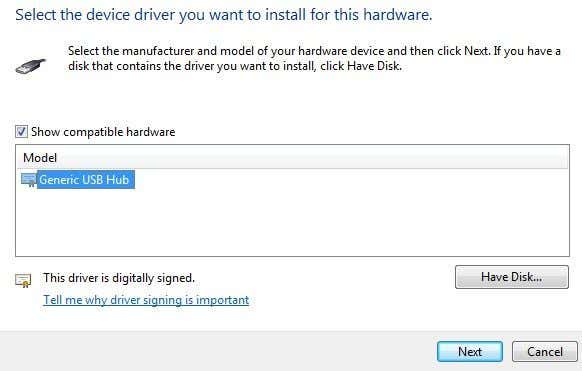
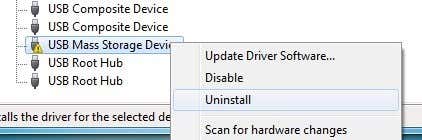
From the list, select Generic USB Hub. Normally, there won’t be anything else listed except for that one choice. Click Next and then click Close once it finishes installing it. At this point, the Device Manager screen should refresh and either the unknown device will still be there or it may now be recognized. If it’s still showing as not recognized, then you repeat the process for each Generic USB Hub listed. Method 8 – Uninstall USB DevicesAs a last resort, you can also try uninstalling all USB devices from your system and then restarting. I mention this last because even though Windows is supposed to automatically recognize the USB controllers, hubs and devices automatically, it can sometimes fail and you’ll end up with no USB ports working. I had a computer with 6 USB ports and only one port would not work properly. I uninstalled everything under USB Serial Bus Controllers in Device Manager and restarted. Instead of re-detecting everything, I was left with no USB port working, so be careful when using this method. Go to Device Manager and start uninstalling each item from under USB Serial Bus Controllers. Before you start with anything that is already working, uninstall the items with exclamation points or that are listed as Unknown Device.
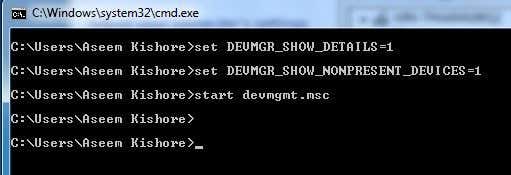
Method 9 – Uninstall Hidden DevicesBy default, Device Manager doesn’t show all devices that have been installed to the system. It basically only shows the ones that are currently connected. However, if you installed a USB printer earlier and now no longer use it, it will still be installed, but won’t show up in Device Manager. Certain hidden or ghost USB devices can cause conflicts with current USB devices and therefore lead to this error. You can view hidden devices in Device Manager by first opening a command prompt and then typing the following two commands:
Once Device Manager loads, you need to click on View and then click on Show Hidden Devices.
Now you want to expand Imaging Devices, Universal Serial Bus Controllers and Unknown Devices. If you see anything listed there that is greyed out or that says unknown device, go ahead and right-click on them and choose Uninstall. Hopefully, removing the older devices will allow the newer devices to work properly. Other Possible SolutionsIf nothing has worked until this point, it’s pretty safe to say there could be a problem with the actual hardware. The best thing to do is to connect the device to another computer and see if it works or not. If not, then it’s definitely an issue with the device. Possible Solution #1 – The other possible solutions are to try a different USB cable, if you have one lying around. This is a fairly rare problem, but I have seen it occur a few times over my many years doing technical support. Possible Solution # 2 – Another possible solution is to take the device, connect it to another machine and if it does recognize the device properly, to then eject it properly from that computer before reconnecting it to the original computer. I’ve seen this problem occur with several flash drives that were unplugged without ejecting properly. After connecting them to another computer and ejecting them properly from there, they suddenly started to show up on the original computer that was not recognizing them. Possible Solution #3 – A few people have had luck getting rid of this problem by updating the BIOS. I’ve already written an article about whether it’s a good idea or not to update the BIOS, but in this case, it might be worth a try. You can also go into the BIOS and disable USB, restart the computer and then enable USB again. The only thing you need to make sure is that you have a PS2 port on your computer, otherwise you won’t be able to do anything once you disable USB in the BIOS if your keyboard and mouse are connected via USB. Hopefully, one of the many solutions above will solve your USB problem. If not, post a comment and I’ll try to help. Enjoy! The post How to Fix USB Device Not Recognized in Windows appeared first on Online Tech Tips. |
| What is a Checksum and How to Calculate a Checksum Posted: 17 Feb 2015 10:11 PM PST Are you wondering what a checksum is? You may have noticed that when you download files from certain websites, they have a very long string of numbers and letters called a checksum or MD5 checksum or SHA-1, etc. These really long strings basically act as fingerprints for that particular file, whether it be an EXE, ISO, ZIP, etc. Checksums are used to ensure the integrity of a file after it has been transmitted from one storage device to another. This can be across the Internet or simply between two computers on the same network. Either way, if you want to ensure that the transmitted file is exactly the same as the source file, you can use a checksum. The checksum is calculated using a hash function and is normally posted along with the download. To verify the integrity of the file, a user calculates the checksum using a checksum calculator program and then compares the two to make sure they match. Checksums are used not only to ensure a corrupt-free transmission, but also to ensure that the file has not been tampered with. When a good checksum algorithm is used, even a tiny change to the file will result in a completely different checksum value. The most common checksums are MD5 and SHA-1, but both have been found to have vulnerabilities. This means that malicious tampering can lead to two different files having the same computed hash. Due to these security concerns, the newer SHA-2 is considered the best cryptographic hash function since no attack has been demonstrated on it as of yet.
As you can see in the screenshot above, the ISO file I am trying to download from Microsoft has a SHA1 checksum listed. Once I download the file, I would use a checksum calculator to verify the integrity of the file. About 99.9% of the time, you really don’t need to care or worry about checksums when downloading files off the Internet. However, if you are downloading something sensitive like anti-virus or privacy software like Tor, it’s probably a good idea to verify the checksum because hackers can create malware-infested versions of critical software in order to gain full access to a system. There are a ton of different utilities for calculating checksums and I’ll mention only one or two here since the good ones can create multiple hashes for you and can also verify hashes. MD5 & SHA Checksum UtilityThe MD5 & SHA Checksum Utility is my favorite utility for working with checksums because it has all the features I need in the free version. Once you download it, simply run the EXE file to open the program.
The interface is very straightforward and easy to use. Simply click on the Browse button to choose your file and the hashes will automatically be calculated for MD5, SHA-1, SHA-256 and SHA-512. As you can see the MD5 hash is the shortest and the SHA-512 hash is very long. The longer the hash, the more secure it is.
To verify a hash, just copy and paste it into the Hash box at the very bottom. Click on Verify and it will compare it to the four generated hashes to see if there is a match. Online Checksum CalculatorFor those who would rather not download any software onto their systems, an online checksum calculator would be the better choice. The online calculators have more restrictions, mostly the max upload size of the file, but for smaller files, they work just fine. A site called Defuse has a free file checksum calculator for uploads up to 5MB in size. That’s pretty tiny, so you’ll need to use either the desktop application or the next online tool mentioned below for anything bigger than that.
If 5 MB is just too small, then check out OnlineMD5, another free site that allows you to generate checksums for files up to 4 GB in size. Apparently, it does this without uploading the actual file to their servers. I’m not sure how it works, but it seems to just run the algorithm locally on your system and then just displays it in the browser. Quite a smart way to do it because you don’t have to download extra software and you don’t have to wait forever uploading a large file.
This site is also very nice because you can verify a checksum in addition to just calculating one. Hopefully, you now have a better understanding of what a checksum is and how it can be used and calculated. If you are sending or receiving secure files, a checksum is the best way for both parties to verify the integrity of those files. If you have any questions, post a comment. Enjoy! The post What is a Checksum and How to Calculate a Checksum appeared first on Online Tech Tips. |


| You are subscribed to email updates from Online Tech Tips To stop receiving these emails, you may unsubscribe now. | Email delivery powered by Google |
| Google Inc., 1600 Amphitheatre Parkway, Mountain View, CA 94043, United States | |
0 commentaires:
Enregistrer un commentaire