

Computer Tips From A Computer Guy |
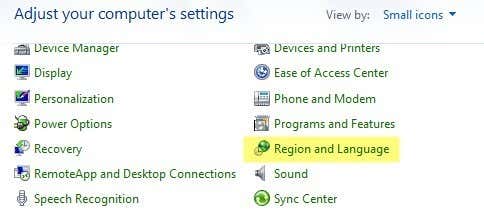
| Change Clock To and From Military Time in Windows Posted: 23 Feb 2015 01:47 AM PST Most people probably don’t care, but the default time display in Windows is 12 hour format, not military time. However, for all of the people who routinely tell time using the military time format, being able to change it on their computers can prove to be very useful. You would think it would be super easy to change the clock in Windows to military time, but it's not! The procedure is also different depending on which version of Windows you are using. In this article, I’ll walk you through the steps to change your Windows XP, 7, 8, or 10 PC time to military format. Windows XP Time FormatFirst open the Control Panel and then open Regional and Language Options. If you don’t see the icons, click the Switch to Classic View link at the top left.
Next click on the Customize button on the Regional Options tab.
Click on the Time tab and choose any of the options with the upper case H. Lower case h means 12 hour format and upper case H means 24 hour format.
Now click OK until you are back to the Control Panel. Not a very straightforward process at all. It would make much more sense to put the option in the Date and Time Properties dialog when you double click on the time in your system tray.
Microsoft has kind of done this in Windows 7 and higher, but it takes quite a few clicks to get it done. Ironically, it’s faster to use the Control Panel in Windows 7 and higher. I explain the steps below for later versions of Windows. Windows 7, 8 & 10 Time FormatIn Windows 7, open the Control Panel and click on Region and Language. In Windows 8 and Windows 10, it’s just called Region. If you are in Category view, switch to Small or Large icons at the top right.
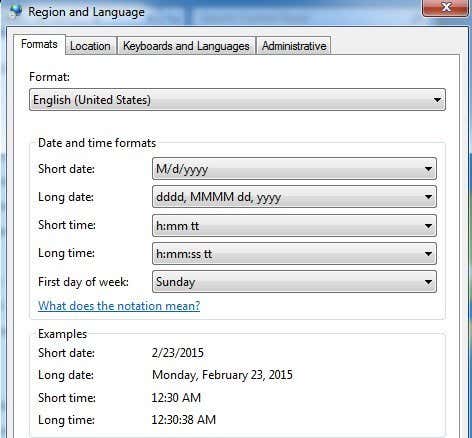
Now in Windows 7 and higher, the Formats tab is front and center and you can change the time format from the Short time and Long time dropdowns.
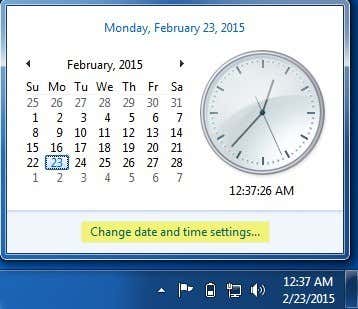
Again, the capital H is military time. In order for the change to appear in the time shown in the taskbar, you have to change the Long time format. I’m not sure where the Short time format is used in Windows, but you can change that too in order to keep everything consistent. The other way to go about this in Windows 7, 8, and 10 is to click on the date and time in the taskbar and then click Change date and time settings.
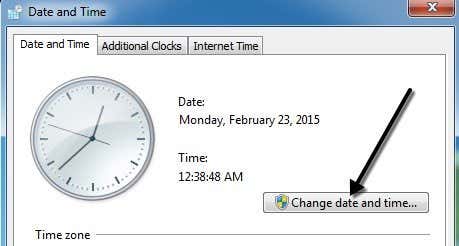
A new dialog will appear and at the top you have to click the Change date and time button.
Another dialog will pop up where you can actually adjust the date and time manually. Here you have to click on the Change calendar settings link.
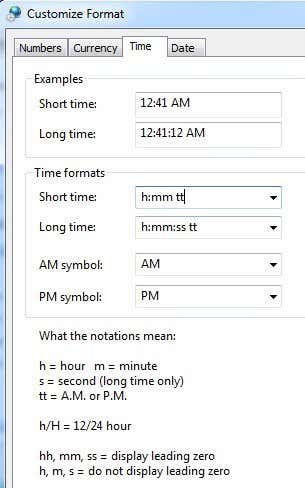
Finally, this will bring up Customize Format dialog, where you have to click on the Time tab. This is a really long way to get to the same dialog that you can get to in one click from the Control Panel.
That’s about all there is to changing the time to military format in Windows. If you have any questions, feel free to post a comment. Enjoy! The post Change Clock To and From Military Time in Windows appeared first on Online Tech Tips. |
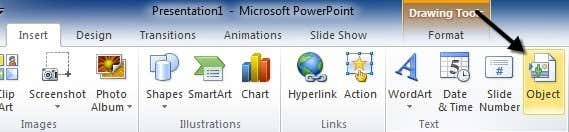
| Posted: 22 Feb 2015 12:17 PM PST Are you working on a PowerPoint presentation and need to insert a PDF document into a slide? Well it seems easy enough right? Just click on the Insert menu, choose Object and pick the PDF file! Unfortunately, I learned that it's not that simple, especially if you are dealing with a PDF document that has more than one page. In this article, I’ll show you how to get your PDF document into a PowerPoint presentation and will also explain all the pitfalls associated with the process. Before we get started, let’s understand what is meant when we say “insert PDF into PowerPoint”. Firstly, you can only insert the first page of any PDF document, so if you have more than one page, you have to split the file into multiple PDF files, which I explain below in the “Split PDF File” section. Secondly, you need to have some kind of PDF reader app installed on your system or nothing will work. If you try to insert a PDF file without any PDF reader on your system, you’ll just get an “object” icon in your slide that you can’t do anything with. So make sure to install a PDF reader like Adobe Reader before trying anything below. I used Adobe Reader, but everything should work even if you use a different PDF reader. After that, there are basically three ways we can go about inserting into PowerPoint: 1. Insert the PDF as an object and display the entire first page on the slide 2. Insert the PDF as an object or icon and attach an action that will open the PDF file in a PDF reader 3. Take a screenshot of the PDF and insert it as an image Insert PDF as ObjectIf you want to display the PDF in your PowerPoint presentation directly, you can insert it as an object. To do this, click on the Insert tab and then click on Object.
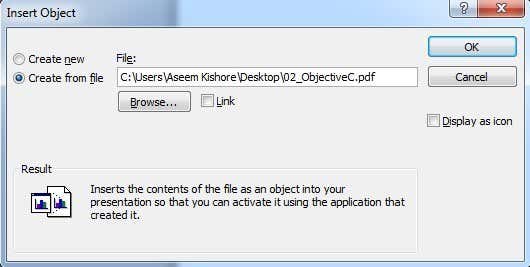
Click on the Create from file button and then click Browse. Choose your PDF file and then click OK. Don’t check any of the boxes.
If all goes well, you should see the first page of the PDF file displayed on the slide as shown below.
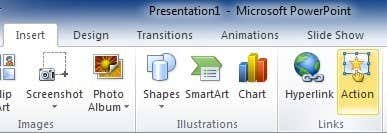
At this point, if you were to play the slideshow, it would just display the first page and then move on to the next slide. If that’s all you want, then you’re set. If you want to insert more pages from the PDF file, skip down and read the section on splitting the PDF file into multiple files. Once you do that, you would just repeat the same procedure shown above for each page. Insert PDF and Attach ActionIf you don’t want to split your PDF file into a whole bunch of files, the alternative is to simply show the first page and then open the PDF file in the default PDF reader application when the presenter clicks on it. This requires opening an external application, but if you don’t mind that, it’s an easier solution. If you check the Link box next to the Browse button on the Insert Object dialog (screenshot above), it should make the PDF object clickable automatically, but this didn’t work on my system. It could be an issue with the version of Adobe Reader I have installed (XI) and if you’re having the same issue, then you can try attaching an action. There are a couple of ways you can attach an action to the inserted PDF document. In PowerPoint, click on the PDF file object on your slide and then click on the Insert tab and then click on Action.
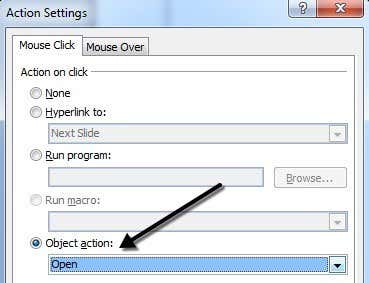
The Action Settings dialog will appear and here you want to select Object action and then pick Open from the dropdown. On my system, the only option was Open, but you might see other options like Edit or Activate Contents. Make sure to try them all out if one of them doesn’t work.
If you run the slideshow now, you should be able to click on the PDF in the slide and it should open the PDF file. I say “should” because this didn’t work on my system running Windows 7 and Office 2010. Instead, the first page of the PDF just shrunk down to a tiny box and nothing opened.
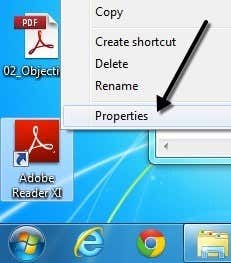
Again this could be due to the version of Adobe installed on my system, but I couldn’t figure out any way to fix it. Hopefully, it won’t occur on your system. If it does, don’t worry, because there is another way we can get PowerPoint to open the PDF file. This procedure is a bit more complicated, but it finally worked for me. Basically, we are going to choose Run a program in the Action Settings dialog instead of Object Action like shown above. Even though this is a more complicated method, it’s actually better because you can specify the exact page to open in the PDF reader app. The first thing we need to do is figure out the path to your PDF reader executable file. To do this, find the desktop, taskbar or Start menu shortcut to the program, right-click on it and choose Properties.
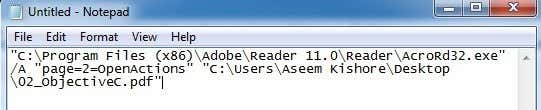
Copy the entire path listed in the Target box as shown below. You’re going to want to open Notepad and use that in order to build the entire command that we will eventually paste into PowerPoint. Make sure to keep the quotes.
Your Notepad entry with the command should look like this right now:
Now copy the following bit of text and paste it after the ending quote with one extra space in-between:
Again, make sure to keep the quotes. The page= parameter lets you specify the page you want to open in the PDF document. Here is the current state of the Notepad file:
Finally, we need the path to the actual PDF file that you want to open. Go to Explorer and navigate to the location of the PDF file. Then click in the address bar and copy the path.
Add a quote and then paste the path into the Notepad file. Add a forward slash and then type in the name of the PDF file along with .pdf at the end. Finally, add a closing quote to the end of the path. It should look like this now:
Now copy that entire bit of text and go to Action Settings again for the PDF object, select Run a program and paste all of this text into the box.
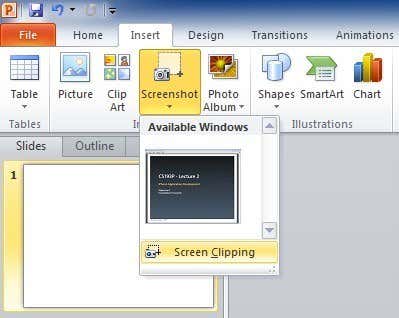
Click OK and then run the slideshow. You should now be able to click on the object and it will open Adobe Reader to the page that you specified in the command we created. You can add these actions to any object, i.e. text boxes, images, etc. and therefore create a separate link for each page in the PDF without having to split the PDF file up. Insert Screen ClippingIf you don’t have to insert a lot of content from your PDF document into PowerPoint, then you can simply take some screen clippings of the PDF and insert those. To do this, click on Insert and then select Screenshot. In the dropdown, you’ll notice that it will show you Available Windows and a link for Screen Clipping.
If you have the PDF document open already to the page that you need, just click on the little thumbnail and it will insert a screenshot of the entire PDF reader window. The only reason you may not want to use this feature is because it includes everything including the title bar of the program, etc. If you just want a portion of the PDF page, click Screen Clipping and PowerPoint will minimize and allow the cursor will become a crosshair. You can then select the region on the screen and it will simply insert that image into your slide. This is a very simple procedure, but worth mentioning for those who need to include only a few small sections of a PDF document in their PowerPoint presentations. You can also just convert your PDF pages into images and then insert each image into the presentation. Split PDF FileFor those of you who want to include each page as a PDF document into your slides, you’ll need to first split the multi-page PDF document into single page PDF files. The easiest way to do this is to use free tools that are available online. Here are a couple of online tools I have tested and verified for splitting PDF files: The top two just extract every page into a separate PDF file and then zip the whole thing together for you to download. It’s super fast and free! Hopefully, you’ve been able to get your PDF file to display properly within PowerPoint using the methods above. If you’re having any trouble, feel free to post a comment and I’ll try to help out. Enjoy! The post Insert a PDF into PowerPoint appeared first on Online Tech Tips. |


| You are subscribed to email updates from Online Tech Tips To stop receiving these emails, you may unsubscribe now. | Email delivery powered by Google |
| Google Inc., 1600 Amphitheatre Parkway, Mountain View, CA 94043, United States | |
0 commentaires:
Enregistrer un commentaire