

Computer Tips From A Computer Guy |
| How to Fix Access is Denied, File May Be In Use, or Sharing Violation Errors in Windows Posted: 11 Oct 2014 12:00 AM PDT Ever try to delete a file and get an Access is Denied error? Or maybe you’re trying to copy or move a file or folder and you get a message stating the source file may be in use? This type of error can occur for several reasons: you do not have ownership of the file or folder and therefore cannot perform any actions on it or the operating system or another program is currently using it. You can usually figure out which situation you’re involved with by taking a look at what exactly you’re trying to do. If you get the Access is Denied or You don’t currently have permission to access this folder message, then you’re probably looking at a permissions problem. If you’re not an Administrator on the computer, you’re probably not going to be able to fix this issue, so first make sure you can get access to an admin account. Access Is Denied Error
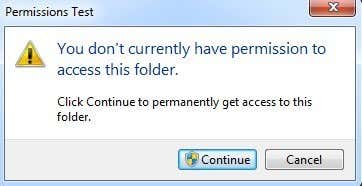
This particular error is normally caused by NTFS permissions, but it can also be caused by other issues like a corrupt user profile, encryption on the file or if the file is in use. We’ll talk about file in use errors in the next section. To gain access to the file or folder, you’ll need to have the correct permissions configured for your account. Before you start doing any work, you should try to click on the Continue button that will show up in Windows 7 and Windows 8 automatically. This will try to give your user account permissions to the folder as long as you are the owner.
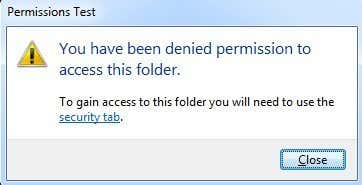
If you get the You have been denied permission to access this folder message after clicking Continue, that means you are not the owner and you’ll have to first take ownership of the folder before you can change any permissions. Take Ownership of Files and Folders in WindowsTaking ownership is unfortunately quite a process, so it’s best to have ample time and patience before attempting this. To get started, you need to right-click on the file or folder, choose Properties and then go to the Security tab.
If you have no access to the folder, you’ll see a message stating you have to be an Administrator to view the security properties. Go ahead and click on Continue. This will pop up another dialog where you get the option to change the owner.
In the Change owner to box, select your user account or Administrators. I personally choose my own account because that’s the default behavior in Windows when you create a new folder/file. Also make sure to check the Replace owner on subcontainers and objects box. Click OK and you’ll get another message saying you don’t have permissions to read the contents, do you want to replace permissions and grant yourself Full Control. Click Yes.
Now make sure to click OK on any remaining open windows so that all dialogs are closed. Don’t try to change any other settings at this point. You have to first close any open dialogs and go back to the Explorer screen. Once there, again right-click on the file/folder and choose Properties and go to the Security tab. It should now look a bit different.
You can access the contents of the file/folder at this point, but it’s best to reset the permissions completely. At this point, you have just added yourself and that’s it. If you want the default Windows permissions that would be applied, you can follow the next couple of steps. Click on the Advanced button and then click on Change Permissions.
Click the Remove button and remove all of the permissions currently listed. At this point, it should just be your user account. Once the listbox is empty, go ahead and check the Include inheritable permissions from this object’s parent box. Then click the Apply button, not the OK button.
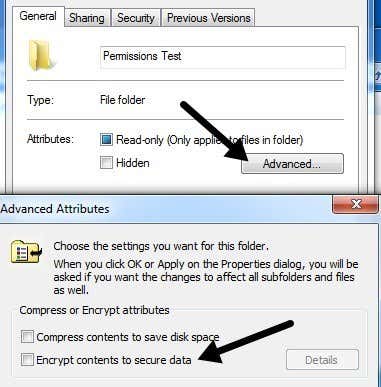
You should see several entries appear in the listbox, including one for your user account. The default permissions also include SYSTEM and Administrators usually, so it’s a good idea to reset them properly this way. If the folder has many sub-folders with files, you can check the Replace all child object permissions with inheritable permissions from this object box. Close all dialogs and you should be good to go! As I mentioned earlier, Access is Denied can be caused in some cases by other issues. A corrupt user profile is one of those odd issues that I have seen more in domain environments. You can create a new user profile and then try to access the file or folder. The other issue is if the file is encrypted. You can always try checking to see if the file is encrypted or not by right-clicking and choosing Properties. Then click on the Advanced button from the General tab and uncheck the Encrypt contents to secure data box.
If someone else has encrypted the file/folder, you won’t be able to access it until you can decrypt it using their user account. The last issue if the file itself is corrupt. In that case, you will have to search for software that can help repair corrupt files, though this is a very rare cause of the problem. File in Use or Sharing Violation ErrorNote that getting the Access is Denied message can be caused by a sharing violation, so if the above method did not work, try the following procedure below. You can download and install a free program called Process Explorer from Microsoft. You can use it to find out which processes are locking up a file. Right-click on the executable file after unzipping and choose Run as Administrator to run the program. Then don’t worry about all the crazy colors and bars, just go to the top and click on Find and then Find Handle or DLL.
Now type in the name of the file in question in the box and type search. You don’t have to type the full name of the file; just part of it will also work most of the time.
You should get back a list of processes that currently have locks on the file. In my case, Notepad.exe locked my test document. Now select the item in the box and then close the search box. You should be back at the main process explorer screen. At the bottom, a row should be highlighted and it should be the path to the file that you had selected in the search box.
Right-click on that row and choose Close Handle. If there was more than one process in the search box, you will have to repeat the same procedure for each process. At this point, you should be able to delete or modify the file as you please. The program is very useful when you get these types of error messages:
Program is very lightweight and does not take up very many resources at all. It can also tell you a lot of other information about Windows processes, but that’s for another post. Like I said above, if someone has denied you access manually, you will not be able to get into that folder or file unless you are given permissions from an Administrator! Have any questions, post a comment. Enjoy! The post How to Fix Access is Denied, File May Be In Use, or Sharing Violation Errors in Windows appeared first on Online Tech Tips. |
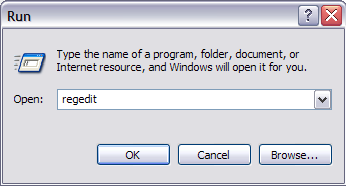
| How to Hide a Drive in Windows Explorer Posted: 10 Oct 2014 07:02 AM PDT You’ve probably read a bunch of posts on how to create hidden folders, secure folders, locked folders, etc, in Windows on many occasions! Heck, one of the most popular articles on this blog used to be on how to create a secure and locked folder in Windows XP. However, hiding a folder is a tricky proposition and usually doesn’t work well unless you use something like Bitlocker or FileVault. So here’s another way to “hide” your data, but with the big caveat that it can easily be found by someone who has some technical skills. If you’re trying to dupe your computer illiterate parents or friends, then feel free to try the following method. It’s basically a registry hack that hides a computer drive, i.e. C, D, etc, from the Windows Explorer interface. Even though you can’t see the drive in Explorer, it can still easily be accessed via the command prompt or by manually typing in the path into the address bar in Explorer. Also, the drive will still show up in third-party programs and in tools like Computer Management, etc. That’s no real security, but if someone doesn’t know the drive even exists, it might be a quick way to keep it out of sight. I tried this hack on Windows XP, Windows 7 and Windows 8 and it worked on all three. Ok, so here’s how to implement the hack: first off, back up your registry as this requires adding a key to the registry. Once you’ve backed up your registry, open the registry editor by clicking on Start, Run and typing in regedit.
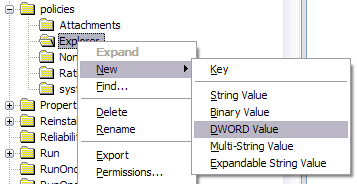
Now navigate to the following registry hive shown below: HKEY_LOCAL_MACHINE – Software – Microsoft – Windows – CurrentVersion - Policies – Explorer Right-click on Explorer and choose New and then DWORD Value. In Windows 7 and Windows 8, you can choose DWORD (32-bit) Value.
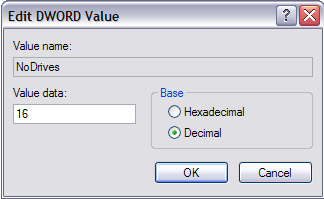
Name the new value NoDrives and then double click on it to open the properties dialog box. Click on Decimal for the Base unit.
Type in one of the following values depending on the drive letter you want to hide. A: 1, B: 2, C: 4, D: 8, E: 16, F: 32, G: 64, H: 128, I: 256, J: 512, K: 1024, L: 2048, M: 4096, N: 8192, O: 16384, P: 32768, Q: 65536, R: 131072, S: 262144, T: 524288, U: 1048576, V: 2097152, W: 4194304, X: 8388608, Y: 16777216, Z: 33554432, All: 67108863 If you want to hide drive E, just type in the value 16. The really cool thing about this trick is the fact that you can hide multiple drives by adding the numbers of the particular drives together. For example, if you want to hide drive E and drive G, you would type in the number 80, which is 64 + 16. Restart your computer and your drive will now be hidden! You can even hide the C drive, though I don’t see any point to doing that. Everything still works fine, in case you were curious. When you want to get your drives back, change the value of NoDrives to 0 or simply delete the value altogether. If you need to hide and un-hide the drive quite often, it might be better to write a script to do it for you. As mentioned earlier, though, you can access the drive covertly while it’s hidden, so there is no real reason to un-hide it. This trick also works for mapped drives, so if you want to hide mapped drives, you can do it this way (though it might just be easier to disconnect a mapped drive). If you have any questions, post a comment. Enjoy! The post How to Hide a Drive in Windows Explorer appeared first on Online Tech Tips. |


| You are subscribed to email updates from Online Tech Tips To stop receiving these emails, you may unsubscribe now. | Email delivery powered by Google |
| Google Inc., 20 West Kinzie, Chicago IL USA 60610 | |
0 commentaires:
Enregistrer un commentaire