

Computer Tips From A Computer Guy |
| How to Increase Windows Explorer Default Thumbnail Size for Pictures Posted: 14 Oct 2014 03:54 AM PDT Here’s something about Windows XP that really annoys me: why can’t you increase or decrease the size of thumbnails in Explorer like you can in Windows 7 and Windows 8? If you’re going to have thumbnails in the first place, is it that hard to put in a little slider bar whereby you can increase or decrease the size? I hate going through a folder in Explorer and not being able to clearly see the details of the picture. I guess Microsoft didn’t think about that issue when the released Windows XP. Nor did they add the option in Service Pack 3, the last major non-security update to XP. By default, the thumbnails in Windows XP look like this:
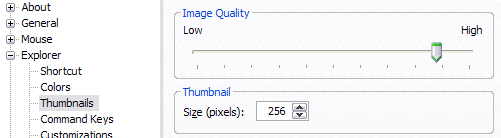
That size is simply not large enough, especially for anyone with vision problems! Luckily, there’s an easy way to modify these settings so that the thumbnails can be any size you want up to 256×256. Unfortunately, the max size for icons in Explorer is 256×256 pixels. If you want to see them bigger than that, you’ll have to use a third-party program. Scroll down past Tweak UI to learn about adjust thumbnail sizes in Windows 7/8. Tweak UIPreviously, I had written about a cool little utility that you can get for free from Microsoft called Tweak UI that lets you modify and tweak a bunch of Windows XP settings. Using this program, we can quickly and easily change the default 96 pixels size of thumbnails to something more visible. Once you install the program, go to the Start Menu and click on All Programs – Powertoys for Windows XP – Tweak UI. After you have opened the program, click on Explorer from the left hand menu and then click on Thumbnails.
Change the default size from 96 to something higher. In my case, I chose 256. Also, make sure to keep the Image Quality closer to high so that the thumbnails look nice. Of course, it will take more resources when browsing pictures, but if you have a fairly new computer, it should not be a problem. Now when you browse through your photos in My Pictures or anywhere where you have thumbnails turned on, you should see something like this:
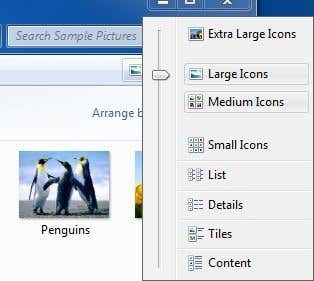
Now that is much better! ThumbnailSize Registry HackIf you decide to use the registry hack, then you can change the size of the thumbnails on Windwos XP, Windows Vista, Windows 7 and Windows 8 since the same hacks works for all these versions. The only clear advantage to using the registry hack at all in Windows Vista and higher is if you want to use a custom size for the thumbnails. By default, in Windows 7 and Windows 8, you can choose from Small, Medium, Large and Extra Large icons. You can adjust the size by moving the slider in Windows 7.
In Windows 8, the Explorer interface has change a little bit and Microsoft removed the whole slider option. Instead, you have to click on the View tab and there you will see the same options in the Layout box.
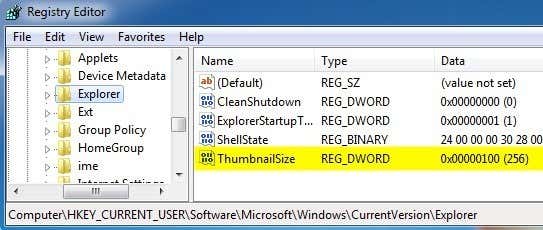
Anyway, back to the registry hack. If you want a custom size for your icons, you can open the registry editor by going to Start and then typing in regedit. Then navigate to the following registry key in the left pane: HKEY_CURRENT_USER – Software – Microsoft – Windows – CurrentVersion – Explorer Now on the right pane, you should look for a key called ThumbnailSize. If it’s not there, you will have to right-click in the right-pane and choose New – DWORD (32-bit) Value. Give it a name of Thumbnail Size and then double-click on it to edit it. Choose Decimal give it a value from 32 to 256.
You should be able to see the effects immediately when you open a new Explorer window. Note that the thumbnail size will apply to all folders and files regardless of what other settings you may have previously chosen. You can still manually change the thumbnail size for a particular folder, but when you browse back to the same folder later, the thumbnails will display with the custom size you set in the registry. Preview Pane in Windows 7/8If you’re still not happy with the 256 max size for thumbnails in Windows and you don’t want to install any third-party software, you have one other option. Both Windows 7 and Windows 8 have a Preview Pane option that basically lets you view a preview that is as large as you can make the preview pane itself.
As you can see, the preview is much bigger. You can expand the explorer window to as large as your monitor and the preview will expand as well. In Windows 7, just click on that small little window button at the top right. In Windows 8, click on the View tab and then click on Preview Pane to enable it. Hopefully, whether you are running Windows XP or Windows 8, you now have enough options to view thumbnails at a desirable size. If you have any questions, post a comment. Enjoy! The post How to Increase Windows Explorer Default Thumbnail Size for Pictures appeared first on Online Tech Tips. |
| 5 Ways to Crack or Reset a Forgotten Windows Password Posted: 13 Oct 2014 09:34 AM PDT I recently helped a client recover his forgotten Windows password by using a couple of different tools. We eventually were able to reset the Administrator password to a blank password so that he could log into Windows. It was a fairly long and complicated process, but it worked. Unfortunately, there is no “one” way to reset a Windows password and depending on what version of Windows you are running, you might have to try different methods. In the end, there is also no real guarantee that you’ll be able to crack the password. There are already so many articles written on how to recover or reset a password that I’m not going to reinvent the wheel, but instead will guide you to the best online resources that I have used to crack my Windows password. 1. Ophcrack Live CD – My favorite ways to blank out or crack a Windows password is to use a Linux Live CD. These are special distributions of Linux that run directly from the CD (no installation required) and are specially designed for cracking Windows passwords. You can read the documentation to learn how to use it.
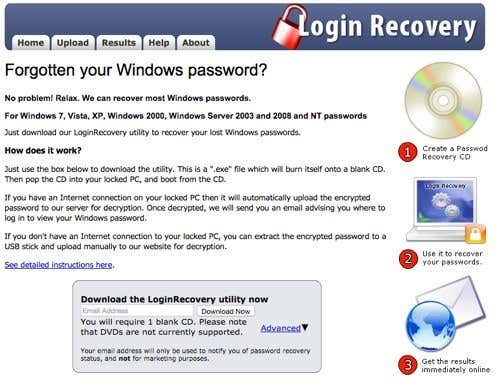
Simply burn the ISO and boot using the CD and the program will get right to work. It may not work, however, on very complicated passwords because it actually tries to determine the password rather than reset it. My buddy over at the How-To Geek site has a great tutorial on using Ophcrack. Also, Ophcrack uses password tables to brute force crack the user passwords. You can download their free tables, but that won’t crack long passwords. For those cases, you can purchase larger password tables that range from $100 to $1000. 2. Offline NT Password and Registry Editor – This is a very small program, only 3MB in size that you can burn to a CD and boot to. It’ll auto-detect the Windows installation and the account names (that is if everything was installed in the default Windows directories). Using this program you can reset or blank out a Windows password, which means it doesn’t matter how long or complicated it is. The program was recently updated after four years and now supports cracking passwords all the way up to Windows 8. It’s a bit hard to use, but About.com has a great screenshot guide that walks you through the entire process, so be sure to check that out. 3. Login Recovery – Login Recovery is a web site that has a program that you can either download onto a floppy disk or a cd that you than use to boot up with. If the PC is connected to the Internet, it will automatically upload the encrypted data to their servers and begin the process of trying to recover the passwords. If you don’t have an Internet connection, it will generate a file, which you then manually upload to their site.
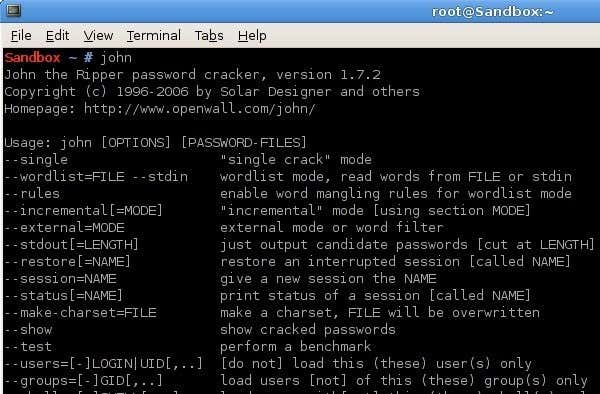
I have tried this site and it did not work for my password, which was 11 characters and mostly symbols, numbers, and letters. However, if the password is something simpler, they will probably be able to crack it. 4. John The Ripper – Another free password cracker that works on Windows, Linux and Macs, so it’s useful for any Mac or Linux user who wants to recovery a password. Pretty easy to use and comes with good instructions, so most people can follow along. If you want a step by step guide on using John the Ripper, check out this article from 101Hacker.com.
5. Knoppix STD – G4TV has a good article on another Linux distro you can download and use to crack your Windows password. Follow the detailed instructions he gives and if the password is not too long or difficult, it should be able to crack it! As you can tell, the best ways to crack a Windows password is using Linux! It might be a little too techie for some people, but it’s definitely worth it if you want to avoid having to re-install Windows and lose all of your data! Any questions, post a comment! The post 5 Ways to Crack or Reset a Forgotten Windows Password appeared first on Online Tech Tips. |


| You are subscribed to email updates from Online Tech Tips To stop receiving these emails, you may unsubscribe now. | Email delivery powered by Google |
| Google Inc., 20 West Kinzie, Chicago IL USA 60610 | |
0 commentaires:
Enregistrer un commentaire