

Computer Tips From A Computer Guy |
| How to Move or Transfer Email Accounts from One ISP to Another Posted: 17 Oct 2014 01:33 AM PDT Are you looking for a way to move your email account from Gmail to Outlook or Yahoo to Gmail? Outside of the major email providers, if you’re still stuck with your college email address or an email from your local ISP like Cox or BellSouth, switching to Gmail, Yahoo or Outlook.com is a good idea because you’ll get a lot more features, better security and more support. Also, some colleges and universities eventually shutdown student email addresses after a certain time period, so switch before you lose everything. You can try to perform a migration yourself and there are tons of tutorials on the Net, but if you’re not familiar with the technical details or don’t have the time, it might be better to use a third-party solution. So if you need to transfer your account info, emails, tasks, calendar items, address book and contacts, etc to a new email provider, there’s a paid service that can do it for you. Note: There used to be a service called TrueSwitch that was backed by the likes of Google and Yahoo and let you switch between email providers for free, but it seems the site and service are no longer available. YippieMove
You would think there would be more services out there to help people move their email between providers, but there really aren’t very many. YippieMove is now the only one that provides this service that I could find online. With TrueSwitch gone, you’ll have to pay a small price if you want someone else to migrate your email. If you want to do it for free, you’ll have to try it yourself. For those folks, scroll down to the bottom where I have listed out some excellent resources for migrating email yourself. Basically, for one transfer, i.e. Cox to Gmail, you’ll have to pay $15. That includes transferring all the email from one account to the other. What I like about YippieMove is that it supports a whole lot of email providers, including colleges/universities, international providers and those pesky local ISPs like Comcast, Cox, etc. Here is a full list of providers that they support. Also, you can quickly check whether or not YippieMove will work for you or not by checking whether your email provider supports IMAP. If it only supports POP3, then you can’t use YippieMove. The good thing is that even if your email provider is not listed on the list of supported providers, it will probably still be able to migrate your email as long as IMAP is supported. The site also provides quite a few guides and videos just to make the process even easier for you. It doesn’t list every possible transfer, but the principle is pretty much the same for all the transfers. To get started, you click on the Start now button on the homepage. The process is basically three steps: where from, where to and what to transfer. Go ahead and fill in your login credentials for the email provider you want to move from first and click Next. Then enter the credentials for the email provider you are moving to and click Next.
Finally, on the last screen, you will get to choose which folders you want to migrate. It will try to match the folders for you, but if there are any problems, you can manually change the destination folder.
It’s worth noting that the website does not give you any error message if you mistype your login credentials on the first two steps. When you get to step 3, it’ll be empty instead of listing out the folders. In that case, go back and retype your login credentials. Also, if you’re using two-factor on any of the accounts, you will probably have to disable it in order to do the transfer. You could possibly use an app password, but I didn’t test that. Finally, click Finish and the process will begin on their backend servers. According to the site, the entire process usually completes within 24 hours. The main feature talked about in the FAQ is the fact that YippieMove will maintain the integrity of the original email when performing the transfer. That means it will maintain the date/time it was sent, any attachments, read and unread status, etc. You can then create an account and login to see the status of the migration. YippieMove also states that the credentials you enter on the site will be encrypted via SSL. The only issue I don’t like is their policy on storing your data. If you look at the privacy policy, it states they can store your credentials on their servers and that it will be deleted within 60 days. I see no reason why they should hold on to your credentials for 60 days. My suggestion would be to use the service and then to change your passwords for both email providers just to be on the safe side. Overall, YippieMove is a legitimate service that seems to work well for most people. I couldn’t find any bad reviews or remarks about the service online, so I’m guessing most people have been satisfied. For only $15, it worth a try even if it gets most of your email into the new provider. If you have used the service, let us know your experience in the comments. Enjoy! The post How to Move or Transfer Email Accounts from One ISP to Another appeared first on Online Tech Tips. |
| How to Fix Internet Explorer has Encountered a Problem and Needs to Close Posted: 16 Oct 2014 10:30 PM PDT Have you ever been browsing the Internet using IE happily until all of a sudden you get this horrid “Internet Explorer has encountered a problem and needs to close” error message, after which IE completely shuts down and you lose all of your tabs along with any forms you might have been filling out? Now that I use Chrome religiously, this has not happened to me even once, but it happened all the time with Internet Explorer. So for those poor souls still using older versions of IE, here’s a quick list of steps you can take to try and fix the underlying problem. The cause of this error can be any number of things, so you may have to try a few different methods before the problem is fixed. If you click on the link to see the data the error report contains, you may see something like this: Error sign
So what can you do if you get this error? Try each one of the following steps and see if the problem goes away. Method 1Open IE, go to Tools, Internet Options or click on the Settings gear icon at the top right and then clear out the temporary Internet files. Under Browsing History, click the Delete button and then check Temporary Internet files and website files. In case you downloaded an executable file that is causing the problem, this will remove it.
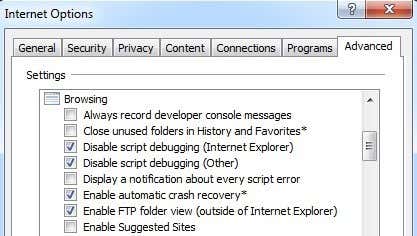
Method 2In some versions of IE, script debugging can be the cause for this issue. You can try disabling script debugging by going to Internet Options again, clicking on the Advanced tab and then checking the Disable Script Debugging (Internet Explorer) and Disable Script Debugging (Other) boxes.
Method 3Run anti-spyware and anti-virus software on the computer. Download MalwareBytes Anti-Malware and Spybot and run each to remove any malware. Both program have free versions and that’s all you need. Also, download CCleaner and HiJackThis and run both applications. Remove unwanted entries that you see when you run HiJackThis (you’ll have to read the docs to know what to remove). Method 4Go to Start, Run and then type in MSCONFIG. Click on the Startup tab and uncheck all items and then re-start the computer. This disables all startup programs from running. If you still get the error, go ahead and turn them back on one by one and see at which problem the problem comes back. This is called performing a clean boot.
Method 5Disable Smarts Tags in Internet Explorer by going to Tools, Internet Options, Advanced tab, and then clearing the Enable Smart Tags check box. Method 6Install the latest updates from Microsoft Update web site. If you started receiving this error AFTER installing the latest updates, you will have to perform a System Restore to the point before you installed the updates. You can access the System Restore feature by going to Start, All Programs, Accessories, and then System Tools.
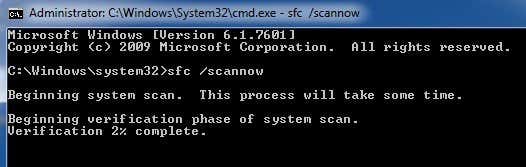
Method 7Use System File Checker to scan for changes or modifications to Windows protected files. If any files were overwritten or deleted, etc, SFC will automatically retrieve the correct version of the file and replace it. You can run SFC by going to Start, and then Run, typing in CMD and then typing sfc /scannow in the command window.
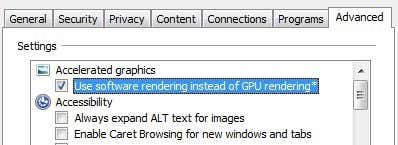
Method 8Re-register Internet Explorer DLL files. Click on Start, then Run, type in CMD and then type the following lines and press Enter after each one: regsvr32 softpub.dll Method 9Disable all third party add-ons to Internet Explorer by going to Start, Control Panel, Internet Options, Advanced tab and then un-checking the “Enable third party browser extensions” check box under the Browsing section. You will have to scroll down a couple of lines. You can also start IE with no add-ons by going to Start, All Programs, Accessories, System Tools and clicking on Internet Explorer (No Add Ons). Method 10Sometimes a compatibility issue causes the problem with the graphics card. To check and see, go to Internet Options, Advanced and check the Use software rendering instead of GPU rendering box under Accelerated Graphics.
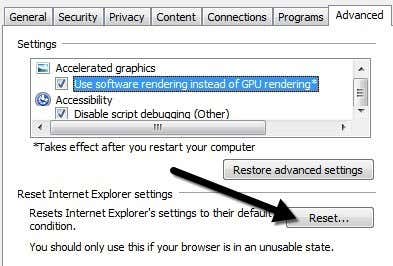
Method 11One final option you can try is to reset Internet Explorer. Again, go to the Advanced tap in IE Options and at the bottom you’ll see the Reset button.
Also make sure to check the Delete personal settings box when you get the pop up dialog to confirm the reset. Hopefully if you’ve been getting this error, one of these methods mentioned above will fix the problem. If you have questions about how to perform a step, please post a comment and I will try to help you out! Enjoy! The post How to Fix Internet Explorer has Encountered a Problem and Needs to Close appeared first on Online Tech Tips. |


| You are subscribed to email updates from Online Tech Tips To stop receiving these emails, you may unsubscribe now. | Email delivery powered by Google |
| Google Inc., 20 West Kinzie, Chicago IL USA 60610 | |
0 commentaires:
Enregistrer un commentaire