

Computer Tips From A Computer Guy |
- Remove Shortcut Arrows from Desktop Icons in Windows
- How to Kill or Close All Running Programs in Windows Quickly
- How to Create Microsoft Outlook Shortcuts for Email and Tasks
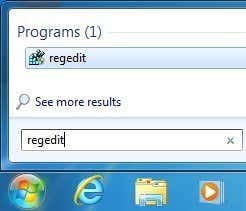
| Remove Shortcut Arrows from Desktop Icons in Windows Posted: 13 Oct 2014 02:11 AM PDT In all versions of Windows, whenever you place a shortcut on the desktop, it will overlay an arrow in the bottom left-hand corner as a visual sign that it’s a shortcut. If you don’t care to have that arrow, you can remove it in a couple of different ways. In this article, I’ll talk about a registry hack and also about a freeware utility that gets the job done. Remove Shortcut Icon via RegistryI mention the registry hack first because it’s the quickest and easiest way to get rid of the arrows without having to install any third-party programs. It works on Windows Vista, Windows 7 and Windows 8 without any issue. You do have to be a little comfortable using the registry, but it’s really straightforward. Click on Start and type in regedit in the search box. On Windows 8, go to the Start Screen and starting typing regedit.
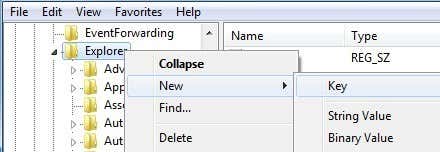
Now navigate to the following key: HKEY_LOCAL_MACHINE – SOFTWARE – Microsoft – Windows – CurrentVersion – Explorer – Shell Icons Note that you may not have the Shell Icons key under Explorer by default. If it’s not there, right-click on Explorer in the left-hand pane and choose New – Key.
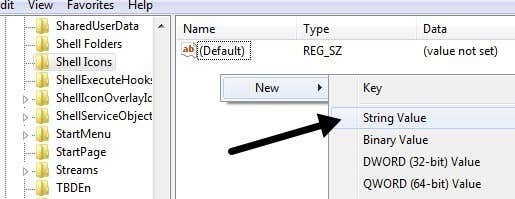
A new key will appear in the left-hand menu and you’ll have to give it a name. Now type in Shell Icons with the capitalization shown in the screenshot above. Then click on Shell Icons in the left pane and you’ll see just a key named Default in the right-hand pane. Right-click on any white area in the right-pane and choose New – String Value.
Change the name to the number 29 and press Enter. Then double-click on the entry to bring up the key editor. In the Value Data field, go ahead and copy and paste the following: %windir%\System32\shell32.dll,-50
Click OK and close out the registry editor. Now just log off and log back in or restart your computer and the arrows should be gone from your desktop icons if done correctly. This will also work on 32 or 64-bit versions of Windows. Windows Shortcut Arrow EditorWindows Shortcut Arrow Editor is a nifty little program is my favorite because it not only works on Windows Vista, Windows 7 and Windows 32 or 64-bit versions, but also doesn’t require you to mess around with the registry.
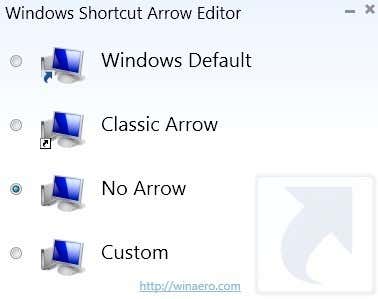
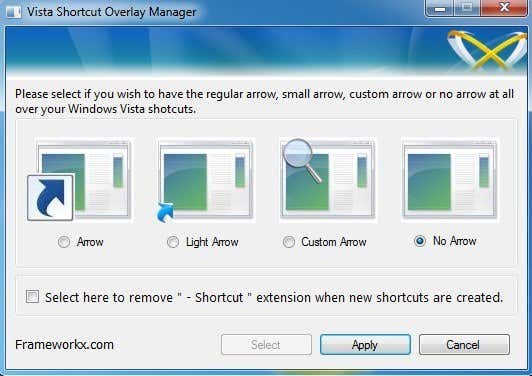
Once you download it, just unzip the files and then navigate to the appropriate directory for your OS and platform. There are 32 and 64-bit versions for Windows 7 & Vista and the same for Windows 8. Once you run the EXE file, you’ll get a simple dialog as shown below where you can choose from one of four options.
The classic arrow is a smaller arrow than the default one and you can also choose a custom image if you want something other than an arrow to show up on the icon. The nice thing about this program is that you don’t even have to log off for it to work. Once you select the radio button, the desktop is automatically updated and you’ll see the arrows have disappeared. Vista Shortcut Overlay RemoverVista Shortcut Overlay Remover basically takes the registry hack and wraps it into a small program. This little freeware application is by no means a stunning piece of software with loads of features, etc, but then again it’s usually the simple applications that everyone loves. The only downside is that it only works on 32-bit versions of Windows.
The program is very simple to use and does it’s one job very well. You can either shrink the arrow size for the arrow shortcuts or remove them altogether from your icons. Choose one of the four options from the list and click Apply. You can also check the box at the bottom, which will remove the word “shortcut” when you create new shortcuts on the desktop. Now go ahead and log off your computer and log back on. Your arrows should either be gone or be reduced in size. I also tried to run this program on Windows XP, but it didn’t allow me to. If you want to remove the shortcut arrows from Windows XP desktop icons, you’ll need to check out my post on tweaking Windows XP using Tweak UI for XP. You can also tweak many other settings using the Tweak UI program. The post Remove Shortcut Arrows from Desktop Icons in Windows appeared first on Online Tech Tips. |
| How to Kill or Close All Running Programs in Windows Quickly Posted: 12 Oct 2014 11:17 PM PDT Looking for a free Windows utility that you can use to quickly close all programs currently running in Windows? This can be quite useful, for example, when you have to shutdown all running programs before installing a new application. I find that quite annoying because I usually have 10 different apps running and I have to manually close them one by one and then re-open them once I’ve installed my program. That’s where two free utilities make the process a lot simpler. Close All and SmartClose are pretty much the only two programs that perform this action properly. Close All seems to do a better job at closing down all applications than SmartClose, but SmartClose has a nice feature that lets you restore the applications that you had previously closed. You should try both and decide which one works better for you. Close AllClose All is a very simple program and doesn’t try to do anything very ambitious other than closing as many apps as possible. It’s also a newer program and therefore supports 32 and 64-bit Windows. Once you install and run it, it will show you a list of all running programs.
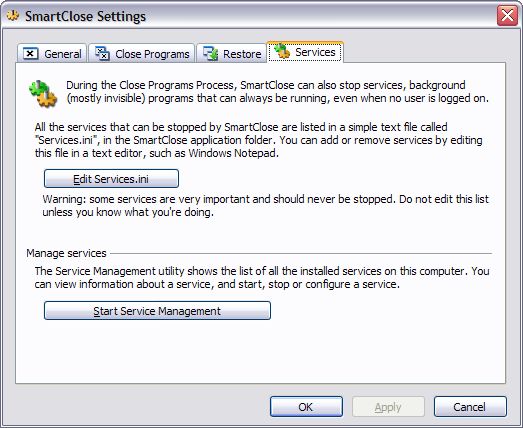
By default, all apps are selected, but you can uncheck an app if you do not want to close it. Just click OK and you’re done! For test purposes, I opened about 10 to 15 programs on a Windows 7 PC and Close All was able to shut them all down. Obviously, your computer will be running different applications and your results may vary, but Close All does the best job of closing the most apps. As I mentioned earlier, there is no way to restore the apps you shut down using Close All. Another caveat to the program is that if you have a program open with unsaved data, the program will ask you if you want to save your data. Close All does not kill the process in this instance, so you have to manually close that particular app. This same issue also occurs with Smart Close even though it has an option to kill programs, it doesn’t seem to work properly. Smart CloseWith SmartClose, the process is a bit slower than Close All, as it takes a snapshot of all of your currently running programs, so that you can restore them later on. This is actually a very useful program for many people because you can startup 4 to 5 of your favorite apps and then save a snapshot, which you can them simply restore at any time by using the program. It can even restore Explorer and Internet Explorer windows to their previous locations on the screen. That way instead of having to click on 5 different icons, etc, you can quickly start up applications using SmartClose. Another really nice feature about SmartClose is that you can configure it to shutdown or stop Windows services also. It actually comes with a list of services that it deems as closable, but you can add or subtract if you know what you’re doing. The program tries not to be stupid by not shutting down services that Windows needs in order to be able to run, but it’s not perfect. Once you have it installed, you can begin by creating a snapshot and closing all programs, restoring a snapshot (restore apps), or changing the program settings.
On the following screen, you’ll see a couple of checkboxes that let you decide what actions to take. If you just want to shut down applications and not worry about snapshots and restoring, you can uncheck the appropriate boxes. You can also prevent the program from closing IE windows and from turning off Windows services. I personally always uncheck the Stop Windows Services box because it turns off a couple of services by default that I normally would not turn off. You can edit this list by going to the Service Settings, which I explain further below.
Clicking Next will bring you to the Protected Programs screen, which is also useful for this program because unlike Close All, which lets you choose the programs to close, SmartClose tries to close everything. On my system, it tried to close certain processes that I didn’t want to shut down. In those cases, you should add the process to the protected programs list so that it doesn’t get shutdown.
When you click Next, SmartClose will get to work and start shutting down all your programs. Again, as with Close All, if a file is open in a program and it’s unsaved, you will be prompted to save the file, in which case you will have to manually click that button.
Overall, it was able to close all the programs in my test run, but it took almost a minute, whereas Close All was done in 2 seconds. I also tried restoring the snapshot after I finished and the results were pretty good. It managed to restore about 11 out of 14 programs. For some reason, it could not restore three processes and I’m not sure why. The program also has a good number of configuration options as show below: General Options
Close Programs
SmartClose has an option to kill programs that it can’t close properly, but it didn’t seem to work on programs with open files and unsaved data. Restore Settings
Service Settings
If you do keep this setting enabled, it’s a good idea to click on Edit Services.ini and add/remove services. By default, it shuts down remote desktop, Windows Time and a couple of other services that I don’t want disabled on my system. I would recommend unchecking that option when running the program for personal use. However, if you are in an IT environment with a lot of your own self-created services, this option is really useful. So those are the two programs that are best suited for shutting down applications in Windows quickly. Each has its own advantages and disadvantages, so please try both before you decide on one. If you have any questions, post a comment. Enjoy! The post How to Kill or Close All Running Programs in Windows Quickly appeared first on Online Tech Tips. |
| How to Create Microsoft Outlook Shortcuts for Email and Tasks Posted: 12 Oct 2014 09:13 PM PDT Here’s a quick guide on how to create your own Outlook shortcuts (not Outlook keyboard shortcuts) on the desktop or Quick Launch bar so that you can easily create a new email message, add new notes, add new contacts, or create new appointments without having to open the Outlook window at all! I find these shortcuts better than the Outlook keyboard shortcuts because those still require you to have Outlook open and active. However, it would be really useful sometimes if I didn’t have to constantly open Outlook every time I want to write a new email, let’s say. It would be so much easier to simply click on an icon on the desktop or on the Quick Launch bar to create a new mail. You can do this by changing how Outlook runs with a set of command line switches. Here’s how you go about doing this: first you should already have a shortcut icon on your desktop or in your Quick Launch bar for Outlook as shown below. If not, just go to the Start Menu, All Programs and drag the Outlook icon onto the desktop.
Go ahead and right-click on the icon and choose Send To and then choose Desktop. You can also simply right-click and drag it to the desktop and choose Copy if you like.
Now you’ll see you have a “Launch Microsoft Outlook” icon on your desktop. If you were to click on that, it would just load Outlook. Now we’ll go ahead and change the command line parameters so that it does something else, like create a new email or task. Go ahead and right-click on the icon and choose Properties. You’ll notice in the Target text box, the path for Outlook will be in quotes followed by some / and then a parameter. In my case, it looks like this: “C:\Program Files\Microsoft Office\OFFICE11\OUTLOOK.EXE” /recycle
What we want to do now is change the parameter. Delete the /recycle or whatever is after the OUTLOOK.EXE” part and replace it with any of the following depending on what you want it to do. These are Outlook 2003 command line switches. I have links below for other versions of Outlook too.
Note: The above path is for Outlook 2003, which is called OFFICE11 in the path name. If you have a different version of Office, simply to go C:\Program Files\Microsoft Office and see check the number. For Office 2007, I believe its OFFICE12. Go ahead and change that value to whatever is on your system. Now click OK and go ahead and rename your shortcut to something more appropriate. You can then drop it back onto your Quick Launch bar by dragging it there. Next time you want to create a new email, just click on it. You can also setup these commands for your mouse if it has extra buttons you’re not using! So you can create new mails, etc by simply clicking a button on the mouse! But that’s not all! You can configure many command lines switches to do a lot more than just the above-mentioned tasks by going to the Official Reference pages from Microsoft. However, most of these are for advanced users and you probably won’t need them. Outlook 2003 Command Line Switches Outlook 2007 Command Line Switches Outlook 2010 Command Line Switches Outlook 2013 Command Line Switches If you use Outlook often and know of some more useful shortcuts not mentioned here, feel free to share them in the comments. Enjoy! The post How to Create Microsoft Outlook Shortcuts for Email and Tasks appeared first on Online Tech Tips. |


| You are subscribed to email updates from Online Tech Tips To stop receiving these emails, you may unsubscribe now. | Email delivery powered by Google |
| Google Inc., 20 West Kinzie, Chicago IL USA 60610 | |
0 commentaires:
Enregistrer un commentaire