

Computer Tips From A Computer Guy |
| Send Free Text Messages to Cell Phones from Your PC Posted: 12 Oct 2014 12:22 AM PDT Have you noticed that when you try to use some of those free SMS online services, half the time they don’t work? Well, most of them never worked for me when all I tried to do was send a text message from my computer at home to my Verizon cell phone! Not only that, but some of them start to spam the phone number with text message ads. So in this article, I will mention the free SMS texting sites last, as you really should avoid using them unless you have no other option. Luckily, there are some legitimate ways to send a text message from your computer without having to use shady websites who might sell your data and spam you. Send SMS via Carrier WebsitesA lot of the wireless carriers let you send text messages directly from their websites. The big caveat to this method is that you can normally only send text message via their website to other people using the same carrier. For example, if you are an AT&T customer, you will only be able to send text messages to other AT&T customers via the website.
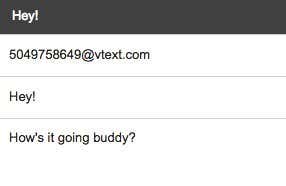
Here are a couple of links that walk you through the process of sending a text message via the carrier’s website: https://www.att.com/esupport/article.jsp?sid=57834&cv=820#fbid=90Ch0SHOfqd http://www.verizonwireless.com/news/article/2013/06/computer-to-phone-text-messaging.html If you can’t figure out where to send a text message on your carrier website, just Google send SMS via carriername website and you’ll find the answer. If you need to send an SMS to someone not on the same network, then continue reading. Send Emails to Phone NumbersAnother feature that most carriers have that a lot of people don’t know about is an email address that is associated to your phone number. You can send an email to this special email address and that phone number will receive a text message.
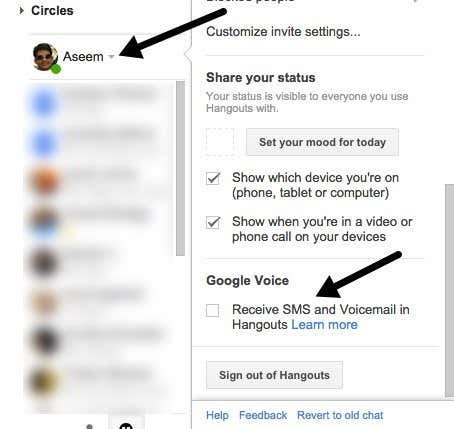
The format is basically the nine digit number @ whatever domain the carrier has chosen. Here are all the ones I could find online: AT&T – @txt.att.net (SMS), @mms.att.net (MMS) Verizon – @vtext.com (SMS), @vzwpix.com (MMS) T-mobile – @tmomail.net Sprint – @messaging.sprintpcs.com Alltel: @message.alltel.com Boost Mobile – @myboostmobile.com Cricket – @sms.mycricket.com, @mms.mycricket.com Metro PCS – @mymetropcs.com Nextel: @messaging.nextel.com SunCom: @tms.suncom.com US Cellular – @email.uscc.net VoiceStream: @voicestream.net Google Voice via Google HangoutsThe other service I use for sending SMS messages from my computer is Google Voice and Google Hangouts. Google Voice will let you send text messages directly from the Google Voice service once you sign up for a number, but you can also integrate Google Voice into Google Hangouts so that you can send SMS messages where you use Google Hangouts, i.e. Gmail, iPhone app, etc. To set it up, you first have to make sure you have a Google Voice account. Make sure you sign up using the same email address you use for your Gmail account. Once you have it setup with a number, go to Gmail and click on your name in the chat window that on the left hand side. If you have chat disabled, you need to go to Settings – Chat and turn the chat back on.
Once you check that box, all your SMS messages will go through Google Hangouts rather than thru Google Voice. Since Google seems to be moving everything over to Hangouts now, I would suggest you set it up this way. Now go ahead and restart Chrome and log back into your Gmail account. Search for a contact by clicking on the little magnifying glass icon next to your name in the chat section and make sure the number is a US phone number. As of now, you can only send SMS messages to US numbers.
You’ll notice a new icon with the letters SMS written on it at the top when the chat window opens. Click on that and it will open a new windows to the left and the text box says Send an SMS message. You can send text messages to any phone number as long as it’s a phone number in the US or Canada. MightyText for AndroidIf you have an Android phone, then you have another option available to your for sending text messages from your computer. The way it works is that you install the MightyText app on your Android phone, which will then link your phone number to your Google account. You then log into the MightyText website on your computer and it will sync all the text messages from your phone.
When you send a message from the web interface, it gets sent back down to your phone and then app will send out the message like a normal text message. When you get a reply, the app will forward it to the web interface. From the reviews, it seems to work very well, so if you’re an Android user, it’s a great option. Use a SMS WebsiteAs I mentioned above, SMS sites are the last resort. I have tried a bunch and have tried to only list the ones that actually worked for me. 1. txt2day.com – Easy as heck to use, simply enter you 10 digit number, email (optional), your provider, and the text message. The reason this service is one of my favorite is for two reasons: first, if you’re sending a message to someone and you don’t know their wireless provider, you can lookup the provider based on the phone number and secondly, if someone starts to spam you using the service, you can have your number blocked so you don’t get any messages from that number.
3. SMS Everywhere (http://smseverywhere.com/) – This is by far the simplest of all the text message sending services. All you have to fill out is the number and a message! The cool thing about this service, which is an advantage over the other two, is that you don’t have to know the provider at all, it figures it out for you! That’s pretty great in my book! Simply put in the number, type your message and you’re done!
4. Text’em (http://www.textem.net/) - This service has no clear advantage over the other services and actually requires more steps, i.e. provider, email address, security code, etc, but at least it works!
All of these services are for the United States only, meaning you can only send text messages to US cell phones. Of course, you can only SEND for free, the person who receives them will be charged for incoming text messages depending on their plan. So if you’re looking for a quick and easy way to send free SMS text messages from your PC to cell phones, hopefully this article helped. If you have any questions, feel free to post a comment. Enjoy! The post Send Free Text Messages to Cell Phones from Your PC appeared first on Online Tech Tips. |
| How to Automatically Move or Copy Files in Windows Posted: 11 Oct 2014 05:32 AM PDT I’ve always wished Windows would come with features to automatically organize my files: automatically move or copy files based on the file name, size, extension, etc. Unfortunately, we have to rely on third-party programs to get the job done. In this article, I’ll walk you through a one of my favorite programs for automatically organizing files. So what are some use cases for a program like this? In my case, I have a lot of home videos that are recorded on my HD video camera in AVCHD format. In order to play the movies on my computer and smartphone, I need it in MP4 format. Once I convert the videos, I copy them to my NAS and then delete the local copies of the videos. Using an organizing program, once the converted files appear in a specified folder, they are automatically copied to my NAS and then deleted from the local computer. It makes my life easier and works great. So let’s talk about the actual program. DropItDropIt is personally my favorite tool because it has a lot of useful options and really lets you control exactly what files/folders you want to process using their examples or by using regular expressions. If you have a fairly complicated set of rules for organizing files, this program is for you. It’s also open source and comes in a portable version, so you don’t have to install anything on your system if you don’t want to. Once you install it and run the program, you’ll notice that only a blue block with a white down pointing arrow appears on top of all other windows. That’s pretty much the interface for the program! It’s not exactly as intuitive as I would have liked, but it’s really easy to learn. Firstly, let’s configure it so it’s not in our way all the time. Right-click on the icon and you’ll see a menu pop up. This is the menu you’ll be using to configure the rules and options for the program. Go ahead and click on Options for now.
The top three items deal with the layout and positioning of the small icon. What I do on my computer is move it to a location with my other desktop icons and then uncheck Show target image always on top and check Lock target image position.
Now the icon just looks like another desktop icon rather than floating all over the desktop on top of my other programs. You can then just drag and drop files/folders onto that icon at any time to manually process files. Later on I’ll show you how to set up monitoring so you never have to manually start a processing job.
Next, let’s understand profiles. If you right-click on the icon, you’ll see an option called Profiles that includes Archiver, Default, Erasor, Extractor, etc. If you pick a different profile other than Default, then when you drop files or folders onto the icon, the current profile rules will apply. For example, if you choose Archiver, you’ll notice the icon changes and if you drop a couple of files onto the icon, it will create a compressed zip file on your desktop!
You can see the rules associated with any profile by right-clicking on the icon and choosing Associations. The list of items in Associations will vary depending on which profile you are currently working in. In our example, we are using the Archiver profile, so we’ll see the Archiver rule.
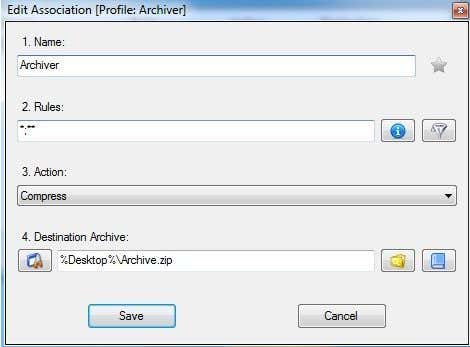
Double-click on the rule to open it. There are four parts to each rule: the name, the filter or rules, the action and an associated last option that changes depending on which action you pick. Normally, it’s just a destination.
The most important part here is the rules. You can click on the little blue information icon and it will quickly give you some examples of rules for files and rules for folders.
The second button to the right of the blue icon is the filter button. Clicking on that will bring up a list of additional filters you can add on top of any file or folder filters you might have added. So you could have picked all files with a .JPG extension and then set the rule so that it only applies to files that are larger than 2 MB.
The other important part is the Action for the rule. Dropit has a large number of actions, which is why I find it so useful. You can move, copy, compress, extract, rename, delete, split, join, encrypt, decrypt, open with a program, upload, send by mail and lots more. It’s quite comprehensive.
Now that you know how to create rules, go ahead to the Default profile again and then go to Associations. You’ll see there are no rules listed there yet. This is where you should add your own rules. Once you create a rule, you can pass your files through the rules by simply dragging the files or folders from Explorer onto the little icon.
Depending on the settings, a dialog will pop up and stay on the screen that will list out what actions will be taken to the files. To start, you click on the little blue play button. Of course, this is not very automated if you have to drag/drop files and manually start the processing. To fix this, right-click on the icon and go to Options again. This time make sure to uncheck the Show progress window during process box.
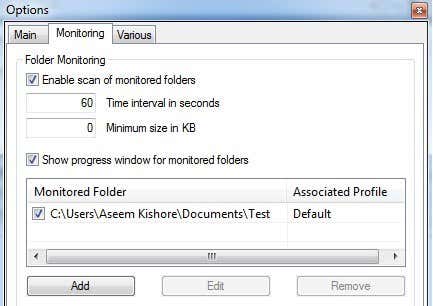
Lastly, go to the monitoring tab and check the Enable scan of monitored folders box. Then click the Add button at the bottom and choose the folder you want to monitor. You can also change the time interval for scanning and the minimum size of the files.
Now just sit back, dump some files into your monitored folder and watch how after a few seconds your files will automatically be processed without you having to do anything at all. The program is quite powerful and I’ve really only touched the surface of what you can do with it, but hopefully this gives you enough to feel confident using it. If you have any questions, post a comment. Enjoy! The post How to Automatically Move or Copy Files in Windows appeared first on Online Tech Tips. |


| You are subscribed to email updates from Online Tech Tips To stop receiving these emails, you may unsubscribe now. | Email delivery powered by Google |
| Google Inc., 20 West Kinzie, Chicago IL USA 60610 | |
0 commentaires:
Enregistrer un commentaire