

Computer Tips From A Computer Guy |
- Beginner’s Guide to the Windows Command Prompt
- How to Open Files in Windows with Different File Extensions
- Format Cells using Conditional Formatting in Excel
- How to Resize a Video or Change Resolution
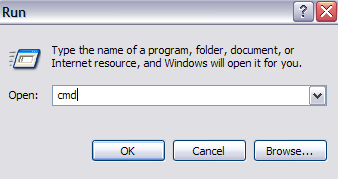
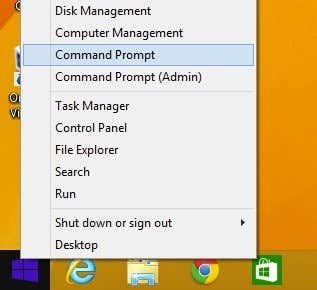
| Beginner’s Guide to the Windows Command Prompt Posted: 19 Nov 2014 04:27 AM PST Earlier today I had to boot a client computer into safe mode and delete a virus via the command prompt because whenever Windows would load, the file would become locked and hence undeletable! There are several other reasons why you may have to use the command prompt in your life (though rarely), so it’s good to know how to navigate your way around! If you have been meaning to learn how to use the command prompt in Windows, I’ll go through some of the basic commands that are performed most often. Just so everyone’s on the same page, you can get to the command prompt by going to Start and then click on Run and typing in CMD. In Windows 7, just click on Start and begin typing cmd. In Windows 8, you can just right-click on the Start button and choose Command Prompt.
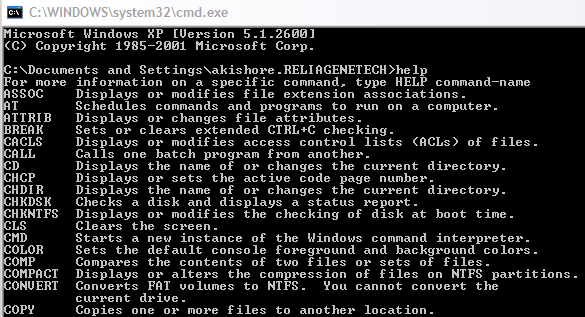
You’ll now see a large black window with the cursor at the end of the path to your user profile in C:\Documents and Settings\Username or C:\Users\Username. So what to do now!? Well, since I can’t explain everything, you’ll probably want to end up using some of the help guides that are provided in MS DOS itself by typing in HELP and pressing Enter. When you do that, you’ll get a list of all the commands you can use in MS DOS and a short description of what they do:
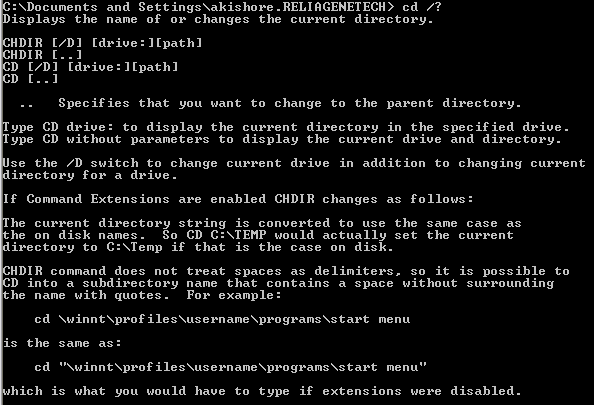
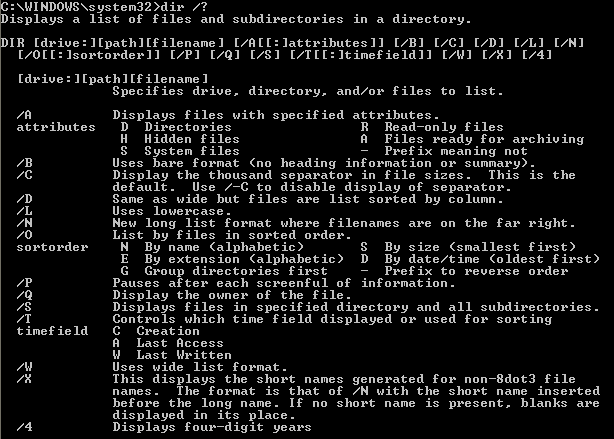
You can also find out more detailed information about the parameters and how to use each command by typing in the command name followed by a /?. For example, typing in CD /?, will present you with a quick tutorial on how to use the CD command:
As you can see from above, the MS DOS command CD displays the name of or changes the current directory. So if you wanted to change from the default user profile directory to the Windows System32 directory to delete a virus file, you would type in the following to navigate to that directory: cd c:\window\system32 and press Enter You current directory at the prompt will now change to:
Now that you are in that directory, you may want to view all of the files and directories first, so you can type in the command DIR and press Enter. You’ll now get a giant list of all of the files and folders in that directory. You can type in DIR /? and see what parameters you can pass to it.
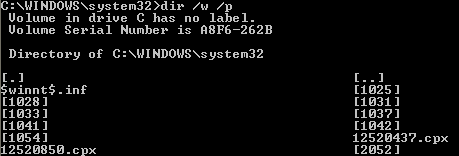
As you can see, you could type in DIR /P to give the list in a paginated format that you can browse through slowly. Or you could type in DIR /W to get the list in a wide format rather than one single column. The cool thing about DOS is that you can include several parameters for each command, so you could type in DIR /P /W and get a page-by-page view along with wide format:
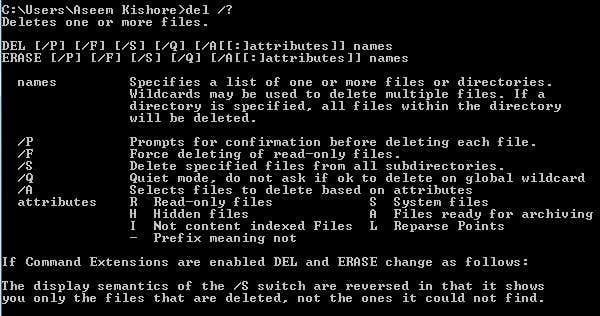
So now that we have a list of files and folders, let’s continue with our deleting a virus example. If you want to delete a file, you would use the DEL command. Again typing in DEL /? will give you some useful info on the command.
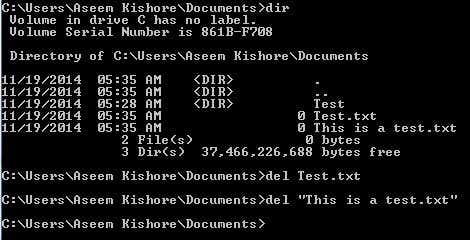
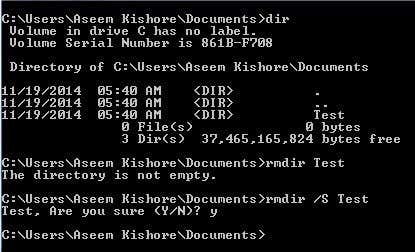
To delete a file, we can simply type in DEL filename and that will delete the file. When you use the command this way, it won’t prompt you to confirm before deleting the file, so make sure you have typed in the correct file name. Also, you have to enter the file name with the extension, so it would be DEL Test.txt to delete that file. Also, if you need to delete a file that has spaces in the name, you have to use quotes like DEL “This is a test.txt”.
If you need to create or delete folders, you would use the MKDIR and RMDIR commands. It’s worth noting that if you try to delete a non-empty directory, you will get an error message. However, if you are sure you want to delete the directory and everything inside, you can use the RMDIR /S foldername command.
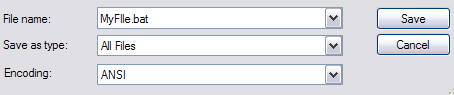
There are lots of other commands that you can use to do all sorts of stuff like copy files, print text files, change file permissions, etc. So if you can do most of this stuff in Windows using the GUI interface, then why bother with DOS, right? Firstly, you never know when something bad will happen to Windows and you’re stuck in the command prompt because nothing else will load. Also, any command you type in the command prompt, like we showed above, can be saved into a file with a .BAT extension and run anytime by just clicking on the file or can be scheduled to run using the Windows Scheduled Tasks Control Panel applet. So if you want to be able to routinely perform some simple actions on your computer, like copying files from one folder to another, just type the commands into Notepad and save the file with a .BAT extension instead of as a text file. Basically, you have to choose All Files for the File Type option and then type in the name like “MyFile.bat” with the quotes included.
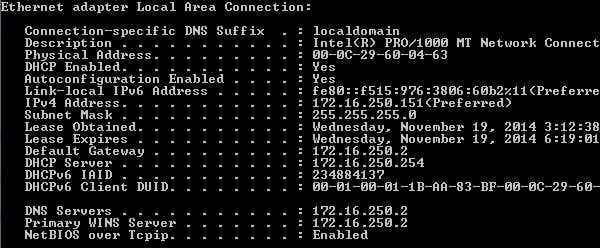
Let me mention a couple of other commands that prove to be very useful very often. IPCONFIGThe IPCONFIG command gives you information about your network cards, IP addresses and also lets you renew your IP address. My favorite is ipconfig /all, which will give you detailed information about each network adapter on your computer. You can then use this info to figure out your router IP address (default gateway) and whether or not you’re getting an IP address from a DHCP server.
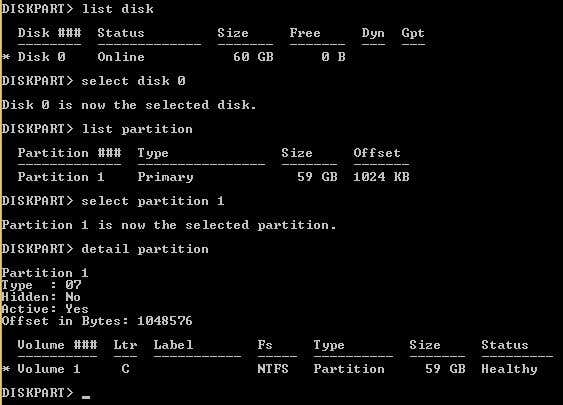
DISKPARTAgain, when you end up with hard drive problems, this command can prove to be very useful. DISKPART lets you administer the hard disks installed on your computer. You can do things like set a partition to be the active partition, assign a drive letter to a partition, shrink a disk, take a disk offline or online, etc.
SFCSystem File Checker is really useful because it scans all protected system files and replaces incorrect versions with correct file versions. There will be a lot of times when certain system files in Windows have become corrupt and system file checker will fix them for you easily. You just run sfc /scannow and it will perform a scan and fix any issues. It does take quite a bit of time, but worth it if you’re having any kind of corruption issues. A couple of other very useful commands that you might have to end up using are listed below:
That should hopefully get you up and running on how to use and navigate in the MS DOS command prompt! You can also check out this site that has a list of all commands you can use at the command prompt. If you have a question, please post a comment! Enjoy! The post Beginner’s Guide to the Windows Command Prompt appeared first on Online Tech Tips. |
| How to Open Files in Windows with Different File Extensions Posted: 19 Nov 2014 01:03 AM PST I’ve always wanted to write a resource article on how to open files with different file extensions such as .wps, .prn, .mpp, .mdi, .rar, .psd, .pps, .sit, .nrg and lots more! I’ve come across this issue myself many times usually because someone sent me a file and I have no idea which program opens it! So if you come across a file with a strange extension you have never seen before, there are a couple of ways you can identify which program opens that file. I’m also going to go through some of most common file types that people need to open, but if it’s not in my list, check the online lookup sites that will let you search for file extensions. Online File Extension LookupThe easiest way to determine the program associated with a file type is to use an online database of file extensions. There are a couple of sites with thousands of entries, so unless someone made up their own file extension, you should be able to find it. FileInfoMy favorite site for getting information on files is FileInfo because it has a huge database plus its got a very clean and well-organized site. Just type your extension into file extension search box to get started. I searched for .NRG and got the following results:
At the top, you see it is a Nero CD/DVD Image file and you get a short description of exactly what the file might be. Also, this site gives you really useful info sometimes like in this case where it says you can convert NRG files to standard ISO files using a program called Nrg2Iso. The best part, however, is the fact that it tells you which programs can open files with that extensions on Mac, Windows and Linux. This is mostly what people are looking to do when they are searching for a file extension, so FileInfo puts that info front and center. FileExtI’m not a huge fan of FileExt because it’s got a ton of ads blended into the content to try and confuse you so that you install software to speed up your pc or scan for registry errors. Just avoid all of those links. To search for a file extension, just use the Google Custom search box at the top of the site.
At the top you’ll see the file extension and also the file type. This is important because it’ll tell you what kind of file the extension is associated with. In the example above, .NRG is a CD-image file created by the Nero application. Skip the blue sections as those are ads and it’ll give you a short paragraph with more details on the program that is used to create those files. FileExt doesn’t give much more info beyond that, so that’s why I listed it second. As shown above, several different programs can open the NRG file and FileExt doesn’t clue you into that fact. How to Open Dat FilesDAT files are so common in emails that I wrote an entire post just about opening .DAT files. DAT files aren’t necessarily from one program and that’s why it’s a bit hard deciphering the best way to open them. How to Open ODT FileI have gotten an ODT file several times while at the office because it’s a text document, created using one of those free open source word processors like StarOffice or OpenOffice. Thankfully, this is a really easy one because you can open it directly in Microsoft Word if you have that installed. On a Mac, you can open it in TextEdit, which is included in OS X. If you don’t have Office installed on a PC, you can also use LibreOffice, Lotus Notes or WordPerfect to open the document. How to Open a RAR fileI don’t know why people use RAR for compressing files, but they do, especially if you are trying to download anything off of torrent sites. Anyway, you don’t have to purchase any software like WinRAR or anything like that because there are free programs that can open RAR files just fine. 7-Zip is my favorite file archiver and will open and extract RAR files just fine. If you have a password protected RAR file, you can read my previous post on cracking password protected RAR files. How to Open PRN fileA PRN file is what you end up getting when you check the “Print to file” option from Windows. It’s a special file that contains the print job in a format that can be understood by the printer, such as what to print, the tray to use, the paper size, etc. Normally, when you print this file is created transparently in the background before being sent to the printer.
Since the PRN file is actually the instruction set for the printer, it will contain lots of extra garbage data that you won’t understand. It’s almost impossible to open it in Word, Notepad, etc if you try. You can, however, use a PostScript viewer like GSView to view the file correctly. Normally, however, if someone was intending to send the file to your electronically, you would want them to print it out to a PDF writer, etc as the “Print to file” option is not meant for humans to read! How to Open MPP fileAn MPP file is the file extension for Microsoft Project files. Sometimes people unintentionally send this file thinking that everyone has Microsoft Project installed on their computers! Sadly we all do now work at places that can afford that type of luxury. Either way, there are a couple of free and commercial programs that you can use to open an MPP file. Check out this list of free/paid apps for opening Microsoft Projects files. How to Open PSF fileThe PSF file extension can be one of several different types of files. If you have to open a PSF file, it is more likely than not a Photoshop Proof Setup file or a PhotoStudio Graphic. It can also be from Microsoft’s Picture It! software that creates slideshows of pictures. The first way to try an open it would be to download the Picture It! viewer software or try to use Adobe Photoshop. If you don’t have Photoshop, you can try a free photo viewer like XnView. If that doesn’t work, try to rename the file extension to .JPG instead of .PSF and then open it. Some people have said this method works for opening PSF files. Also, it could be a PhotoStudio file from Arcsoft, which you can get here. That should hopefully get your file open! You will need to download the trial version since it’s not free. How to Open MDI fileMDI stands for Microsoft Document Imaging and is usually created by the Microsoft Office Document Image Writer when you go to print files from Office. This is basically useful for printing documents in electronic format that you can then send to someone else for viewing. Sometimes Windows will not open this file type even if you have Office installed on your computer, especially if it’s Office 2007 because Microsoft Office Document Imaging is not installed by default. You can install it by following these steps:
You should now be able to open MDI files with Office 2007 in Windows XP or Windows Vista. How to Open VSD fileA file with a VSD file extension is a Microsoft Visio drawing. In order to view the drawing, you have to have Microsoft Visio installed on your computer. If you don’t, there are several free Visio viewers that are available for free. Using the Visio 2010 viewer, you should be able to view Visio documents created in Visio 5, 2000, 2002, 2003, 2007, and 2010! How to Open PUB fileA file with a .PUB extension is another proprietary Microsoft format, this time from Microsoft Publisher! Luckily, if you don’t have Publisher installed on your computer (obviously otherwise you would not be on this site), then you can try to convert the file into another format, such as PDF, etc. Check out Zamzar.com, a cool and free website that converts several different file formats, including PUB into PDF format. Sadly, there are no viewers, plugins, or anything else for viewing Microsoft Publisher files, so you’ll have to convert it to PDF or tell the person to save it out as a different file type. There are many other types of files that I have not mentioned here, so check the websites mentioned above for more info on those. If you have any questions, post a comment. Enjoy! The post How to Open Files in Windows with Different File Extensions appeared first on Online Tech Tips. |
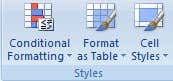
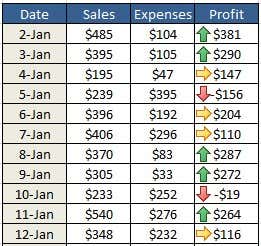
| Format Cells using Conditional Formatting in Excel Posted: 18 Nov 2014 10:01 PM PST If you are used to using older versions of Excel, the conditional formatting options in Excel 2007, 2010, and 2013 will amaze you. So why would you want to bother using conditional formatting? Well, here are a couple of reasons why I love using this feature of Excel: 1. To make your data more visually appealing. 2. To make your spreadsheets easier to understand at a glance. 3. To identify certain types of numbers for help in problem solving. 4. To assist you in drawing conclusions from your data. 5. To visually display to the user what is "good" or "bad" by using green and red. Now, you can use conditional formatting to format every cell in a range based on your own criteria (and there are a lot of formatting options to choose from). For example, if you have a profit sheet and you want to color code all profits greater than $200 as green and all profits less than $200 as yellow and all losses as red, then you can use conditional formatting to quickly do all the work for you. Conditional Formatting in ExcelConditional formatting enables you to format significant amounts of data quickly and easily – while still being able to distinguish different types of data. You can create rules for the formatting options that will allow Microsoft Excel to auto-format for you. You really only have to follow three simple steps. Step 1: Select the cells you want to format. Step 2: Click the Conditional Formatting button under the Home menu, Styles section.
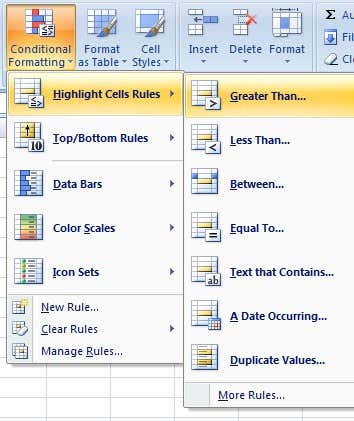
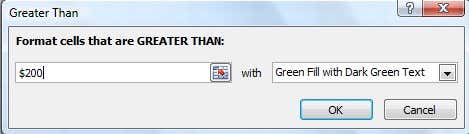
Step 3: Select your rules. There are Highlight Cells Rules and Top/Bottom Rules at the top that let you do comparisons with values. For this example, we imposed three rules. The first was that any value greater than $200 was green. It’s worth noting that only the Highlight Cells Rules section can also be used to compare a dataset to another dataset. Everything else will just use the one dataset that you have highlighted and compare the values against each other. For example, when using the Greater Than rule, I can compare values from A1 to A20 against a specific number or I can compare A1 to A20 against B1 to B20.
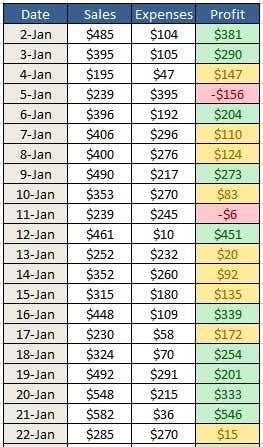
The same logic was applied to the second and third rules. The second rule was that anything between $0 and $200 was formatted yellow. The third rule was that anything less than $0 was formatted red. Here is what a portion of the finished spreadsheet looks like.
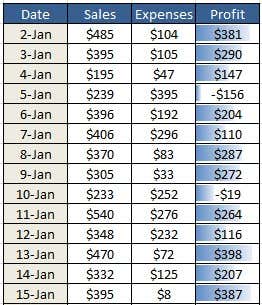
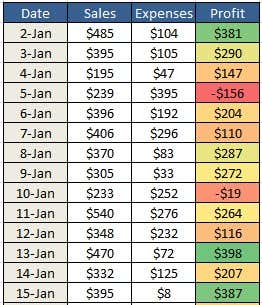
If you do not like these formatting options, Excel has many different new Conditional Formatting options that you can use from. For example, you can insert icons like colored arrows (Icon Sets), bar charts like in the second example (Data Bars), or even a range of automatically selected colors like in the last example (Color Scales). These three options only compare values from the same dataset. If you select A1 to A20, it’ll only compare those values against each other.
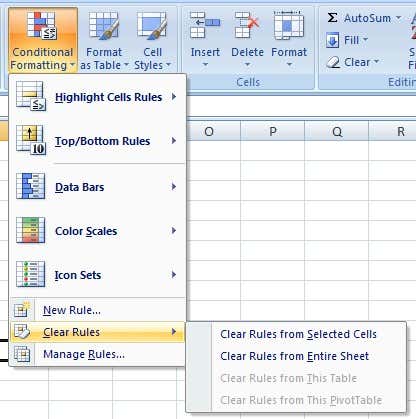
If you later decide that you don't want your cells to be conditionally formatted, all you have to do is clear the formatting. To do this, select the Conditional Formatting button and select Clear Rules. Then, select whether you want to clear the rules from only the selected cells or from the entire worksheet.
Also, if you have created several rules, you might forget what rules you have applied to what cells. Since you can apply many rules to the same set of cells, it can become quite confusing especially if someone else created the spreadsheet. To see all the rules, click on the Conditional Formatting button and then click on Manage Rules.
When you have more than one rule applied to the same range of cells, the rules are evaluated in order from higher precedence to lower precedence. By default, the newest rule added will have the higher precedence. You can change that by clicking on the rule and then using the up and down arrow buttons to change the order. Also, you can click the dropdown at the very top and see the rules for only the current selection or for each sheet in the workbook. There is also a checkbox called Stop If True, which I won’t go into detail here because it’s quite complicated. However, you can read this post from Microsoft that explain it in great detail. New Conditional Formatting Options Excel 2010Just about everything is the same in Excel 2010 when it comes to Conditional Formatting that was included in Excel 2007. However, there is one new feature that really makes it much more powerful. Earlier I had mentioned that the Highlight Cells Rules section lets you compare one set of data to another set of data on the same spreadsheet. In 2010, you can now reference another worksheet in the same workbook. If you try to do this in Excel 2007, it will let you select the data from another worksheet, but will give you an error message when you try to click OK at the end. In Excel 2010, you can now do this, but it’s a bit tricky so I’m going to explain it step by step. Let’s say I have two worksheets and on each sheet I have data from B2 to B12 for something like profit. If I want to see which values in B2 to B12 from sheet 1 are greater than the B2 to B12 values of sheet 2, I would first select the B2 to B12 values in sheet 1 and then click on Great Than under Highlight Cells Rules.
Now click on the cell reference button that I have shown above. The box will change and the cursor icon will become a white cross. Now go ahead and click on sheet 2 and select ONLY cell B2. Do NOT select the entire range of B2 to B12.
You’ll see that the box now has a value of =Sheet2!$B$2. We’re going to need to change this to =Sheet2!$B2. Basically, just get rid of the $ that comes before the 2. This will keep the column fixed, but allow the row number to change automatically. For whatever reason, it won’t just let you select the entire range. Click the cell reference button again and then click OK. Now the values in sheet 1 that are greater than sheet 2 will be formatted according to the formatting options you chose.
Hopefully, that all makes sense! When looking at Excel 2013, there doesn’t seem to be any new features when it comes to conditional formatting. As a last tip, if you feel that the default rules don’t match what you are trying to accomplish, you can click the New Rule option and start from scratch. What’s great about creating a new rule is that you can use a formula to determine which cells to format, which is very powerful.
Even though conditional formatting looks relatively easy and simple on the surface, it can become quite complex depending on your data and your needs. If you have any questions, feel free to post a comment. Enjoy! The post Format Cells using Conditional Formatting in Excel appeared first on Online Tech Tips. |
| How to Resize a Video or Change Resolution Posted: 18 Nov 2014 06:36 AM PST There are a lot of reasons why you might need to resize a video and in this post I’m going to mention a couple of freeware app that will help you easily change the resolution of your videos. If you have one of those 1080p 60fps HD video cameras, you understand the need for some serious conversion. With the introduction of 4K camcorders on the market, you’ll need a beast of a PC along with a 4K monitor to even have a chance of playing that high quality There are currently no default tools built into Windows that you can use to resize videos. You can use Windows Movie Maker to edit videos and add transitions, etc, but not to change the actual video resolution. If you do a search for RESIZE VIDEOS in Google, you’ll get a list of a bunch of commercial applications that you would have to shell out cash for! So if you’re lucky enough to have run across this post, I’ll show you a couple of free ways to resize videos quickly and easily. HandBrakeHandBrake is my all time favorite utility for converting and encoding videos. Basically, it can take as input pretty much any video file you can throw at it and it gives you two options for output: MP4 and MKV. You can also pick from three video codecs for the two video containers: H.264, MPEG-4 and MPEG-2.
In HandBrake, you can either choose a preset by clicking the Toggle Presets button, which will show up on the right side. If you’re not interested in any of those items, you can leave it at the default Normal under the Regular heading. To get started, just click on the Source button and choose your video file. You can change the destination, format and video codec if you like, but if you’re only interested in changing the resolution of the video, then leave the values alone. Now go ahead and click on the Picture Settings button at the top.
Here you can change the width of the video and it will automatically adjust the height to maintain the aspect ratio. At this point, you don’t have to do anything else other than click on the Start button. If you want to convert multiple videos files all at once, you can click the Add to Queue button and then click the Source button again to choose another video. Keep adding to the queue and when you’re done click Start.
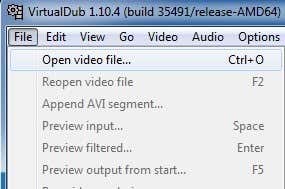
You’ll see the progress of the conversion at the bottom of the program window. The amount of time will depend on the original size and encoding of your video. VirtualDubVirtualDub is a free video capture and video processing software app. It doesn’t have many of the video editing features that you would find in Adobe Premiere, but it is streamlined for performing linear operations on video very fast. It also has batch-processing capabilities for processing large number of video files. You can do a TON of stuff with VirtualDub, including add special effects to your videos such as blurs, black and white, flipping, and lots more. However, we’ll only going to go over how you can use it to resize your videos. It should be noted that VirtualDub works best on AVI files and will require additional codecs installed in order to work with other files types like AVCHD, MP4, etc. First download VirtualDub and extract it to a folder on your hard drive. VirtualDub does not require any installation; it simply runs directly via an EXE! That means it doesn’t mess around with your registry or anything else in Windows. Once installed, launch the program by clicking on the VirtualDub icon. You’ll get a blank screen with some controls across the bottom. Now I’m assuming you already have your video that you would like to resize, so to get going, click on File and choose Open Video file.
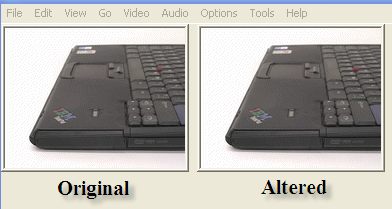
Browse to the location of your video and open it. You’ll now see your video appear twice in the main window. This is because the left one is considered your original and the right one is your “processed” or altered version. When you apply a filter to your video, the right one updates and you can watch both at the same time! Cool!
Right now they are both the same since nothing has been done. Ok, so now that the video is imported, go to Video and click on Filters.
Click on the Add button at the right and scroll down till you see resize.
Click Ok and you’ll now be brought to the resize filter options. Do not be intimidated by this screen if you’ve never heard of most of things listed, I haven’t either! What you’re interested in is the top section where you choose a new size. You can choose an absolute size and type that in manually if you like, or you can specify a size relative to the current size.
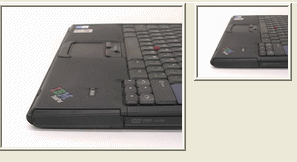
Go ahead and choose how you want to resize your video. If you know you want it to be 640×480, then click on Absolute and type that in yourself, otherwise choose Relative. I’m making mine 50% smaller. There are a bunch of other options listed, such as adding a frame, or changing the aspect ratio of the video, but you can just leave that all the same if you just want to resize. Click Ok and then Ok again. You should now see your original video on the left and your processed video on the right, in my case, half the size!
Now to save your newly resized video, click on File and choose Save As AVI. And that’s it! Go ahead and play your video and you should have it in the smaller or larger resolution! Easy as that! Freemake Video ConverterI would have recommended Freemake Video Converter over VirtualDub because it accepts so many different video formats as input, but I purposely am listing it last because the installer for the program has a lot of junkware. This is not malware or spyware, but it’s just junk that you would not want on your system. When you install the program, you need to make sure you click the Custom Installation radio button and choose not to install several programs. It’s also deceiving because they purposely make that radio button greyed out as if you could not click on it. However, when you click the radio button, it becomes active, so don’t be fooled. Anyway, outside of that, the program works fine and doesn’t have any ads, malware, spyware, etc. To get started, click the big add video button to choose the video file you want to convert.
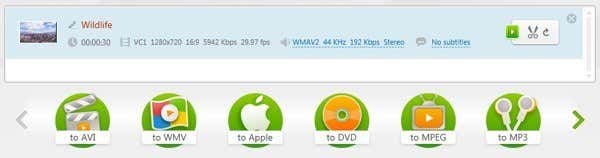
You’ll see the video load into the main window and at this point you can pick one of the many options down at the bottom. You’ll also see a button to the right with a green play icon and some scissors on it. If you click on that, you can do some basic video editing that includes cutting and rotating the video.
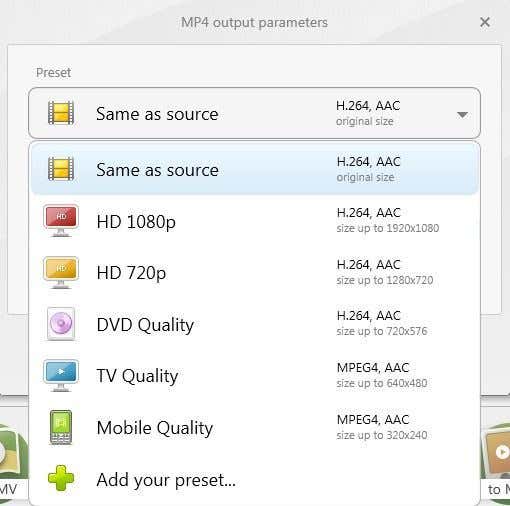
In order to choose a new size for your video, you’ll first have to choose an option like to Apple, to MP4, to WMV, to AVI, etc. If you click on MP4, for example, you’ll get a pop up window with some preset values or you can choose a custom value by click on Add your preset.
Here you can pick from some preset sizes again or click on Custom and then enter your own width and height. You can also adjust the frame rate, bitrate, video codec, audio channels and more.
I really like this program because it has a ton of options that will let you get your video onto pretty much any device you can think of. I really just wish they didn’t try to bundle that crapware along with the installer! You can even send the video directly to YouTube, convert it to HTML5 compatible format, convert it to Xbox and Playstation format and even burn to DVD or Blu-ray disc right from the program. If you’re an Apple user, you’ll love the to Apple option, which lets you pick the exact device you want the video to be played on.
So those are a couple of good options for getting your video into a size and resolution that your computer, device or online service can handle. In summary, HandBrake works best for converting to Apple friendly devices, VirtualDub can work for any file, but you’ll need to install the codecs for certain file formats and Freemake works for everything but you have to make sure to avoid the junkware when installing it. If you have any questions, post a comment. Enjoy! The post How to Resize a Video or Change Resolution appeared first on Online Tech Tips. |


| You are subscribed to email updates from Online Tech Tips To stop receiving these emails, you may unsubscribe now. | Email delivery powered by Google |
| Google Inc., 1600 Amphitheatre Parkway, Mountain View, CA 94043, United States | |
0 commentaires:
Enregistrer un commentaire