

Computer Tips From A Computer Guy |
| Recover or Restore Missing Recycle Bin Icon in Windows Vista, 7, 8 Posted: 07 Nov 2014 11:35 PM PST Doing some spring cleaning on your computer and accidentally delete the Recycle Bin icon in Windows Vista, Windows 7 or Windows 8? If your Recycle Bin icon is missing in Windows, there’s a simple way you can get it back without having to hack the registry or anything like that. So without further ado, here’s how you would get your Recycle Bin icon back in Windows if you deleted it or removed it by accident. Windows VistaFirst, right-click on the Desktop and select Personalize. In the dialog box on the right hand side, there should be an option called Change desktop icons.
On the Change desktop icons dialog box, go ahead and check the Recycle Bin box to add that back to your desktop. You’ll notice that there is a Full Recycle Bin and Empty Recycle Bin icon.
If you click Apply, your icon should now be back on the desktop. However, there may be an issue for some people in which the Recycle Bin continually shows full or empty and does not change depending on if something is added or removed from the trash. It’s almost like Windows Vista gets confused and simply uses one icon instead of switching back and forth. If you have this problem where the recycle bin icon does not change to reflect “full” and “empty” then you need to first check off Recycle Bin icon like shown above. Then go ahead and left click on the Recycle Bin full icon and click Change Icon. Select the already highlighted icon, which should be the full Recycle Bin icon. Do the same thing with the empty Recycle Bin icon and go ahead and click Apply.
The Recycle Bin icon should now be on your desktop and should automatically update based on whether there is data in the trash or not. Windows 7 & 8In Windows 7, the process is slightly different for recovering your recycle bin icon. First, click on Start and then type in desktop icons. Go ahead and click Show or hide common icons on the desktop.
This will bring up the same dialog similar to the one in Windows Vista where you can just check Recycle Bin to bring it back to your desktop. On Windows 8, you click on the pseudo Start button and start just typing desktop icons. The Charms bar will appear on the right with the search results.
This will bring up the exact same dialog as in Windows 7. There’s not much else to getting the recycle bin back, but there are a couple of tricks I’ve learned over time. Firstly, you can bypass the recycle bin by simply holding down the CTRL key when you delete a file in Windows. You should only use this option when you are completely certain you won’t need to recover a file later on. Secondly, you can right-click on the recycle bin, choose Properties and configure a couple of options like the size of the recycle bin and whether or not you want to see the delete confirmation dialog. If you have a small hard drive like an SSD, then reducing the size of the recycle bin can save you quite a bit of space. If you’re having any other trouble restoring your recycle bin icon, feel free to post a comment and we’ll try to help. Enjoy! The post Recover or Restore Missing Recycle Bin Icon in Windows Vista, 7, 8 appeared first on Online Tech Tips. |
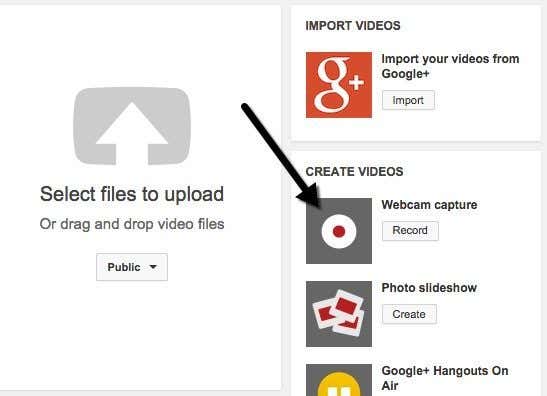
| How to Record Yourself Online Using a Webcam Posted: 07 Nov 2014 10:19 PM PST Want to make a video recording of yourself online? For some odd reason, a lot of people still record simple videos using camcorders, transfer them to their computer and then upload them to the Internet. That’s totally understandable if you are filming a project, film, etc and you’re using an HD cam for that, but if you just need to record yourself speaking about something, that’s a bit overkill for most people. You can always use your smartphone to record a video and upload it, but a webcam may be preferable due to better resolution, lighting, upload speed, etc. Luckily, there’s a really simple way you can record yourself online using your own webcam and share it with the world. I’m going to assume that most people use YouTube for uploading videos, but will try to list out some alternatives for those of you that don’t. YouTube Webcam CaptureThe easiest way to record a video of yourself online is to use the YouTube webcam capture feature. Simply go to the YouTube upload page and you’ll see a bunch of options for getting videos into YouTube.
Click on the Record button below Webcam capture and you’ll be brought to another page where you can click the Start recording button to begin recording your video selfie.
When you click that button, a popup will appear asking if you would like YouTube to have access to your camera and microphone. Click the Allow radio button and check the Remember box. Depending on your OS and browser, you may get another popup message from the browser itself that asks you whether you want to allow or deny access to your camera. In Chrome for me, it showed up at the very top of the website. Once I clicked that, it started the recording.
When you are done, click the Stop recording button. Now you’ll have the option to either start over or to upload the video to YouTube. That’s about it for recording videos using your webcam and uploading them to YouTube. In terms of fun factor, YouTube doesn’t give you a lot of options when recording a video. If you want to add some special effects to your videos without the hassle of video editing, etc, then check out another site called Fotofriend. Fotofriend Video EffectsI enjoyed using Fotofriend because it has a lot of cool video effects that you can use in real time when recording your video. First, allow access to your webcam and microphone and then you’ll automatically see a grid of four effects that you can choose from. You can also click on the left and right arrows to see more effects. All in all, they have about 56 different video effects.
Once you select an effect, it will load the screen with that effect and a couple of options. For some odd reason, you can only choose a recording length of 10 seconds, 30 seconds or 3 minutes. Where they came up with those values, I have no idea. You can also switch it to high quality if your webcam has HD resolution.
Once you finish the recording, you can play it back or click the New Video button to discard the current video and record again. If you like the video, just click the Save Video button and you can download it directly to your hard drive as an FLV file. You can then upload that FLV file to YouTube without any need to convert or alter the file. There are a couple of other sites you can use to record video online, but for 99% of people, these two options will be just fine. I really couldn’t find any other site that had good video effects like Fotofriend, so if you know of one, please post it in the comments. Enjoy! The post How to Record Yourself Online Using a Webcam appeared first on Online Tech Tips. |


| You are subscribed to email updates from Online Tech Tips To stop receiving these emails, you may unsubscribe now. | Email delivery powered by Google |
| Google Inc., 1600 Amphitheatre Parkway, Mountain View, CA 94043, United States | |
0 commentaires:
Enregistrer un commentaire