

Computer Tips From A Computer Guy |
- Quickly View Search History Across All Browsers in Windows
- How to Create Custom Icons for Flash or USB Drives
- How to Minimize iTunes to the Windows Taskbar
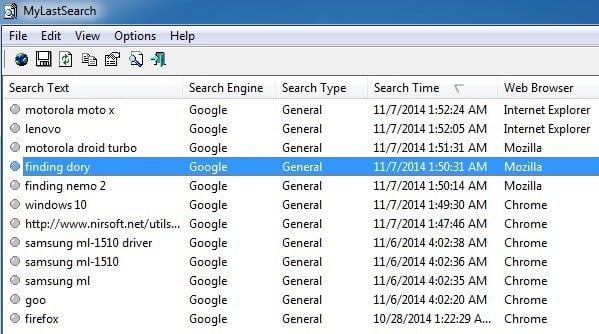
| Quickly View Search History Across All Browsers in Windows Posted: 07 Nov 2014 01:00 AM PST When you talk about search history, most people are looking for a way to clear their search history or delete their search history, right? Whatever the reason for hiding their search history may be, an astute person reading this post will be able to VIEW the recent search history for all browsers of any computer using a simple and free program. Basically, when you perform searches in Google, Yahoo, MSN or specific sites like Facebook or Twitter, the browser caches that search history onto the local computer in temp files. If you don’t manually delete the search history, someone can easily come along and view all of your previous searches. Now in IE, Chrome and Firefox, you can open up the History sidebar or tab and view the most recently visited sites, but it would be a tedious process to open each browser individually to see the search history. In addition, you still would not be able to see the searches performed on social sites. If you want to quickly view all of the most recent searches performed on a computer no matter which search engine or which browser has been used, check out a cool program called MyLastSearch. MyLastSearch is a tiny 47KB program that doesn’t even require you to install it in order to use. It’s simply an .EXE file that can be run from a portable USB drive if you like! That means you can take it around and quickly connect it up to any computer and see the recent searches performed! This is a bad program if it gets into the wrong hands!
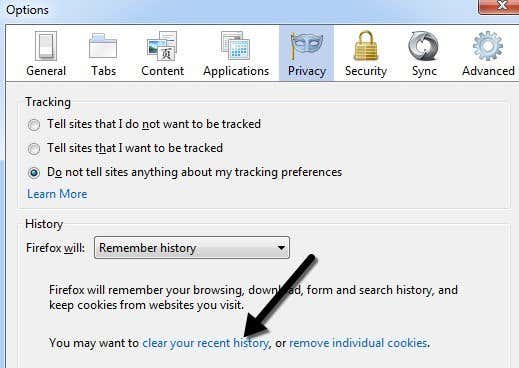
I ran the program on my computer and instantly got a bunch of search results back! It breaks it down into a table with Search Text, Search Engine, Search Type, Search Time, and which web browser the search was performed on. It seems to work on Google, Yahoo, MSN, Ask, and Alexa. You’ll have to try other search engines to see if it works on those, but most people are going to try one of those first. In my tests, everything worked as stated, but I was not able to see the search results for searches I performed on social sites like Facebook and Twitter. It could have been because I was not logged into either service, but I would think it should work without that requirement. Of course, if you delete the cache and history files from your browser, MyLastSearch will not be able to find anything. So if you want to be safe and not have your search history readable by this program, you can read the article I linked to above about deleting search history. Basically, you can clear the local browsing history and you’ll be fine. In Firefox, you need to go to Tools (three horizontal bars), then Options, then click on Privacy and finally click on the clear your recent history link.
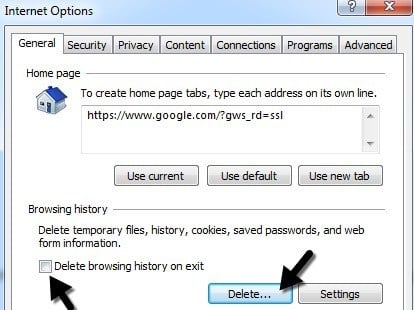
You can also click the dropdown next to Firefox will and choose Never Remember History so that you never have to worry about clearing your history manually. In IE, click on the Settings gear icon and choose Internet Options. On the General tab, click the Delete button under Browsing history. You can also check the Delete browsing history on exit so that browsing history is never stored in IE.
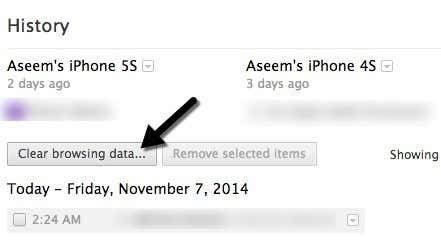
Lastly in Chrome, you click on the settings icon (three bars again) and then click on History. Finally, click on Clear browsing data and then choose how much of your history you want to remove. Chrome is the only browser that doesn’t have an option to not record history or to clear your browsing history on exit. Instead, you have to rely on third-party extensions click Click & Clean.
MyLastSearch is a quick and easy way to see search history on a Windows computer and it does a very good job overall. It’s worth noting that before you run the program, you should log off the computer and log back in, if possible. Some browsers do not write all data to the local cache until several minutes after being closed or until the user logs out of Windows, so you may not see all searches unless you first log off. If you have any questions, post a comment. Enjoy! The post Quickly View Search History Across All Browsers in Windows appeared first on Online Tech Tips. |
| How to Create Custom Icons for Flash or USB Drives Posted: 06 Nov 2014 11:00 PM PST You probably already know how to create custom icons for your local hard drive or for your CD drive, but did you know there is also an easy way to create custom icons for USB flash drives? You can configure the USB drive so that whenever you plug it into a PC, it’ll show up with a custom icon and custom label instead of the default removable disk icon that Windows uses.
In this article, I’ll show you the steps you need to perform to create your own custom USB drive icon. Note that this procedure will work for anything that uses the Autorun feature in Windows like CDs, DVDs, external hard drives, etc. Step 1: The first thing you’ll need to do is either find an .ICO file on your computer or online that you would like to use or create your own ICO file from an image. If you want something really fast you can open Explorer and simply perform a search for *.ICO.
It’s also worth noting that Google search has some awesome search features for finding icons. Go to Google image search and then type in filetype:ico keyword where keyword is the kind of icons you are looking for.
You’ll get a bunch of results for icons of all sizes and types, but the awesome part is that you can filter the search results based on size, type, time, color, etc. In our case, you’re going to want to choose Exactly from size and then type in 64 for width and height. I tried to use a size smaller than 64×64, but it would not work in Windows 7. Seems like the minimum size for the icon file has to be 64×64 pixels.
Step 2: Once you have an icon file that you can use for your USB drive, we then need to create what is called an Autorun.inf file. This is basically a configuration file that all versions of Windows automatically recognize and will use to set up the connected device. To create the file, first go ahead and open Notepad. Step 3: Now copy the text below and paste it into the Notepad file. [autorun] If you only care about the custom icon, you can just remove the second line that starts with label completely. Otherwise, you can just type anything you want there. It seems that you can also add a label with spaces or even apostrophe’s and it still works. If you do happen to run into an issue using a complicated label, then try putting quotes around the label name. As you can see from the third line, the file just tells Windows the name of the icon file it wants to use as the drive icon. You can actually change the name of the icon file if you want to anything you like as long as you put that same name in the third line of the of autorun.inf file. Step 4: Now that you have the file ready, we need to save it properly as an INF file. To do that, click on File – Save. In the Save dialog, you need to change two things. Firstly, click on the drop down box next to Save as type and choose All Files. Then go ahead and type in autorun.inf into the File name box.
Now make sure to save this file at the root of your device. Once you have done that, copy over the ICO file to the root of the flash drive also. That’s all you have to do for setting it up. Go ahead and eject your flash drive and then plug it back in. If everything works properly, you should now have your new custom icon and custom label showing up in Explorer:
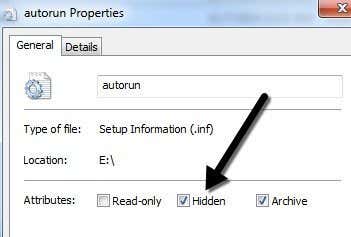
Also, if you don’t like both of those files showing up automatically whenever you open the flash drive, you can simply right-click on them, choose Properties and check Hidden at the bottom.
That’s it! Now whenever your plug your USB drive into your computer or any computer for that matter, you’ll see your custom icon and label! You can also try this technique for other autoplay devices, such as cameras, MP3 players, CDs/DVDs and more! If you have any questions, post a comment. Enjoy! The post How to Create Custom Icons for Flash or USB Drives appeared first on Online Tech Tips. |
| How to Minimize iTunes to the Windows Taskbar Posted: 06 Nov 2014 09:56 AM PST Even though I’ve been using iTunes for a long time, I apparently did not know one of the most useful features of the software: the fact that iTunes can be minimized to and controlled from the Windows taskbar just like Windows Media player! So if you’re always using iTunes to play your music and you didn’t already know this little trick, here’s how to setup iTunes so that it can be controlled from the Windows taskbar. By controlled, I mean you can stop and pause a song, skip to the next song, etc. By default, if you minimize iTunes in Windows, it just goes down to the taskbar as a rectangle just like all Windows programs do. If you want it to appear with the music controls, you first have to right-click on the Taskbar and go to Toolbars and then select iTunes.
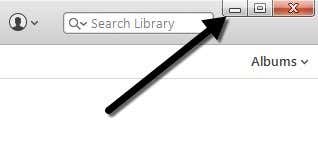
Now click on the minimize button at the top right of the iTunes window:
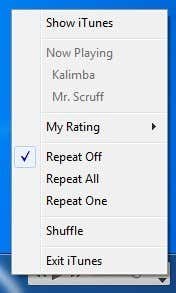
Now you should see the iTunes controls minimized to the bottom right corner of the Windows Taskbar. You can pause the current song, skip to the previous or next song and adjust the volume.
You can click on the tiny little arrow at the bottom right and here you’ll have a few more options like Repeat Off, Repeat All, Repeat One and Shuffle.
Note that this is different than the option in iTunes to minimize to system tray. If you go into iTunes and then go to Preferences and click on the Advanced tab, there are two options towards the bottom called Show iTunes icon in system tray and Minimize iTunes window to system tray. All these options do is control where the main program is minimized too. For example, instead of minimizing to the taskbar, it will minimize iTunes to the system tray as a tiny icon.
You can leave the Show iTunes one checked if you want, but make sure to uncheck the Minimize iTunes windows box. Sounds kind of counter-intuitive, but you want Windows to control how the minimizing process, not iTunes.
If you leave both checked, then the little music controls in the taskbar will disappear. If you leave Show iTunes checked, then both the icon and the music controls will appear.
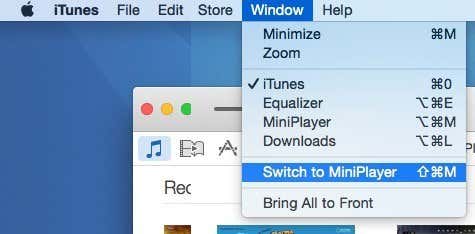
And that’s it! You should now be able to control iTunes through the Windows taskbar. If you’re on a Mac and you want to do something similar to Windows, you have to switch iTunes to the mini player and then switch to the extra small mini player. First open iTunes, click on Window and then Switch to MiniPlayer.
You can also switch to miniplayer by just hovering your mouse over the middle top section of iTunes that has the Apple icon. When your mouse moves into that area, a little icon at the top left will appear. Just click on that and it will open the miniplayer.
The miniplayer is just a smaller version with the album artwork and a few music controls and a few other options for seeing what songs are coming up next, etc.
However, this is not the smallest mode iTunes on OS X can go. If you look closely, there is a tiny icon towards the top left that looks like two triangles pointing at each other. Go ahead and click on that and you enter tiny mode, at least that’s what I call it.
Unfortunately, there is no smaller mode you can get than this. Actually, this is small enough; it would just be nice if you could drop it into Apple bar at the top so that you could control it from any virtual desktop or from full-screen apps. Instead, it just acts as a floating toolbar that will stay on top of anything on that particular desktop, but won’t show up on other desktops. It’s still better than having a giant iTunes window open on your Mac, but I wish they had a comparable solution to the Windows taskbar. If you have any questions, feel free to post a comment. Enjoy your music in the meantime! The post How to Minimize iTunes to the Windows Taskbar appeared first on Online Tech Tips. |


| You are subscribed to email updates from Online Tech Tips To stop receiving these emails, you may unsubscribe now. | Email delivery powered by Google |
| Google Inc., 1600 Amphitheatre Parkway, Mountain View, CA 94043, United States | |
0 commentaires:
Enregistrer un commentaire