

Computer Tips From A Computer Guy |
| How to Access Mac Files from a Windows PC Posted: 24 Nov 2014 04:56 AM PST Apple is becoming more popular everyday (I love my MacBook and it’s selling in record numbers this year), yet most people still have Windows PCs at home. If you are running both Macs and PCs on your network, there’s a good chance you might want to share files between your Mac and PC. You can do this in one of two directions: either access Mac files from a Windows PC or access Windows files from a Mac. Today I’m going to talk about how you can share files on your Mac and access them on your PC. The process is fairly simple and should work as long as you are on the same network and don’t have any over zealous security settings configured on your Mac. The first thing you’ll need to do is enable file sharing on your Mac. Here’s how to do it. Enable File Sharing on Mac OS XFirst go to the System Preferences menu option by clicking on the Apple icon at the top left and then clicking on System Preferences.
Now click on the Sharing icon, which is where we need to go to configure all the sharing options.
Before you get started, make sure to click on the little gold lock icon at the bottom left otherwise everything will be greyed out and you won’t be able to make any changes. Now go ahead and check the File Sharing box under Service to enable file sharing. This one dialog pretty much contains all the settings and options for sharing. Starting at the top, you can change your computer name to something less complex so Windows users have an easier time connecting. If you don’t, OS X will give it a short name automatically so that Windows can recognize it. Click the Edit button to change the name.
You’ll also see the IP address for the computer listed by the Options button. Under Shared Folders, the Public folder is shared out by default. Click the little + (plus) button to share any folder on your hard drive. Under Users, you can see the standard permissions and edit them as you see fit. The only other thing you have to do is click on the Options button and you’ll see a section at the bottom called Windows File Sharing. In order to connect from a Windows machine, you have to check the box next to the user name and enter your password. For whatever reason, OS X has to store your Mac user account password in a less secure way in order to connect from a Windows machine. If you don’t do this step, you’ll be asked to enter the username and password from your Windows machine, but it will just give you an error even if you type it in correctly.
That’s about it from the Mac side. Now it’s time to try connect from your Windows machine. Connect to Mac from WindowsThere are a couple of ways you can do this. One way is to simply open up Explorer and click on Network. You should see the Mac computer listed there.
If Windows asks you to enable Network Discovery, then go ahead and do that. Now when you double-click on the computer name, it should pop up a login dialog box. Enter the same username and password that you had entered in the Windows File sharing dialog on OS X earlier. If the user account on your Mac had spaces, don’t worry because Windows can handle it just fine.
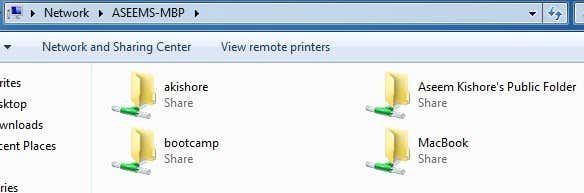
If everything went well, you should see some shared folders now on your Windows computer!
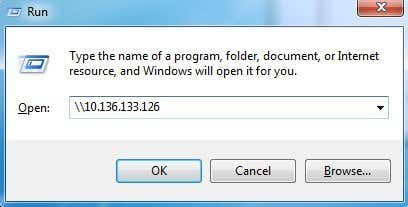
Another way to connect is to use the Run command from the Start Menu. Click on Start, then Run and type in the IP address or computer name:
Now you’ll get the same dialog box where you have to enter the username and password for your Mac user account. You should now be able to copy files back and forth from Windows to Mac and vice versa. The only setting that can cause issues is the firewall on OS X. Everything should work fine with the firewall enabled with default settings, but if you go to firewall and then Firewall Options, you can block all incoming connections. If this item is checked, then file sharing will no longer work.
Just uncheck that option under firewall options and you should be good to go. If you have any other trouble sharing your Mac files with your PC, post a comment and I’ll see if I can help. Enjoy! The post How to Access Mac Files from a Windows PC appeared first on Online Tech Tips. |
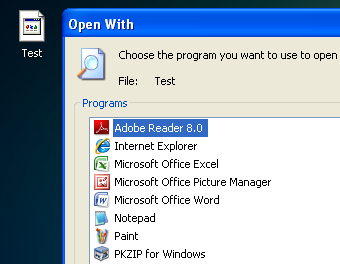
| How to Batch Change File Extensions for Windows Files Posted: 23 Nov 2014 10:43 PM PST Recently, I came across a problem where I had to change the file extension on a bunch of Windows files from no extension to .JPG. Someone sent me a large number of files, but for some strange reason, they had no file extension, even though they were images! Once I added the .JPG extension to the end of the file, I was able to open the images. There are many other reasons why you may need to rename file extensions, so I’ll show you how you can change them one at a time if you have a small number of files or batch rename file extensions if you have lots of files. If you have a file with no extension, Windows will probably assign a generic icon to it. When you try to open it, the Open With dialog will pop up where you’ll get a list of programs to choose from.
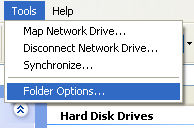
Obviously, since there is no file extension for the file, Windows is not able to determine which program should open it. If you want to change the file extension for the file, you first need to be able to see file extensions in Windows. You can do this by going to My Computer and then going to Tools and Folder Options.
In Windows 7, click on the Organize button and then click Folder and search options.
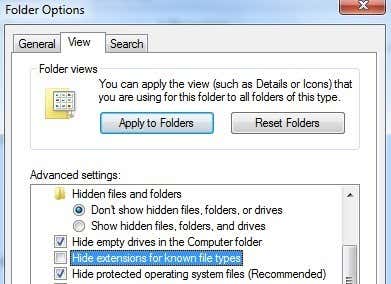
In Windows 8, you just click on the View tab in Explorer and check the File name extensions box.
Go to the View tab and scroll down till you see the option “Hide extensions for known file types“. Go ahead and uncheck it.
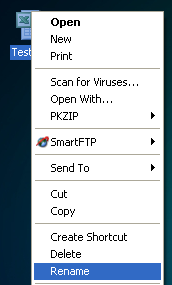
If the file has no extension at all, this step may not be necessary, but I am including it because if you’re trying to CHANGE the file type from one type to another, then you need to do this. Now right-click on your file and choose Rename.
Move to the end of the name and type in .XXX or whatever the type is for the file you want it to be, i.e. .TXT for text files, .XLS for Excel files, etc. Obviously, the file has to have originally been from that program that you are changing the file extension too. In my case, the text file was from Excel, so I added that extension back.
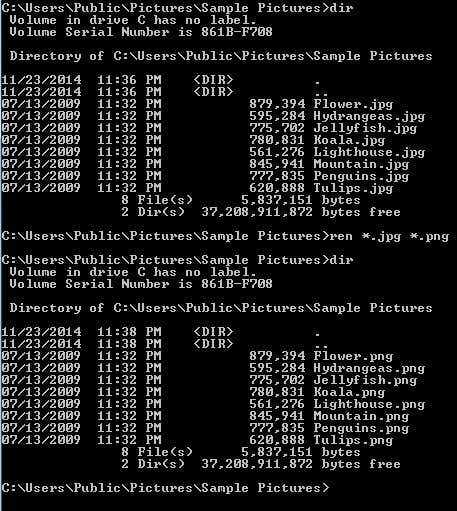
How to Batch Rename File ExtensionsSo how do you rename multiple file extensions at once? If you have a directory full of files that need to be changed from .PNG to .JPG, it’s going to take forever to do this using the method above. Luckily, there are a couple of different ways we can change the file extension for multiple files at once. Command LineFor those of you who are familiar with the command line, there is a very easy command you can use to perform very simple file renaming tasks. There are two commands that you can use at the command prompt: ren and rename. Both of them do the exact same thing, so it’s just a preference as to which one you use. If you have a folder with a bunch of JPGs inside and you want to change the file extension to PNG, for example, you would type in the following command: ren *.jpg *.png
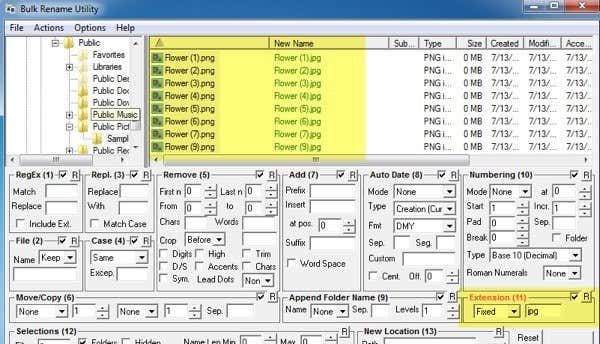
As you can see above, the command changed all the files in that directory with a JPG file extension to ones with a PNG file extension. You can get more information on how to use the ren command from Microsoft’s website. Bulk Rename UtilityIf the command line sounds daunting, then there are a couple of useful file renaming utilities that will get the job done for you with only a few clicks. One of my favorites is the Bulk Rename Utility because it is the single most comprehensive file renaming utility out there.
Yes, the interface is absolutely jammed pack with options that make little to no sense unless you read all the document from the website. However, for our purpose, all we have to worry about is the box labeled Extension (11) down at the bottom right. Change it from Same to Fixed and then type in the new extension you want. You’ll see that the list box will show you the new name of the file instantly before you even commit the changes. Click the Rename button and that’s it. I mentioned this tool even though it’s overkill for our purpose because it’s a really great utility and one that some might be interested in learning if they want to rename thousands of photos with names likes DSC00x, IMG00x, etc. Advanced RenamerAnother good program that also requires a bit of reading to figure out is Advanced Renamer. Thankfully, both sites have user guides and tutorials. Also, I’ll explain the process for changing the file extension here. Once you install it, go ahead and click the Add button to add their files or to add a folder, which will add all the files in that folder to the list.
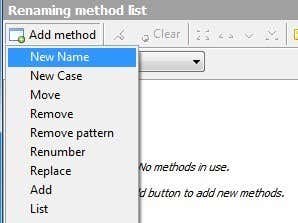
Now in order to perform any actions on that list, you have to add methods in the left hand pane. You can add multiple methods to perform complex renaming of files and folders. We want to click Add Method and then choose New Name.
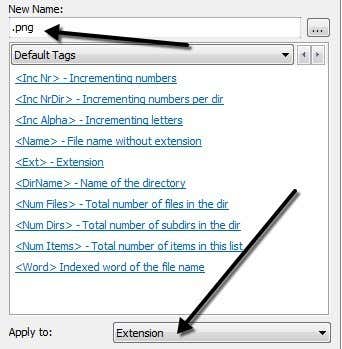
Now go ahead and type in the new extension you would like into the box at the top and then change the Apply to box at the bottom to Extension instead of Name.
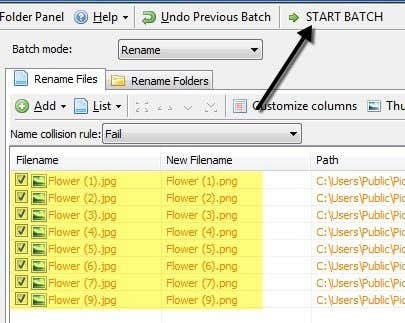
In the list of files, you should see the updated New Filename field updated with the changes to the file name or extension. When you have gotten it right the way you like, go ahead and click on the Start Batch button.
Again, I’m giving the simplest example with these programs, but you can create far more complex renaming schemes if you like. If you really don’t care about all the extra functionality, then check out the last program that does nothing but change the file extension. Bulk Extension ChangerIf you want simple, Bulk Extension Changer is the program for you. All you have to do is three things: first, pick the folder where the files are located, then set the current and replacement extension and then just press the Go button.
The only option is if you want to include sub-directories or not. In the 2nd step, you can add multiple replacement rules in case your folder has files of many different types and you want to check several at once. Hopefully, those are enough options for any need you might have for renaming file extensions. If you have any questions, feel free to post a comment. Enjoy! The post How to Batch Change File Extensions for Windows Files appeared first on Online Tech Tips. |


| You are subscribed to email updates from Online Tech Tips To stop receiving these emails, you may unsubscribe now. | Email delivery powered by Google |
| Google Inc., 1600 Amphitheatre Parkway, Mountain View, CA 94043, United States | |
0 commentaires:
Enregistrer un commentaire