

Computer Tips From A Computer Guy |
| How to Check All of Your Email Accounts from Gmail Posted: 06 Nov 2014 12:59 AM PST Just about everybody these days has more than one email account, usually more than can be counted on one hand. Personally, I have 5+ accounts with different email service providers, including Yahoo, Gmail, Cox, my office email address, my website email, etc, etc. Currently, I use Outlook to check all of my accounts from one client application since it makes it easier to manage. If you’re ok with Outlook, then you have no problem. However, if you prefer to use Gmail for everything, since its web-based and has better spam filtering and security, then you might be interested in setting up all of your email accounts in Gmail and managing them from there. In this article, I’ll explain the steps for using Gmail as a master account for collecting email from all of your other online accounts. First, log into your Gmail account and click the little gear icon at the top right. In the menu, go ahead and click on Settings.
Now click on the Accounts and Import tab and you’ll basically see two different options for importing emails into Gmail. One option it to Import mail and contacts and the other is to Check mail from other accounts (using POP3).
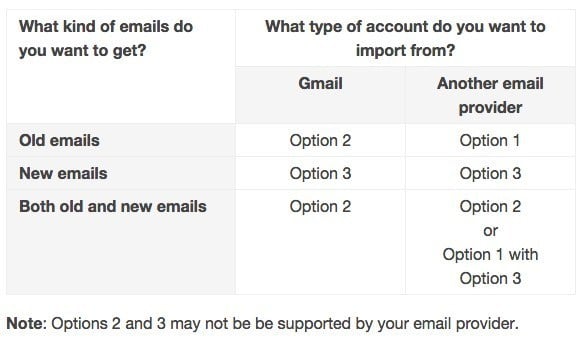
It’s a bit confusing, but luckily Google has a short page written about the different ways to move email into your Gmail account. Basically, you have to decide whether you want to import only old emails, only new emails, or both old and new emails.
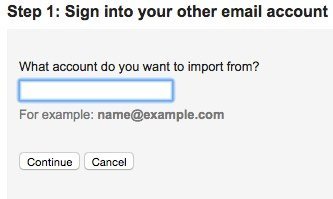
Option 1 is for getting old emails from a different email provider into Gmail and for that you’ll click on the Import mail and contacts link under Accounts and Import. You can import email from Hotmail, Yahoo, AOL or any other email provider that allows POP3 access. When you click on the link, a new tab will open and you’ll be asked for the email address for the other account.
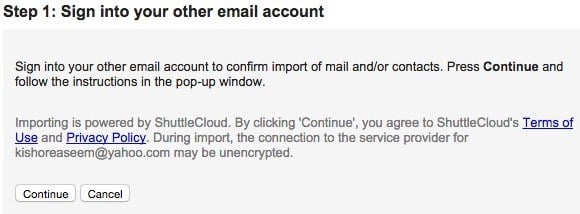
Click Continue and you’ll get a message stating that you have to log into your other email account to confirm the import. It also says that a third-party company called ShuttleCloud carries out the process and that the transfer may be unencrypted.
Once you are signed into your other email account go ahead and click Continue. Depending on your email provider, a new window will pop up asking you to confirm that ShuttleCloud can access all your data.
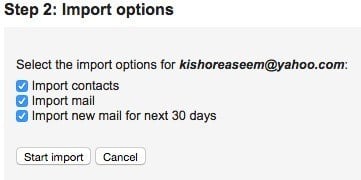
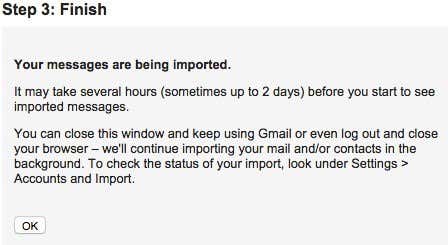
Once authorization has been successful, it’ll ask you to close that window. Go ahead and do that and on the previous window that you were on before, it’ll update and move on to Step 2, which is to choose what you want to import.
The last option Import new mail for next 30 days is why this option is really only useful for importing older email from a non-Gmail client into your Gmail account. If you just want new emails to come into the account, you should choose the second option way above, which was Add a POP3 mail account you own. I’ll explain that option next. For now, click Continue and the process of importing will begin. If you are trying to migrate all your old email from another email provider and you also want all the new email to come to your Gmail account, then the best thing to do is to uncheck Import new mail for next 30 days and then setup the add POP3 account separately. That way your old mail will be imported and new mails will be checked too.
If you have a ton of old email, it could take up to several days for the emails to import into your Gmail account. So where does all those imported email go? Well, glad you asked! Basically, when you expand the list of folders and labels on the left side of Gmail, you will see it listed in alphabetical order along with everything else.
The really nice thing about importing using Gmail is that it converts all the folders from your other accounts into labels into of just taking all the emails and dumping them into one giant Inbox. Now when you go back to Accounts and Import, you’ll see a few new options.
Firstly, you’ll be able to see the progress of the import here. Since I had a whopping three emails in my Yahoo account, it finished the import almost immediately. Under Send mail as, you’ll see that you can make your other email address the default for sending mail, but I’m not sure why you would want to do that. Lastly, when replying to a message, it will automatically reply from your Gmail address because it assumes you want people to start using that email to contact you. However, if you don’t want that, you can choose Reply from the same address the message was sent to and when you reply to an email from the other email account, it will also reply from that email address instead of your Gmail address. It should also be noted that you can click the delete button under Send mail as for the other email account, but that will not delete the actual emails that had been previously imported. If you want to delete all the imported mails, you have to go to the label and click on the arrow next to it and choose Remove label. It will then show you the label and any sub-labels and confirm whether you want to delete the emails. To get new emails into your Gmail account, you should start with the Add a POP3 mail account you own from Accounts and Import. You’ll be asked to enter the email address for the other account.
However, the next step is different than what we had did when importing emails. Here you will enter the password and usually Google can figure out the POP server settings automatically. You’ll also have several options like whether you want to leave a copy of the email on the server, whether you want to use SSL (recommended), whether to label the messages and whether you want to archive them.
If you leave the default setting as shown above, the emails will just show up in your Gmail inbox like normal email. When you are done, click the Add Account button. Also, it’s worth noting that any new unread emails in your Inbox will also be imported into Gmail. In my case, I had an unread email in my Yahoo account from one year back. In addition to new emails importing, it imported that email and I couldn’t even find it in Gmail unless I searched for it because it was way in the back on my inbox. So it’s worth labeling the incoming messages so you can easily find all the emails from the other email account in case a bunch of unread ones are also imported. The last thing you can do to get email into Gmail is to simply set forwarding on the other email account to your Gmail account. You could set it up that way, but I prefer to use the two methods included in Gmail for getting old and new emails. If you have any questions, post a comment. Enjoy! The post How to Check All of Your Email Accounts from Gmail appeared first on Online Tech Tips. |
| How to Connect Two Computers or Laptops Wirelessly Posted: 05 Nov 2014 06:03 AM PST Need to quickly connect up to another laptop wirelessly so you can transfer some data without a router or Internet connection? Without an Internet connection, you can’t use syncing services like Dropbox to share data between devices easily. If you have a networking device like a router, hub or switch, you can get the computers to talk to each other, but it requires quite a bit of additional work (file sharing, permissions, firewall configurations, etc). However, if you have a laptop or computer that has a wireless card and so does your buddy, you can use the cards to make a wireless connection between the two computers. Once they are connected wirelessly (also called a peer-to-peer ad-hoc wireless network), you can easily share data between the computers. You can create an ad-hoc network in Windows or in OS X and in this article I’ll explain the steps for creating the network for each OS. It’s important to note that ad-hoc networks in general have certain limitations that make them only useful for certain situations. Firstly, the speed of an ad-hoc network is normally less than that of a normal infrastructure network. Ad-hoc network specs only require a max speed of 11Mbps, which is way slower than b/g/n/ac max speeds. Secondly, you can’t monitor signal strength of ad-hoc networks, so you have to make sure the computers are fairly close to each other and don’t move around a lot. Lastly, ad-hoc networks don’t support all the security features of normal infrastructure networks, so they can be more easily hacked. Setting Up an ad hoc NetworkThis tutorial will be written for Windows 7, but you can follow the same instructions for Windows 8 and Windows Vista. To get started, open the Control Panel and click on Network and Sharing Center.
On the next dialog, click on the Setup a new connection or network link towards the bottom.
In the new connection dialog, scroll down till you see the Setup a wireless ad hoc (computer-to-computer) network option.
On the next screen, it will explain what a ad hoc wireless network is and will let you know that if you’re currently connected to a wireless network, you’ll probably get disconnected. Go ahead and click Next.
Now you have to give the network a name, choose a security type and give it a security key. For the security key, you can choose from only three options: no authentication, WEP or WPA2-Personal. The default is WPA2-Personal, which is the strongest. Click next and then you’ll get a screen showing you that the network has been setup. Note that if you don’t check the Save this network box, once you disconnect from the ad hoc network, it will simply disappear. If you want to use it again, you’ll have to start from scratch.
Congrats, you’ve completed the first part! Go ahead and open your list of wireless networks and you should see your newly created one listed along with the rest of the wireless networks. Click on it to connect.
Once you are connected, you’ll see a message next to the network name that says Waiting for users. You network is now ready to accept new connections. Now it’s time to actually share data between the two computers. Let’s get into the details as it’s not as straightforward of a process as it seems. Share Data Across ad hoc NetworkNow that you got the ad hoc network setup, go ahead and have the other clients connect to the network. Note that the wireless icon may continue to show that blue spinning circle icon even though the computer is connected to the ad hoc network. That is because it’s also trying to connect to the Internet, which it obviously won’t be able to do since it’s just a peer network. At this point, you have several ways to share data between the computers. Let’s break it down based on the different scenarios. - If the computers are all running Windows 7 and higher, you can use the homegroup feature that is built right into Windows. It lets you share music, videos, documents, pictures and printers easily. - If all computers are running Windows, but there are also Windows XP or Windows Vista clients, then you have to join all the computers to the same workgroup and make sure that the network discovery and file and printer sharing are enabled. - If the computers are a mix of operating systems like Windows and Mac, then you need to rely on just file sharing and permissions. The most important things here are making sure the user account in Windows has a password (otherwise you can’t connect to a file share) and enabling file sharing on the non-Windows operating systems correctly. Setting Up a HomegroupThe easiest way to share data between Windows 7 and higher computers is to use a HomeGroup. You don’t have to worry about sharing folders or files manually, configuring the firewall or adding passwords to user accounts. Everything just works and that’s nice! To get started, go to the Control Panel and click on HomeGroup.
If there is already a computer that is joined to a homegroup on the ad hoc network, it will show up and you can join that or click on the Create a homegroup button.
We’ll create a new homegroup and on the next screen, you’ll be asked what items you want to share. You can choose from Pictures, Music, Videos, Documents and Printers. Click Next and you’ll get a screen with a homegroup password.
At this point, you just need everyone else to do the same thing as shown above, but to join the existing homegroup rather than creating a new one. Once you do that, you can open Explorer and click on Homegroup in the left-hand menu. When others join the homegroup, the shared data folders will appear there and you whatever is dropped into those folders will be visible to everyone in the homegroup.
Workgroup SharingIf you have computers running Windows XP and Vista in the mix, then the homegroup option will not work. In that case, you still have options. Firstly, if you are trying to connect from the XP or Vista machine to a Windows 7 or higher machine, then there are a couple of things you need to setup on the Windows 7 or higher machine. Firstly. you need to make sure the ad hoc network is setup so that its network type is either Home or Work. To do that, open Network and Sharing center again and then click on the link that is below the name of the wireless network. If it already says Home, then you’re set. If not, then you want to click on it and set the network location to Home. That will allow sharing on the network with other computers.
The next thing to do is to make sure that all the computers are in the same workgroup. This is especially important for Windows XP and Windows Vista computers that you want to access via a Windows 7 or higher machine. By default, most Windows machines are in the WORKGROUP workgroup, so you may not have to change anything, but it’s a good idea to check. On Windows XP, click on Start, right-click on My Computer and choose Properties. Under System Properties, click on the Computer Name tab. Click Change if you need to change the workgroup name. On Windows Vista and higher machines, click on Start, right-click on Computer and then click Properties. Under the Computer name, domain, and workgroup settings section, click the Change settings button if you need to change the name. Now the last thing we need to do applies to Windows 7 and higher. Go to Explorer and click on Network in the left-hand menu.
When you do that, you might see a bar pop up that says Network discovery and file sharing are turned off. Network computers and devices are not visible. Click to change. Go ahead and click on that and choose Turn on network discovery and file sharing. Once you do this, you should see all the other computers that are on the ad hoc network as long as network discovery and file sharing and enabled on them too. Just follow the same procedure on each computer to turn it on. The process mentioned above is just for Windows 7 and higher. Here’s how to do it on the other operating systems: Enable File Sharing Windows XP Enable File Sharing and Network Discovery Windows Vista For all the advanced sharing options, go to Network and Sharing Center from the Control Panel and click on Change advanced sharing settings link.
Here you will find all the options for sharing, some of which we mentioned above. Make sure you are looking at the settings for the Home or Work profile and not for the Public profile.
The top section is network discovery and file and printer sharing, which we already talked about. Public folder sharing is if you want to allow others to access only the public folders over the network. If you’re doing this over a ad hoc network, then just turn it on.
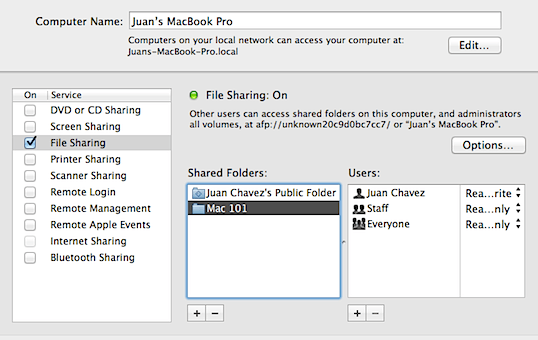
Media streaming will allow others to stream content from your computer, but you can disable this and still share data between computers just fine. File sharing connections are set to use 128-bit encryption by default, so you should probably leave that setting alone. Password protected sharing makes it so that you have to use a user name and password from the computer you are trying to access in order to see the shared folders/files. If you don’t want to have to do that, then you can turn off this option. Lastly, homegroup connections will be accepted by default and those don’t require passwords to connect. Sharing Between Operating SystemsLastly, to share between a Windows and a Mac or some other operating system, you still need to follow all the instructions above for the Windows machines. If you’re trying to connect to the Windows machine, you should be fine doing everything mentioned above. The only issue is that you might have to create a password for your Windows user account in order to connect. You can try turning off password protected sharing as shown above, but sometimes other operating systems still require you to enter a password, so give that a try if you are not able to connect and can’t figure out why. If you’re trying to connect from a Windows machine to another OS like OS X, then you’ll have to enable file sharing on those operating systems separately. On Mac, for example, you would go to System Preferences and then click on Sharing or File Sharing. Go ahead and add the folders you want to share and appropriate user permissions.
In order to access files on a Mac from a Windows machine, you have to click on Options and then check the Share files and folders using SMB (Windows) box.
I can’t go into too much detail in this post for different operating systems, but hopefully this will get you far enough and you can probably Google the rest. If you have any questions about connecting two computers wirelessly, post them in the comments. Enjoy! The post How to Connect Two Computers or Laptops Wirelessly appeared first on Online Tech Tips. |


| You are subscribed to email updates from Online Tech Tips To stop receiving these emails, you may unsubscribe now. | Email delivery powered by Google |
| Google Inc., 1600 Amphitheatre Parkway, Mountain View, CA 94043, United States | |
0 commentaires:
Enregistrer un commentaire