

Computer Tips From A Computer Guy |

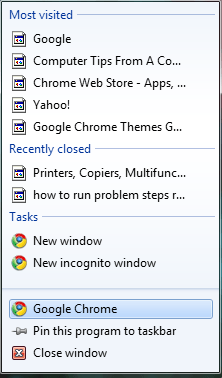
| Get the Most Out of Your Taskbar in Windows 7 Posted: 07 Apr 2011 04:50 AM PDT The Windows 7 taskbar, as most everyone knows by now, is far more versatile than anything seen in Windows before, but what many people may not know, is that there is a lot more you can do with it, than simply pin things or use jumplists. First, for those that don't know, applications can now be "pinned" to the taskbar; which means dragging them to the task bar, where they will stick, until such a time as you choose to unpin them at a future date. To pin an application, click on the Start icon, then right click on one of your applications and drag it down to the taskbar; when you get there, let go. Windows will create an icon for that app. Then, from this point on, to launch that application, all you have to do is click on it on your taskbar. The next thing you should know about are jumplists; or little menus that give you choices of things to jump to. To see how a jumplist works, right click on the application you just pinned to your taskbar; you should see something that looks like this:
This is a jumplist for Google Chrome, note how it displays the sites you've most recently visited, and those that have been most recently closed. The things that show up on your jumplist depend on the kind of application you've pinned. For example, if you've pinned Word, you should see the last x number of files you've loaded in it. The other new thing about the taskbar is that if you hover over an application that has been pinned, you'll get a small preview window(s) of what is running in it. For example, if you open two Word documents, then hover over the Word icon, you should get something that looks like this:
To jump to the one you want, put your cursor over the preview that shows what you wand and click on it. So far, this is all mostly common knowledge stuff, to get to the real meat of what you can do with your taskbar, right click on the Start icon; you should get a popup menu sort of like this one:
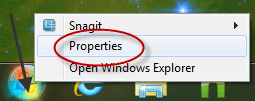
From this menu, you can customize the way your taskbar looks. For example, one common complaint about the taskbar, is that you can't tell which of the apps that have been pinned to it are actually running. To fix this, right click on the Start icon, then choose Properties from the popup menu:
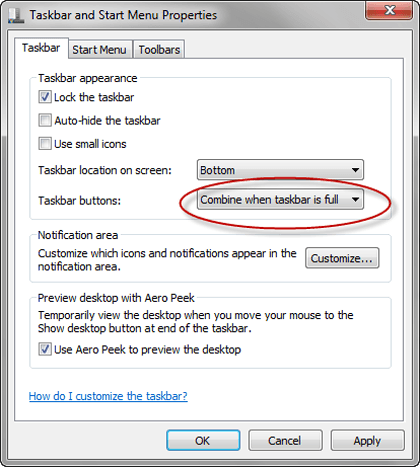
Then click next to where it says Taskbar buttons, choose "Combine when taskbar is full." This should cause the apps that are currently running to appear wider on the taskbar than those that are not:
Note how the above icons for Word and Chrome are wider than those for Sticky Note and the Magnifier. Many people have also complained that the taskbar is too big, and thus takes away valuable screen space. You can fix this also by making the icons smaller; to do that, right click once again on the Start icon, choose Properties, and then check the box next to where is says Use small icons.
Your taskbar should look this this after you click Ok.
Note how the icons are much smaller after choosing this option. Also note that your taskbar now looks as it did in Windows XP. The the taskbar properties menu can be used to change a lot of the things you may or may not like about your taskbar; to see which you would like to change, it's best to look them over and try out the ones you like. To sum up, the taskbar in Windows 7, like almost all of the other tools and menus, can be customized and changed to suit your needs; all it takes is getting familiar with the properties menu.
Related postsCopyright © 2007 Online Tech Tips. Aseem Kishore (digitalfingerprint: a59a56dce36427d83e23b501579944fcakmk1980 (74.125.94.87) ) Post from:
|
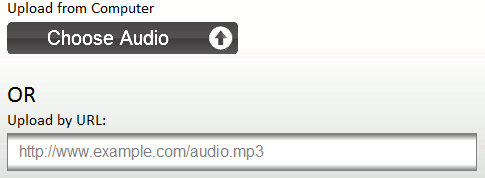
| Upload MP3′s to YouTube the Easy Way Posted: 06 Apr 2011 05:46 AM PDT As a video-sharing service, YouTube was not designed as a place for its users to share MP3 music files. But, like most Web sites in the social media Internet revolution, YouTube's users have shaped the service to fit their purposes. MP3's are found throughout YouTube, cleverly disguised as background music playing as a static image is displayed in place of a real video. Sharing an MP3 on YouTube in this manner is quick and easy with MP32FLV.com.
Click Choose Audio to upload an MP3 from your computer. You can also upload an MP3 that is already available on a Web site. When finished, click Next.
Click the Choose JPEG button to upload a picture. Any picture will do, so long as it is saved as a JPEG. Click Next when finished.
A message appears stating your video is being converted. Depending on the size of your MP3 and JPEG files, this could take a few minutes.
When your video is done, you have the option to either download the video and upload it to YouTube yourself, or you can click Send to YouTube and sign into your YouTube account to instantly transfer the video straight to YouTube.
You will be prompted to give your video a title, keywords and description before the video is sent to YouTube.
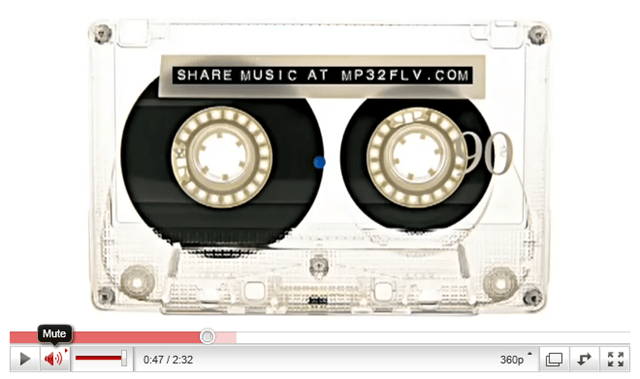
Your MP3 video is watchable from YouTube within just a few minutes. In one of our tests, we did not upload a JPEG. The service kindly added one advertising MP32FLV.com.
The cassette is a nice touch—but a large chunk of YouTube's users probably have never even seen this almost forgotten media. Overall, MP32FLV.com does what it claims easily, and with little time investment. Our only complaint with the service is over-abundance of advertising scattered throughout the Web site. Some of the ads are intrusive and can make finding the next button confusing at times.
Related postsCopyright © 2007 Online Tech Tips. Aseem Kishore (digitalfingerprint: a59a56dce36427d83e23b501579944fcakmk1980 (74.125.94.87) ) Post from:
|


| You are subscribed to email updates from Online Tech Tips To stop receiving these emails, you may unsubscribe now. | Email delivery powered by Google |
| Google Inc., 20 West Kinzie, Chicago IL USA 60610 | |
0 commentaires:
Enregistrer un commentaire