

Computer Tips From A Computer Guy |

| Rotate Your Desktop Wallpaper Automatically with Photos from Flickr Posted: 13 Apr 2011 04:17 AM PDT Desktop wallpaper sets the mood for all we do on our Windows-based computers. But, even the best vacation photographs grow stale after a while. To keep energy flowing while behind a computer screen, we should change our desktop wallpaper often—or at least periodically. If you do not have time to change your desktop wallpaper, a program like FlickrWall can do it for you. Flickrwall rotates desktop wallpaper on a set schedule by pulling photographs from Flickr.
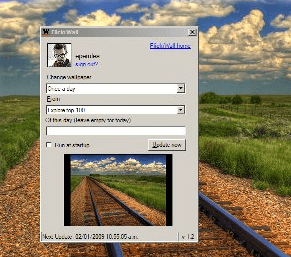
After a quick download from Softonic, extract and install FlickrWall. Be careful: the software comes packaged with the Bing toolbar. If you do not want to install this toolbar, be sure to uncheck it during the installation process. Once installed, the software opens for you to choose your options. First, login to to Flickr by clicking the Sign in button towards the top of the window.
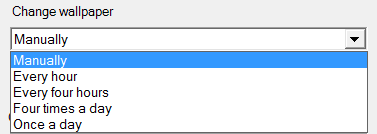
Next, choose how often you would like the software to change your desktop wallpaper. Choices range from every hour to every day.
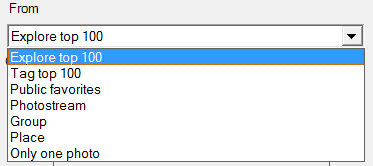
Choose the list of Flickr photos to use. The Explore Top 100 is a good choice, as it changes everyday, but you can also choose to use photos from a specific group or of a specific place.
If there is a certain day's list you would like to use, you can enter a date in the box just below where you choose the list of photos. Leave the box blank for the photos to change with the given day. Most people should leave the box blank.
To have the wallpaper changer start when Windows starts, check the box next to run at startup.
Click Update Now to update your selections, then close the window.
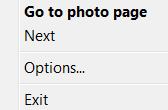
You will see a black W appear next to your clock on the taskbar. You can right-click the W at any time and choose options to change your settings. Or, click next to show a different photo as your wallpaper.
Some users have reported minor issues with the program that were resolved by downloading the latest .NET framework. With Windows 7 Ultimate 64-Bit, we had no problems. Overall, the software is small, does exactly what it claims to do, and does so with a moderate amount of speed. If looking for a creative way to change your desktop wallpaper, FlickrWall is definitely a good choice.
Related postsCopyright © 2007 Online Tech Tips. Aseem Kishore (digitalfingerprint: a59a56dce36427d83e23b501579944fcakmk1980 (209.85.224.91) ) Post from:
|
| How to Setup and Use a Windows 7 Homegroup Posted: 12 Apr 2011 05:47 AM PDT A homegroup in Windows 7 is a means by which users of a home based, generally wireless network, can share resources (hard drives, libraries, printers, etc.) easily and without too much trouble. Because one computer can only belong to one homegroup at a time, most small home based networks have just one homegroup that everyone on the home network uses. And because everyone has to supply a password before gaining access, security is pretty tight. Homegroups are not set up by default, so it must be set up before anyone on the network can join. To create a homegroup, choose one of the Windows 7 based computers and bring up Control Panel. Click on Choose homegroup and sharing options.
If you don't yet belong to a homegroup, and one hasn't yet been created on your home network, you should see the window that says, "There is currently no homegroup on the network." Click on the button farther down that says, Create a homgroup.
You should get this next screen where you are shown which libraries exist on your computer for you to share with others on the network:
Once you have chosen which libraries you wish to share, by checking the appropriate boxes, click the Next button. You'll get a progress bar for a moment, then you should get this next screen giving you the password you'll need to add other computers on your network to your homegroup. You should write it down or print it if you plan to keep using it.
When you click the Finish button, the homegroup setup is completed, and all of the windows and menus will go away leaving you back at the Control Panel window. Then since you probably don't want to keep the computer generated password, click where it says Change the Password.
You should get this popup:
Once you click on Change the password, you should get this screen:
Type in a good password that you'll remember then click the Next button. You should get this screen:
Click Finish and that should be it for creating your homegroup. Now that you've got a reasonably good password, head on over to one of your other networked computers and bring up Control Panel again, and once again, click on Choose homegroup and sharing options. This time you should get a message telling you that "Somebody on SomeComputer has created a homepage on the network." Of course on your network, Somebody and SomeComputer will be your own name and computer name.
Clicking Join now, should get you this next screen:
Check or uncheck whichever libraries you wish to share, then click the Next button. You should get this next screen asking for the password you just created on the first computer:
After you type in the password and click Next, you should get this screen:
Which means you are now finally ready to see the results of your efforts. Close down Control Panel and bring up File Manager; note where it shows you your homegroup:
From here on in you can use your homegroup just like any other library, you can also change what is shared on any computer on the network at any time by going to Control Panel on that computer and clicking on Choose homegroup and sharing options. You can also add libraries not on the default list by creating a new library and then clicking on Share with, in File Manager.
Related postsCopyright © 2007 Online Tech Tips. Aseem Kishore (digitalfingerprint: a59a56dce36427d83e23b501579944fcakmk1980 (209.85.224.91) ) Post from:
|


| You are subscribed to email updates from Online Tech Tips To stop receiving these emails, you may unsubscribe now. | Email delivery powered by Google |
| Google Inc., 20 West Kinzie, Chicago IL USA 60610 | |
0 commentaires:
Enregistrer un commentaire